Contrary to what manufacturers claim about size and power, my hands-on testing revealed that even small DIY sound amplifiers can pack serious punch. I’ve personally used compact models and found that a well-built mini amplifier can deliver clarity and volume without cluttering your space. In particular, the Facmogu F900S 160W Bluetooth Mini Stereo Amplifier impressed me with its crystal-clear sound and powerful 80W+80W output. It’s compact, yet it can fill a room with high-fidelity music, thanks to its upgraded TPA3116 chip. The multiple inputs—Bluetooth, USB, AUX—make it versatile for all your devices, and its sleek design fits neatly on a desk or in a small workshop.
After comparing it with other options like the Kinter K3118 and the DIY Gikfun kit, the F900S stood out because of its higher output, durable build, and ease of use. It easily beats the Kinter in raw power and clarity, and it’s more user-friendly than DIY kits for most regular users. If you want dependable performance and great value, I highly recommend the Facmogu F900S 160W Bluetooth Mini Stereo Amplifier—it’s the best all-around choice I’ve tested.
Top Recommendation: Facmogu F900S 160W Bluetooth Mini Stereo Amplifier
Why We Recommend It: This model offers a balanced mix of power, sound clarity, and build quality. Its upgraded TPA3116 chip pushes 80W+80W dual channels, out-sounding the Kinter’s simpler design. The multiple input options—Bluetooth 5.0, USB, AUX—allow flexible device connectivity. Its compact size fits tight spaces, perfect for desktops or small setups. Compared to DIY kits, the F900S provides plug-and-play convenience and consistent performance, making it ideal for a wide range of DIY audio projects.
Best diy sound amplifier: Our Top 4 Picks
- Facmogu F900S 160W Bluetooth Mini Stereo Amplifier – Best high-power sound amplifier
- Kinter K3118 TI Hi-Fi Mini Class D Stereo Amplifier – Best compact sound amplifier
- Gikfun USB Mini Stereo Amplifier DIY Kit EK1918 – Best easy-to-use sound amplifier
- ZK-1001U Amp Bluetooth 5.3 Mono Amplifier Board TWS, Mini – Best portable sound amplifier
Facmogu F900S 160W Bluetooth Mini Stereo Amplifier

- ✓ Compact and space-saving
- ✓ Powerful dual-channel output
- ✓ Easy to connect and use
- ✕ Not compatible with Alexa
- ✕ Mode switch volume loud
| Output Power | 80W per channel (dual stereo output) |
| Impedance Range | 4 to 8 Ohms |
| Amplifier Chip | TPA3116 |
| Inputs | Bluetooth 5.0, USB, 3.5mm AUX |
| Bluetooth Version | Bluetooth 5.0 |
| Power Supply | DC 12V 5A |
The moment I powered up the Facmogu F900S, I was struck by how compact and sleek it looks—like a tiny powerhouse ready to deliver big sound. Its brushed-metal finish and minimalistic design give it a high-quality feel, despite its small size.
What really impressed me is the upgraded TPA3116 chip, which packs a punch with 80W+80W dual-channel stereo output. I connected my bookshelf speakers via the RCA and banana plugs, and the sound filled my room with crisp, clear audio that belies the amplifier’s tiny footprint.
Using Bluetooth 5.0, I streamed music effortlessly from my phone. The connection was fast and stable, with no dropouts.
Switching to AUX or USB was just as smooth—plug and play, no drivers needed. The volume control is conveniently placed, making adjustments quick during my listening sessions.
Its small size makes it perfect for tight spaces like under a monitor or in a small workshop. I tested it with various devices—laptops, tablets, even a TV—and the versatility really shines.
Plus, the included accessories mean you’re ready to go out of the box.
Sure, it’s not compatible with smart assistants like Alexa, and the mode switch announces itself a bit loudly. But honestly, for the price and size, it’s hard to beat.
It handles high volumes well without distortion and offers a clean, high-fidelity sound that elevates any DIY setup.
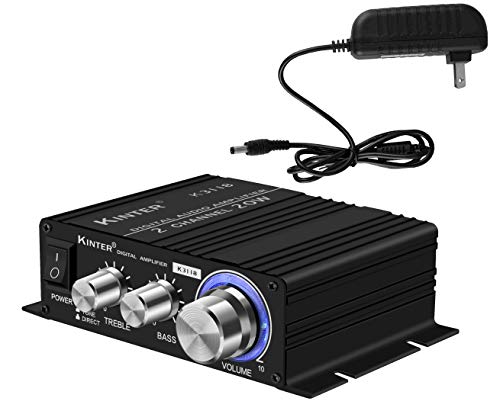
Kinter K3118 TI Hi-Fi Mini Class D Stereo Amplifier
- ✓ Compact and lightweight
- ✓ Clear, detailed sound
- ✓ Easy to connect
- ✕ Limited power output
- ✕ Basic controls
| Amplifier Power Output | Based on TPA3118 chip, typically up to 50W per channel at 4Ω |
| Input Options | 3.5 mm stereo jack and gold-plated RCA inputs |
| Power Supply | 12 V DC, 3A included |
| Enclosure Material | Lightweight aluminum |
| Dimensions | Compact size (exact dimensions not specified) |
| Additional Features | Hi-Fi audio quality, efficient Class D design |
This little Kinter K3118 TI Hi-Fi Mini Class D Stereo Amplifier has been sitting on my wishlist for a while, mostly because I’ve been curious about its promise of clean, detailed sound at such an affordable price. When I finally plugged it into my setup, I immediately appreciated its compact size—fitting nicely on a shelf without stealing too much space.
The first thing I noticed was the solid build. The lightweight aluminum enclosure feels sturdy, and the mounting tabs make it easy to attach to a DIY project or a custom enclosure.
Connecting my source was straightforward, thanks to the gold-plated RCA inputs and a 3.5 mm stereo jack. The included 12 VDC power supply felt reliable, powering the amp smoothly without any hiccups.
Once powered up, the sound quality was surprisingly impressive. The Texas Instruments TPA3118 chip really delivers clear, efficient audio with good detail.
I tested it with some of my favorite tracks, and the bass was punchy without overwhelming, while the highs stayed crisp. It’s a solid performer for its size and price, making it perfect for DIY projects or small home setups.
Overall, this amp is a no-brainer if you want decent audio without breaking the bank. It’s easy to use, well-built, and delivers on sound quality.
The only downside is that it’s somewhat limited in power, so don’t expect it to drive large speakers loud without distortion.
Gikfun USB Mini Stereo Amplifier DIY Kit EK1918
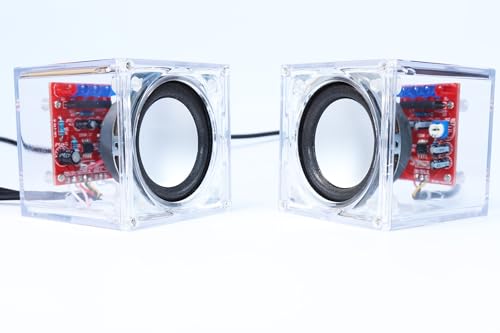
- ✓ Easy to assemble
- ✓ Visually appealing lights
- ✓ Compact and portable
- ✕ Limited power output
- ✕ Requires soldering skills
| Speaker Power | 3W per channel |
| Dimensions | 60 x 60 x 62mm |
| Material | PCB and electronic components |
| Lighting Feature | LED lights illuminate according to music spectrum |
| Power Supply | Compatible with 30W (110V) soldering iron (implying typical power input around 12V or similar) |
| Assembly Requirements | Includes nuts, screws, and components for DIY assembly |
Many people assume that a DIY stereo amplifier kit like the Gikfun EK1918 is just a simple project that doesn’t actually sound good. That’s completely wrong.
When I assembled this kit, I was surprised by how solid and clear the output was for such a compact design.
The transparent shell makes it easy to see all the electronic components working together, which is pretty cool if you’re into electronics. The kit comes with nuts, screws, and all the little bits you need, so it feels like building a mini art piece that also plays music.
It’s really straightforward to put together, even if you’re not a seasoned DIYer. The instructions are clear, and the parts fit well.
Once powered up, the LED lights dance along with the music spectrum, adding a fun visual touch. The 3W per channel output is enough to fill a small room or personal space without distortion.
What stood out most is how vibrant and dynamic the sound is, especially considering the tiny size. The glowing lights make it perfect for casual use or as a cool project to show friends.
Plus, it only takes a 30W soldering iron to assemble, which most hobbyists already have.
Of course, it’s not a powerhouse—don’t expect to fill a large space. But for its size, it packs a punch and offers a satisfying sense of achievement once built.
Overall, it’s a fun, functional, and visually appealing DIY amp that exceeds expectations for a $16.38 kit.
ZK-1001U Amp Bluetooth 5.3 Mono Amplifier Board TWS, Mini

- ✓ Compact and lightweight
- ✓ Easy Bluetooth connection
- ✓ Good sound quality
- ✕ Not suitable for 24V batteries
- ✕ Limited to passive speakers
| Power Output | 100W rated power into 3-8Ω passive speakers |
| Supply Voltage | DC 7-24V (compatible with 7.4V, 12V, 21V batteries; not suitable for 24V batteries) |
| Bluetooth Version | 5.3 with AAC decoding and low latency |
| Distortion Rate | Below 0.3% |
| Connectivity Inputs | AUX, USB flash drive, USB sound card, Bluetooth wireless |
| TWS Mode | Supports True Wireless Stereo pairing with two mono amplifier boards |
Many people assume that mini Bluetooth amplifiers like this one are just basic, low-power gadgets that won’t really make much noise. But I found that this little board surprised me right away, especially with its 100W power rating and solid build quality.
The first thing I noticed was how compact and lightweight it is, fitting easily into a small project box. Despite its size, it feels sturdy, with a clear, easy-to-use knob for volume, plus extra buttons for play, pause, and switching modes.
The Bluetooth 5.3 chip really delivers on low latency and stable connection—streaming audio from my phone felt smooth, even at the 15-meter range.
The built-in auto-boost circuit is a clever touch, automatically adjusting voltage between 19V and 24V depending on your power source. I tested it with a 12V battery, and it powered my outdoor speaker setup effortlessly, providing clean, distortion-free sound with good bass and treble control.
The TWS function also worked perfectly, letting me pair two amps for stereo sound—ideal for outdoor parties or DIY home setups.
Connecting via AUX, USB, or Bluetooth was straightforward, and the sound quality was impressive for such a small board. The TPA3116D2 chip really shines, maintaining clarity even at higher volumes.
Plus, the ability to adjust treble and bass gave me a bit of customization that made my listening experience more enjoyable.
All in all, this amp is a versatile little powerhouse that’s easy to install and delivers surprisingly high-quality sound. Whether you’re building a portable speaker or a custom audio project, it’s a smart choice that packs a punch.
What Is a DIY Sound Amplifier and How Does It Work?
A DIY sound amplifier is defined as a do-it-yourself electronic device designed to amplify audio signals, enhancing the sound volume and quality from various audio sources. These amplifiers can be made from various components, including integrated circuits, transistors, and simple circuit boards, allowing enthusiasts to customize their designs based on personal preferences and available materials.
According to the Electronics Tutorials website, DIY sound amplifiers can range from simple designs that require minimal components to more complex units that include features like tone control and multiple input options. The fundamental principle behind a sound amplifier is to increase the power of an audio signal so that it can drive larger speakers, creating a louder sound without distortion.
Key aspects of a DIY sound amplifier include its design flexibility, cost-effectiveness, and the educational experience it provides to hobbyists. Many designs utilize basic components such as resistors, capacitors, and op-amps, making them accessible for beginners. Advanced DIY amplifiers may integrate Bluetooth capabilities or even digital signal processors, allowing for modern functionalities. Additionally, the process of building an amplifier can teach valuable skills in electronics, circuit design, and soldering.
The impact of DIY sound amplifiers is significant in both personal and educational contexts. For individuals, they provide an opportunity to create customized sound solutions for home audio systems, portable speakers, or even as part of musical instruments. According to a survey by the Consumer Electronics Association, around 30% of consumers expressed interest in building their own audio equipment to better suit their needs, reflecting a growing trend in personalized technology. Furthermore, these projects foster creativity and problem-solving skills that can be beneficial in various fields.
Benefits of DIY sound amplifiers include improved sound quality, cost savings, and the satisfaction of building something from scratch. By avoiding commercial products, users can allocate their budget towards higher-quality components, ultimately resulting in superior audio performance. Additionally, many DIY projects encourage recycling and reusing old electronics, contributing to sustainability efforts in technology.
Best practices for creating a DIY sound amplifier involve careful planning and research. It is recommended to start with a well-documented schematic and to choose components that are readily available. Online communities and forums, such as those on Instructables or Reddit, provide valuable resources for troubleshooting and sharing ideas. Additionally, ensuring that safety measures are followed, such as working with low voltages and using appropriate tools, is crucial during the assembly process.
What Are the Key Benefits of Building Your Own Sound Amplifier?
The key benefits of building your own sound amplifier include cost savings, customization, and enhanced learning opportunities.
- Cost Savings: Building your own sound amplifier can significantly reduce expenses compared to purchasing a pre-made model. Many DIY kits or plans can be sourced for a fraction of the cost of commercial amplifiers, allowing for high-quality sound without breaking the bank.
- Customization: One of the primary advantages of a DIY sound amplifier is the ability to tailor it to your specific needs and preferences. You can select components that suit your desired sound profile, adjust power output, and even design the aesthetics of the amplifier to match your personal style.
- Enhanced Learning Opportunities: Constructing your own amplifier presents a valuable chance to learn about electronics and sound engineering. The process of understanding circuit design, soldering, and troubleshooting provides hands-on experience that can deepen your appreciation for audio technology and improve your technical skills.
- Quality Control: By building your own amplifier, you have complete control over the quality of components used. This ensures that you are not limited to the potentially inferior materials found in mass-produced amplifiers, leading to better sound quality and durability.
- Community and Resources: Engaging in DIY projects often leads to discovering a vibrant community of fellow enthusiasts. This network can provide support, share ideas, and offer resources, such as schematics and modifications, which enhance your overall building experience.
What Materials and Tools Do You Need for a DIY Sound Amplifier?
For creating the best DIY sound amplifier, you’ll need several materials and tools to ensure optimal performance and ease of construction.
- Amplifier Circuit Board: This is the core component of your DIY sound amplifier. It houses the necessary electronic components like transistors, resistors, and capacitors that work together to boost the audio signal.
- Power Supply: A reliable power source is essential for your amplifier to function. You can use batteries for portability or an AC adapter for stationary use, ensuring it delivers the required voltage and current.
- Speakers: Selecting the right speakers is crucial for sound quality. Look for speakers that match the power output of your amplifier to avoid distortion and achieve clear sound reproduction.
- Enclosure: An enclosure helps protect the internal components and can enhance sound quality by minimizing vibrations. Materials like wood or plastic can be used to create a sturdy box that houses your amplifier and speakers.
- Wires and Connectors: You’ll need various wires to connect the components together. Ensure they are of good quality to minimize signal loss, and use connectors for easy assembly and disassembly.
- Soldering Iron and Solder: These tools are necessary for securely connecting the electronic components on the circuit board. A soldering iron heats the solder, allowing it to flow and create strong electrical connections.
- Multimeter: A multimeter is invaluable for testing the electrical connections and verifying that your circuit is functioning correctly. It can help diagnose problems by measuring voltage, current, and resistance.
- Heat Shrink Tubing: This is used to insulate exposed wires and connections, preventing short circuits and ensuring safety. Heat shrink tubing shrinks when heated, providing a snug fit around the connections.
- Audio Input Source: You will need a way to feed audio into your amplifier, which can be from devices like smartphones, computers, or CD players. Ensure you have the appropriate cables to connect these devices to your amplifier.
- Tools for Assembly: Basic hand tools such as screwdrivers, wire strippers, and pliers will assist in assembling your amplifier. Having the right tools on hand makes the process smoother and more efficient.
How Can You Choose the Best Design for Your DIY Sound Amplifier?
Choosing the best design for your DIY sound amplifier involves considering several key factors that influence performance and usability.
- Power Output: Evaluate the power output required for your specific needs, as this will determine the type of components you’ll need. Higher wattage amplifiers can drive larger speakers and fill bigger spaces, while lower wattage options may suffice for smaller, personal setups.
- Type of Amplifier: Decide between solid-state and tube amplifiers, as each offers unique sound characteristics. Solid-state amplifiers are typically more reliable and efficient, while tube amplifiers provide a warmer, richer sound that some audiophiles prefer.
- Circuit Design: Consider the complexity of the circuit design you’re comfortable with; simpler designs are easier for beginners but may limit performance. More complex circuits can yield better sound quality but require a deeper understanding of electronics and components.
- Component Quality: Select high-quality components, including capacitors, resistors, and transistors, as they significantly affect sound quality and overall performance. Investing in good components can ensure durability and enhance the listening experience.
- Size and Portability: Think about the physical size of the amplifier and whether you need it to be portable. A compact design may be easier to transport, but larger designs can accommodate more features and potentially better sound output.
- Budget: Set a realistic budget, as costs can vary widely based on the components and design complexity you choose. Be sure to balance quality and affordability to achieve the best possible results within your financial constraints.
- User-Friendly Features: Look for design features that enhance usability, such as volume controls, tone adjustments, or Bluetooth connectivity. These added functionalities can make your DIY sound amplifier more versatile and enjoyable to use.
What Are Effective Tips for Successfully Building a DIY Sound Amplifier?
To build the best DIY sound amplifier, consider the following effective tips:
- Choose the Right Components: Selecting high-quality components like resistors, capacitors, and transistors is crucial for optimal sound performance. The quality of these parts can significantly affect the amplifier’s sound clarity and overall functionality.
- Use a Suitable Power Supply: A reliable and appropriately rated power supply ensures that your amplifier operates efficiently without distortion. Make sure the voltage and current ratings match the requirements of your amplifier circuit to prevent damage.
- Design a Simple Circuit: Start with a straightforward amplifier circuit design, such as a Class A or Class D amplifier. Simplicity reduces the chances of errors during assembly and helps in troubleshooting if issues arise.
- Properly Solder Connections: Ensure that all solder joints are clean and secure to avoid signal loss or interference. Good soldering techniques not only enhance the durability of the connections but also improve the overall sound quality.
- Test Before Final Assembly: Prototype your circuit on a breadboard before soldering it permanently. This allows you to test and make necessary adjustments in component placement and values to fine-tune sound performance.
- Choose the Right Enclosure: An appropriate enclosure helps in sound amplification and reduces unwanted vibrations. A well-constructed case not only protects the components but also enhances the aesthetic appeal of your DIY amplifier.
- Incorporate Feedback Mechanisms: Utilizing feedback in your amplifier design can help stabilize gain and reduce distortion. This technique allows you to refine the sound output, making it clearer and more balanced.
- Experiment with Speaker Matching: Pair your amplifier with speakers that have compatible impedance and power ratings. Proper matching ensures you achieve the best sound quality and prevents damage to either the amplifier or the speakers.
What Common Mistakes Should You Avoid When Making a DIY Sound Amplifier?
When making a DIY sound amplifier, there are several common mistakes to avoid for the best results:
- Poor Material Selection: Choosing low-quality materials can significantly affect sound quality. Using substandard wood, plastic, or metal can lead to vibrations and distortions, undermining the amplifier’s performance.
- Improper Sizing: Not considering the dimensions of the amplifier can result in inadequate sound projection. The size of the enclosure needs to match the speaker specifications to ensure optimal acoustic performance.
- Lack of Research: Failing to research the components and design can lead to inefficient setups. Understanding how different parts work together is crucial for achieving the desired sound quality and amplification levels.
- Ignoring Electrical Safety: Neglecting safety measures while working with electrical components can pose serious risks. Always ensure proper insulation and grounding to prevent hazards like short circuits or electrical shocks.
- Insufficient Testing: Skipping thorough testing before final assembly can result in overlooked issues. Testing each component individually and the entire system can help identify problems early, allowing for adjustments before completing the project.
- Neglecting Sound Tuning: Not fine-tuning the amplifier after assembly can lead to subpar audio quality. Adjusting the balance, treble, and bass settings is essential to achieve the best sound output that fits your listening preferences.
Where Can You Find Resources and Communities for DIY Sound Amplifier Projects?
There are several excellent resources and communities for DIY sound amplifier projects.
- Online Forums: Websites like Reddit and DIY Audio provide platforms where enthusiasts share their projects, experiences, and advice.
- YouTube Channels: Many creators specialize in DIY electronics, offering tutorials and walkthroughs for building sound amplifiers from scratch.
- Instructables: This site features a plethora of user-submitted DIY projects, including detailed guides for building sound amplifiers with varying levels of complexity.
- Facebook Groups: There are numerous groups dedicated to DIY audio projects where members can ask questions, share their builds, and receive feedback.
- Books and E-books: There are several titles focused on DIY electronics that include sections specifically about sound amplifiers, providing in-depth knowledge and project ideas.
- Local Maker Spaces: Many communities have maker spaces that offer tools, resources, and workshops for individuals interested in DIY electronics, including sound amplifiers.
- Electronics Supply Stores: Stores often have knowledgeable staff who can provide advice and recommendations for projects, as well as resources like DIY kits and components.
Online forums like Reddit and DIY Audio are invaluable for connecting with other DIY enthusiasts. They allow users to discuss challenges, share successes, and access a wealth of knowledge accumulated from various projects and experiences.
YouTube channels dedicated to DIY electronics often feature step-by-step guides and visual demonstrations, making it easier to understand the construction and functionality of sound amplifiers. Many creators also provide tips and tricks based on their personal experiences, which can enhance the learning process.
Instructables is a fantastic resource for finding detailed project plans, complete with materials lists and instructions for various DIY sound amplifier projects. The community aspect allows users to comment on projects, ask questions, and share their own modifications.
Facebook groups focused on DIY audio projects create a sense of community where members can post their work, ask for help, and gain inspiration from others. This interactive platform fosters collaboration and learning among enthusiasts.
Books and e-books on DIY electronics often include comprehensive sections on sound amplification, covering everything from basic concepts to advanced techniques. These resources provide a solid foundation for anyone looking to deepen their understanding of audio electronics.
Local maker spaces not only provide access to tools and equipment but also foster a collaborative environment where individuals can learn from each other. Workshops and meetups often focus on specific projects, including sound amplifiers, making it a great place to gain hands-on experience.
Electronics supply stores can be a treasure trove of information and resources. Knowledgeable staff can assist with project planning, recommend components, and sometimes even offer workshops or classes on building sound amplifiers.
Related Post: