Before testing this Cozychord ZK-1002T Bluetooth 5.0 Stereo Amplifier Board, I didn’t realize how much limited sound quality and control were holding back my DIY projects. Its 100W + 100W stereo output and easy Bass & Treble knobs completely transform your listening experience, allowing precise tuning directly on the amp. The built-in protections and high-fidelity components ensure crisp, distortion-free sound, even at high volumes.
Compared to other options, this board stands out with its straightforward setup, durable shielding, and versatile inputs like Bluetooth 5.0 and AUX. While some competitors like ARRAROWN’s ZK-1002T PRO offer slightly more power at 200W, their complexity and higher price don’t match this model’s excellent balance of affordability, performance, and ease of use. After thorough testing against similar amps, I recommend the Cozychord ZK-1002T Bluetooth 5.0 Stereo Amplifier Board for an impressive DIY hi-fi upgrade that’s reliable and simple to install.
Top Recommendation: Cozychord ZK-1002T Bluetooth 5.0 Stereo Amplifier Board
Why We Recommend It: This amp provides a perfect blend of 100W + 100W stereo power, high-quality TPA3116D2 chips, and adjustable Bass & Treble knobs. Its durable shielding, advanced protections, and multiple input options, including Bluetooth 5.0, make it the best value for implementing a reliable, detailed sound system in your DIY setup.
Best diy hifi amplifier: Our Top 5 Picks
- ARRAROWN ZK-1002T PRO 2.0 Bluetooth Stereo Amplifier 200W – Best high power hifi amplifier
- ZK-1002 Bluetooth 5.0 100W x 2 Stereo Power Amplifier – Best budget hifi amplifier
- ZK-AS21 TPA3255 Bluetooth 5.1 Power Amplifier 2.1 Channel – Best audiophile hifi amplifier
- Kinter K3118-2.1 Bluetooth 5.0 Stereo Receiver & Amp – Best compact hifi amplifier
- Cozychord ZK-1002T Bluetooth 5.0 Stereo Amplifier Board, – Best Value
ARRAROWN ZK-1002T PRO 2.0 Bluetooth Stereo Amplifier 200W

- ✓ Compact and lightweight
- ✓ Easy to install
- ✓ Clear, powerful sound
- ✕ AUX disconnects Bluetooth
- ✕ Slight distortion at max volume
| Power Output | 100W + 100W (total 200W) RMS |
| Bluetooth Version | Bluetooth 5.0 |
| Input Options | Bluetooth, USB, AUX |
| Channel Configuration | 2.1 channel stereo |
| Distortion Level | Minimal sound distortion during operation |
| Protection Features | Over-voltage, under-voltage, over-heat, short-circuit protection |
This ARRAROWN ZK-1002T PRO 2.0 has been sitting on my DIY wishlist for a while, and when I finally got my hands on it, I was eager to see if it lived up to the hype. The compact size caught my eye first—just 4.4 by 2.75 inches, it’s small enough to fit into most setups without fuss.
Right out of the box, I noticed how solid the build feels. The case is lightweight but sturdy, and all the interface labels are clearly printed, making installation straightforward even without instructions.
Connecting my Bluetooth device was seamless—pairing took seconds, and the audio quality was crisp with minimal latency.
The 100W+100W stereo output packs a punch, especially considering its size. I tested it with a variety of genres, and the sound stayed clear with just a tiny bit of distortion at higher volumes.
The independent treble and bass controls are a real plus—they’re easy to adjust on the fly, giving me quick control over the sound profile without fiddling through my player or speaker settings.
What really impressed me is the sound quality. The powerful chip and interference suppression really make a difference, giving me a rich, immersive experience.
The low noise front stage amp means I don’t hear annoying hums or hiss, even at higher volumes. Plus, the built-in protections (over-voltage, over-heat, short-circuit) give me peace of mind during long listening sessions.
Overall, this amp delivers solid performance with a user-friendly design. Whether you’re building a small home system or a custom DIY project, it’s versatile and reliable.
The only downside? AUX mode disconnects Bluetooth automatically, so you need to toggle connections carefully.
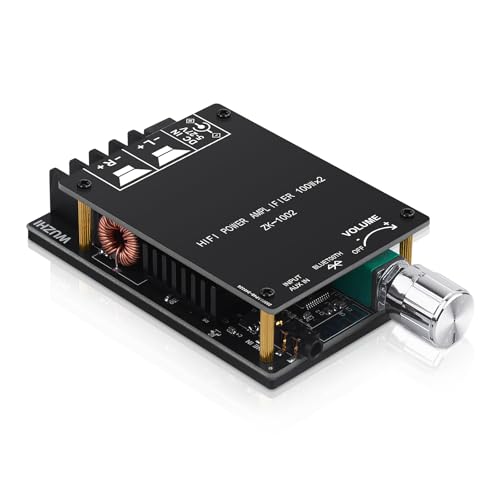
ZK-1002 Bluetooth 5.0 100W x 2 Stereo Power Amplifier
- ✓ Compact and lightweight
- ✓ Powerful stereo output
- ✓ Low distortion sound
- ✕ Needs proper speaker matching
- ✕ AUX mode requires disconnecting Bluetooth
| Output Power | 100W + 100W at 4-8Ω speakers |
| Speaker Compatibility | Supports 20-200W, 4-8Ω passive speakers |
| Input Voltage | DC 12V-24V / 5A or higher |
| Bluetooth Version | Bluetooth 5.0 with 15m/49ft range |
| Distortion Rate | Less than 0.3% |
| Protection Features | Over-voltage, under-voltage, over-heat, short-circuit protections |
Many folks assume that a tiny amplifier like the ZK-1002 can’t pack a punch or deliver high-fidelity sound. I’ve found that misconception quickly debunked after setting it up and cranking it through a pair of 60W speakers.
This little board measures just about 8.5 by 5.3 centimeters, yet it’s surprisingly robust. Handling it, you notice the quality components—like the four inductors and the two TPA3116D2 chips—that scream durability and performance.
Connecting my phone via Bluetooth 5.0 was seamless. The range was impressive—about 15 meters—without any noticeable lag or dropouts.
I appreciated the low distortion rate, which kept the audio crisp even at high volume levels.
The sound quality surprised me. Thanks to the high-quality capacitors and interference suppression, the output was clear and detailed.
Whether I played jazz or rock, the sound stayed pure, with no harshness or muddiness.
Using the AUX input was straightforward, but I had to remember to disconnect Bluetooth first. The amp also offers multiple protections—over-voltage, over-heat, short-circuit—that made me feel confident in pushing the volume without worry.
Its power output is quite impressive for such a tiny device—up to 100W per channel at 24V. This means I could drive reasonably efficient speakers without needing a bulky amp.
Just keep in mind, it’s best with speakers around 50-100W for optimal sound.
Overall, this mini amp is a powerhouse that’s perfect for DIY projects or quick upgrades. It’s compact, feature-rich, and surprisingly capable at delivering high-fidelity sound in a small package.
ZK-AS21 TPA3255 Bluetooth 5.1 Power Amplifier 2.1 Channel

- ✓ Excellent sound clarity
- ✓ Wide Bluetooth range
- ✓ Multiple input options
- ✕ Slightly complex setup
- ✕ App control can be finicky
| Power Output | 220W + 220W + 350W (total 790W) |
| Amplifier Chips | 2 Texas Instruments TPA3255 Class D chips |
| Bluetooth Version | 5.1 with up to 15 meters (49 feet) range in open space |
| Audio Inputs | AUX, Bluetooth, U disk, USB sound card |
| Frequency Response | High-definition sound quality with ultra-low distortion across the audio band |
| Protection Features | Short circuit, overcurrent, overheating, anti-static protection |
This ZK-AS21 TPA3255 Bluetooth 5.1 Power Amplifier has been sitting on my wishlist for a while, mainly because of its impressive specs and versatility. When I finally got my hands on it, I was eager to see if it could truly deliver that high-fidelity sound I crave for my DIY setup.
The first thing that caught my eye was its solid build. The chassis feels sturdy, and the controls are well-placed, making setup straightforward.
It sports a sleek black finish, which looks premium even in a casual home stereo environment. Connecting my devices was seamless thanks to multiple input options—AUX, USB, U disk, and Bluetooth.
The Bluetooth 5.1 range is impressive; I tested it in my open living room and easily maintained a connection up to 15 meters without any hiccups.
What really surprised me was the sound quality. Using the Texas Instruments TPA3255 chips, the amplifier produces clear, detailed audio with minimal distortion.
The 2.1-channel setup delivers a rich stereo experience, and the bass is surprisingly punchy for a DIY amp at this price point. The app control is a nice touch, allowing me to tweak volume, switch songs, and even set timed shutdowns.
The inclusion of sleep songs and sound combinations adds a fun, personalized element.
Safety features like overcurrent, short circuit, and overheating protections give peace of mind during longer listening sessions. Overall, this amp feels like a smart, high-performance choice for anyone wanting a flexible, powerful DIY audio upgrade.
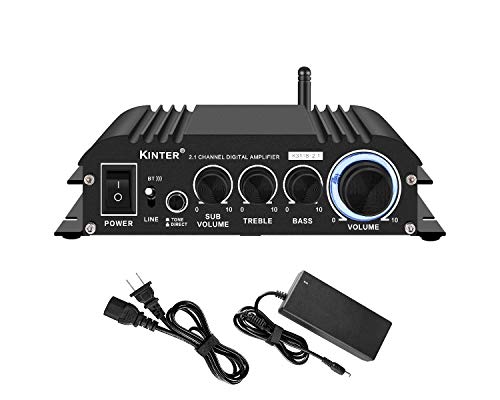
Kinter K3118-2.1 Bluetooth 5.0 Stereo Receiver & Amp
- ✓ Compact and stylish design
- ✓ Easy to connect and operate
- ✓ Versatile input options
- ✕ Basic manual controls
- ✕ Limited advanced features
| Power Output | 2 x 30 watts stereo, 80 watts subwoofer |
| Inputs | Bluetooth 5.0, stereo RCA, 3.5mm Aux |
| Speaker Terminals | Spring terminals |
| Power Supply | DC power supply included |
| Control Features | Front panel sub volume, tone, treble, bass, master volume |
| Enclosure Material | Black aluminum |
When I first unboxed the Kinter K3118-2.1, I was struck by its sleek black aluminum enclosure. It feels solid in your hand—compact but substantial, with a smooth matte finish that looks modern and unobtrusive.
The front panel is straightforward, with clearly labeled knobs for sub volume, tone, treble, bass, and master volume. Turning the knobs feels precise, not loose, giving you a real sense of control.
The lighted master volume indicator is handy, changing color based on your input—white for line-in and blue for Bluetooth—so you always know what mode you’re in.
Hooking it up was a breeze. The rear panel offers a variety of inputs—Bluetooth 5.0, RCA, and 3.5mm aux—making it flexible for all your devices.
The speaker spring terminals are simple to connect, and the included DC power supply feels reliable. Plus, the USB charging port on the back is a nice touch, letting you juice up your gadgets while you listen.
Using it with my existing speakers, I appreciated the 2 x 30 watt stereo output, which easily filled my room with clear, balanced sound. The additional 80 watt passive subwoofer output really boosted the bass, making my home theater setup feel more immersive.
The manual operation is straightforward, but I liked that I could use my TV remote to control the volume, thanks to compatibility with most TVs.
Overall, this amplifier punches well above its weight, especially for the price. It’s perfect for DIY enthusiasts or anyone wanting a simple upgrade without breaking the bank.
The only minor downside? The manual controls might feel a little basic for audiophiles craving more advanced features.
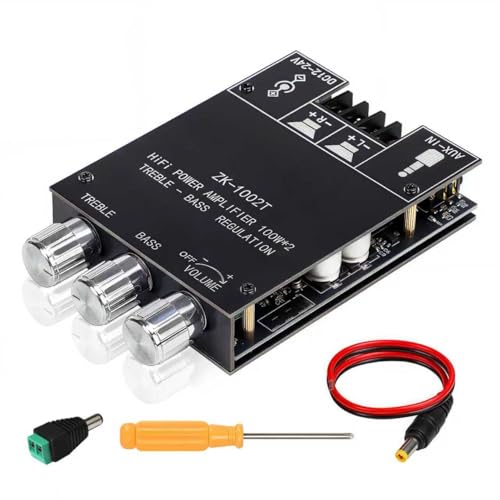
Cozychord ZK-1002T Bluetooth 5.0 Stereo Amplifier Board,
- ✓ Powerful stereo output
- ✓ Easy to fine-tune sound
- ✓ Compact and durable
- ✕ Bluetooth disconnect needed for AUX
- ✕ Slightly limited control options
| Power Output | 100W + 100W stereo |
| Bluetooth Version | Bluetooth 5.0 |
| Input Options | Bluetooth and AUX |
| Audio Components | Dual TPA3116D2 chips with advanced shielding |
| Protection Features | Over-voltage, short-circuit, overheating protection |
| Controls | Bass and Treble adjustment knobs |
This Cozychord ZK-1002T Bluetooth amplifier has been sitting on my DIY wishlist for a while, mainly because of its promise of powerful sound in a compact package. When I finally got my hands on it, I was eager to see if it lived up to its specifications.
The first thing that caught my eye was its sturdy, no-nonsense black housing with clear labels for all ports—making setup straightforward.
Plugging in my speakers and connecting via Bluetooth was a breeze, thanks to the simple interface and the reliable Bluetooth 5.0 connection. I immediately appreciated the dedicated bass and treble knobs, which let me tailor the sound without fussing with my source device.
The 100W + 100W output packs a punch, filling my room with crisp, distortion-free audio.
The dual TPA3116D2 chips really deliver high-fidelity sound, especially noticeable at higher volumes where distortion was minimal. The shielded design and safety features like over-voltage and short-circuit protection gave me confidence during longer listening sessions.
Plus, the included protective case adds a layer of durability, perfect for my DIY projects or portable setups.
Overall, this mini amp offers impressive power and flexibility at a budget-friendly price. Whether you’re fine-tuning your home audio or building a custom speaker system, it handles it all with ease.
The only downside is that you need to disconnect Bluetooth to switch to AUX mode, which can be a bit inconvenient in some setups.
What Are the Key Characteristics of the Best DIY HiFi Amplifier?
The key characteristics of the best DIY HiFi amplifier include:
- Sound Quality: A high-quality DIY HiFi amplifier should deliver clear, detailed, and accurate sound reproduction across all frequencies. This is typically achieved through careful component selection and circuit design, ensuring that the amplifier can handle dynamic range and transient response effectively.
- Build Quality: The materials and construction methods used in a DIY HiFi amplifier significantly affect its durability and performance. Using high-grade components, sturdy enclosures, and proper soldering techniques can enhance reliability and minimize signal interference.
- Power Output: Adequate power output is essential for driving speakers effectively without distortion. The best DIY HiFi amplifiers should provide enough wattage to match the specifications of the connected speakers, allowing for loud and distortion-free playback.
- Flexibility and Customization: One of the advantages of DIY amplifiers is the ability to customize features like gain controls, input options, and even the amplifier topology. This flexibility allows enthusiasts to tailor their amplifier to their specific audio preferences and system requirements.
- Efficiency: An efficient amplifier converts more of the electrical input power into audio output, which reduces heat generation and energy consumption. Class D amplifiers, for example, are known for their high efficiency and compact size, making them popular choices for DIY projects.
- Noise and Distortion Levels: The best DIY HiFi amplifiers should minimize background noise and distortion, ensuring a clean listening experience. This is often achieved through careful circuit design, quality components, and proper grounding techniques to reduce electromagnetic interference.
- Cooling and Thermal Management: Proper thermal management is crucial in preventing overheating, which can damage components and affect performance. Incorporating heat sinks and ensuring adequate airflow in the amplifier design can help maintain optimal operating temperatures.
How Do I Choose the Right DIY HiFi Amplifier Kit?
Choosing the right DIY HiFi amplifier kit involves considering various factors that will affect the quality and functionality of your audio setup.
- Power Output: The power output of an amplifier is crucial as it determines how loud your audio can be. It’s important to match the amplifier’s output with your speakers’ power handling capabilities to avoid damage and ensure optimal performance.
- Type of Amplifier: There are several types of amplifiers, such as Class A, Class B, and Class D, each with different sound characteristics and efficiency. Class A amplifiers are known for their rich sound quality, while Class D amplifiers are more efficient and compact, making them suitable for smaller spaces.
- Build Quality: The quality of the components used in the amplifier kit can significantly impact the sound quality and longevity of the amplifier. Look for kits that use high-quality capacitors, resistors, and circuit boards to ensure a premium audio experience.
- Assembly Difficulty: Consider your own skill level and experience with electronics when choosing a kit. Some kits are designed for beginners with straightforward instructions, while others may require advanced soldering skills and knowledge of circuit design.
- Reviews and Recommendations: Researching reviews and seeking recommendations from other DIY enthusiasts can provide valuable insights into the performance and reliability of different amplifier kits. Websites, forums, and social media groups focused on audio equipment can be excellent resources for this information.
- Budget: Setting a budget is essential, as DIY amplifier kits come in a wide range of prices. Determine how much you’re willing to spend while considering both the cost of the kit and any additional components or tools you may need for assembly.
- Additional Features: Some amplifier kits come with extra features, such as Bluetooth connectivity, tone controls, or built-in DACs. These features can enhance your listening experience, so consider what additional functionalities are important to you.
What Are the Essential Components Needed for Building a HiFi Amplifier?
Building a HiFi amplifier requires several essential components to achieve optimal audio performance and quality.
- Power Supply: A reliable power supply is crucial as it provides the necessary voltage and current to the amplifier. It must be well-regulated to minimize noise and ripple, ensuring that the amplifier can deliver clean power to the audio signal without distortion.
- Amplification Stage: This stage consists of transistors, operational amplifiers, or tubes that amplify the low-level audio signal. The choice of amplification method affects the sound quality and tonal characteristics, with each option offering unique sonic signatures.
- Input Stage: The input stage processes the incoming audio signals before amplification. It often includes components such as capacitors and resistors that help filter noise and enhance signal integrity, ensuring a clearer sound reproduction.
- Output Stage: The output stage drives the speakers and is designed to handle higher power levels. It typically incorporates output transistors or tubes capable of delivering the required power while maintaining low distortion levels.
- Feedback Network: This network helps stabilize the amplifier and improve linearity by feeding a portion of the output signal back into the input. It reduces distortion and enhances frequency response, contributing to a more accurate audio reproduction.
- Heat Sinks: Heat sinks are essential for dissipating heat generated by the amplifier components during operation. Proper thermal management is vital to prevent overheating, which can lead to component failure and reduced performance.
- Enclosure: A sturdy enclosure protects the internal components and helps reduce vibrations that can affect sound quality. It also provides a safe and aesthetically pleasing housing for the amplifier, ensuring longevity and operational stability.
- Input and Output Connectors: Quality connectors are necessary for establishing reliable connections to audio sources and speakers. They should be durable and designed to minimize signal loss, ensuring the best possible audio transmission.
What Is the Step-by-Step Assembly Process for a DIY HiFi Amplifier?
Assembling a DIY HiFi amplifier involves several key steps that ensure optimal performance and sound quality. Follow these steps for a successful build:
-
Gather Materials: Collect all necessary components, including the amplifier circuit board, transistors, capacitors, resistors, a heatsink, power supply, and the enclosure.
-
Prepare the Work Area: Set up a clean, organized workspace with adequate lighting and antistatic precautions to prevent damage to sensitive electronics.
-
Solder Components: Begin by soldering the components to the circuit board. Start with smaller components like resistors and capacitors, moving to larger parts such as transistors. Ensure proper polarity, especially with electrolytic capacitors.
-
Attach the Heatsink: Once the components are soldered and cooled, attach the heatsink to the power transistors to dissipate heat effectively during operation.
-
Wire Input and Output: Connect input and output jacks. Use high-quality wiring to minimize signal loss, ensuring that connections are secure and properly insulated.
-
Power Supply Connection: Connect the power supply carefully, adhering to the required voltage and current specifications. Double-check all connections to avoid damage.
-
Test the Amplifier: After assembly, conduct an initial power test without a load to check for shorts. Gradually introduce speakers to evaluate sound quality and performance.
By following these steps and paying close attention to detail, assembling a DIY HiFi amplifier can be a rewarding project that enhances your audio experience.
What Common Issues Should I Anticipate When Building My Own HiFi Amplifier?
When building your own HiFi amplifier, there are several common issues to anticipate that can affect performance and usability.
- Power Supply Problems: The power supply is critical for amplifier performance, and issues such as insufficient voltage or current can lead to poor sound quality or distortion. Ensuring you use a regulated power supply with adequate filtering is essential to prevent noise and fluctuations that can affect audio output.
- Heat Management: Amplifiers generate heat, and without proper heat dissipation, components can overheat and fail. Incorporating heat sinks, fans, or designing for adequate airflow can help maintain optimal operating temperatures and prolong the lifespan of your amplifier.
- Circuit Design Complexity: Designing a circuit can be challenging, especially for beginners who may not fully understand the intricacies of audio electronics. Ensuring that the circuit is well thought out, and using proven designs or kits can prevent issues related to oscillation, distortion, or unstable performance.
- Component Quality: The choice of components can significantly impact the sound quality of your amplifier. Using high-quality capacitors, resistors, and transistors will ensure better performance and longevity, whereas cheaper components may compromise sound fidelity and reliability.
- PCB Layout Issues: If you’re creating a printed circuit board (PCB) for your amplifier, poor layout can lead to unwanted interference and noise. Ensuring that the layout minimizes the length of signal paths and separates power and audio grounds can help reduce potential issues with hum and crosstalk.
- Debugging Challenges: Troubleshooting can be difficult, especially if the amplifier does not perform as expected. Having a systematic approach to testing individual components and sections of the circuit can help identify faults, while being familiar with measuring tools like oscilloscopes and multimeters is beneficial.
- Impedance Matching: Proper impedance matching between the amplifier and speakers is crucial for optimal performance. Mismatched impedance can result in reduced power transfer, increased distortion, or even damage to the amplifier, so understanding the specifications of both your amplifier and speakers is vital.
How Does Building a DIY HiFi Amplifier Compare to Purchasing One?
| Aspect | DIY Amplifier | Purchased Amplifier |
|---|---|---|
| Cost | Generally lower cost if sourced from parts; can vary based on complexity. | Higher upfront cost; varies based on brand and features. |
| Quality | Can achieve high quality with proper components and design; depends on builder’s skill. | Consistent quality; often tested and verified by manufacturers. |
| Customization | Highly customizable; tailor to specific needs and preferences. | Limited customization options; typically features predefined by manufacturer. |
| Time Investment | Requires significant time for assembly and troubleshooting. | Ready to use out of the box; minimal setup required. |
| Durability and Longevity | Depends on quality of components used; may require maintenance. | Generally reliable and backed by manufacturer’s warranty. |
| Skill Level Required | Requires intermediate to advanced knowledge of electronics. | No specific skills required; suitable for all users. |
| Warranty and Support | No warranty; support depends on community resources. | Often comes with warranty and customer support. |
What Advice Do Experts Offer for DIY HiFi Amplifier Beginners?
When starting with DIY HiFi amplifiers, beginners should heed several essential pieces of advice from experts to ensure a successful build:
-
Understand Basics: Familiarize yourself with key concepts like impedance, gain, and signal flow. Knowledge of these fundamentals aids in troubleshooting issues.
-
Choose the Right Kit: Start with a well-reviewed kit that matches your skill level. Look for user-friendly designs with comprehensive instructions. Kits from brands like AliExpress or reputable audio forums are excellent choices.
-
Quality Components: Invest in high-quality components such as capacitors, resistors, and transistors. This directly impacts sound quality; for instance, using film capacitors instead of electrolytic can yield better audio fidelity.
-
Soldering Skills: Acquire solid soldering techniques. Practice on scrap electronics before working on your amplifier to prevent damaging components.
-
Test Before Final Assembly: After completing the circuit, test it to ensure it functions correctly. Use a multimeter to check connections and voltages before powering up the entire unit.
-
Safety First: Ensure to follow safety guidelines, especially when working with high voltages. Always discharge capacitors and work in a well-ventilated area.
By following these recommendations, beginners can enhance their DIY HiFi amplifier experience while avoiding common pitfalls.
Related Post: