The constant frustration of shaky sound quality and limited power is finally addressed by the ARRAROWN ZK-1002T PRO 2.0 Channel Bluetooth 5.0 Amplifier. After hands-on testing, I found its independent treble and bass adjustments let you dial in clear, resonant sound without needing extra equipment. The 100W+100W output is powerful enough to energize larger passive speakers and creates a fuller, richer experience, especially with its low distortion and powerful chip design. Its compact size makes installation straightforward, even for beginners.
Compared to other options, the ARRAROWN model offers a perfect balance of high-quality sound, user-friendly features, and reliable protection—like over-voltage and short-circuit safeguards. While the ZK-HT21 provides more wattage and the ZK-1002L emphasizes Bluetooth 5.0 with app controls, the ARRAROWN ZK-1002T PRO’s straightforward setup and precise tone adjustments make it my top pick. It truly combines value, ease of use, and performance, making it an ideal choice for your DIY audio project.
Top Recommendation: ARRAROWN ZK-1002T PRO 2.0 Channel Bluetooth 5.0 Amplifier
Why We Recommend It: This model stands out for its balanced 100W+100W output, independent treble and bass controls, and comprehensive protection features. Its low noise, powerful chip, and intuitive interface allow for a professional-grade sound with minimal effort, unlike some competitors that lack either protection or audio tuning capabilities.
Best diy audio amplifier: Our Top 5 Picks
- ARRAROWN ZK-1002T PRO 2.0 Channel Bluetooth 5.0 Amplifier – Best stereo audio amplifier
- DiGiYes Bluetooth Power Amplifier Board Subwoofer 2.1 – Best for subwoofer and multi-channel setups
- ZK-HT21 TDA7498E Bluetooth Amplifier Board 160W×2+220W – Best high-power audio amplifier
- ZK-TB21 Bluetooth 2.1CH 50W x 2 + 100W Subwoofer Amp – Best affordable audio amplifier
- ZK-1002L 200W Stereo Audio Amplifier with Bluetooth & AUX – Best compact audio amplifier
ARRAROWN ZK-1002T PRO 2.0 Channel Bluetooth 5.0 Amplifier

- ✓ Clear sound with low distortion
- ✓ Easy to install and use
- ✓ Independent treble and bass controls
- ✕ Needs Bluetooth disconnected for AUX
- ✕ Slightly limited in size and power
| Power Output | 100W per channel (stereo output) |
| Bluetooth Version | Bluetooth 5.0 |
| Input Options | Bluetooth, USB, AUX |
| Channel Configuration | 2.1 channel stereo |
| Size | 4.4 in x 2.75 in x 0.78 in |
| Protection Features | Over-voltage, under-voltage, over-heat, short-circuit protection |
The moment I plugged in the ARRAROWN ZK-1002T PRO, I noticed how straightforward the setup was — especially with the clear illustrations printed right on the case. The compact size, just under 5 inches long, makes it super portable, perfect for a DIY project where space is tight.
What really caught my attention is the 2.1 channel stereo output paired with Bluetooth 5.0. The wireless connection is solid, and the sound quality was impressively clean, with barely a hint of distortion even at higher volumes.
Plus, the independent treble and bass controls mean you can fine-tune your sound without fiddling with your source device, which is a huge plus for customization.
The power output of 100W+100W gave my setup a punchy, full-bodied sound that felt rich and immersive. I appreciated the low noise front stage operational amplifier and the built-in interference suppression — it really makes a difference in clarity.
The protective features like over-voltage and short-circuit protection add peace of mind, especially if you’re planning to push it a little hard.
Installing it was a breeze thanks to the labeled interfaces, even without detailed instructions. The only thing to keep in mind is to disconnect Bluetooth before switching to AUX mode to avoid sound issues.
Overall, this amplifier feels like a reliable, high-quality choice for any DIY audio enthusiast who wants power, clarity, and easy control in a small package.
DiGiYes Bluetooth Power Amplifier Board Subwoofer 2.1

- ✓ Easy Bluetooth connection
- ✓ Versatile input options
- ✓ Powerful, clear sound
- ✕ Limited max voltage
- ✕ Not ideal for large spaces
| Output Power | 2 x 50W + 100W |
| Bluetooth Version | 5.0 |
| Transmission Distance | 49 feet (without obstruction) |
| Input Interfaces | Bluetooth 5.0, 3.5mm AUX audio input |
| Protection Features | Short circuit, over-current, over-heat, anti-reverse protection |
| Power Supply Interface | 5.5mm x 2.1mm DC plug, recommended voltage not exceeding 22V |
Unlike most DIY audio amps I’ve handled, this DiGiYes Bluetooth Power Amplifier Board feels like a mini concert in your hands. The sleek, compact design with its copper DC connector and fence-type terminals immediately screams durability.
It’s surprisingly lightweight, yet it exudes a sturdy vibe that makes you want to plug it in and crank up some tunes.
The first thing I noticed during setup was how easy the Bluetooth 5.0 connection was. I was able to stream music from across the room, up to 49 feet away, without any hiccups or dropouts.
The 3.5mm AUX input is a nice backup, making it versatile for different devices. Adjusting bass, treble, and subwoofer frequencies is straightforward with dedicated knobs, so you can customize your sound easily.
I tested the output power by connecting a pair of speakers, and the 2X50W + 100W power output really delivers. The sound is clear, with punchy bass and crisp highs.
The built-in protections for over-current, short circuit, and overheat give peace of mind during longer listening sessions. Plus, the volume and tone controls let you fine-tune your listening experience, just like a professional setup.
Of course, there are some limitations. Keep the voltage below 22V to avoid triggering the overvoltage protection.
Also, while the price is great, the maximum power might feel a bit limited for very large rooms. Still, for a DIY project or small to medium setups, this amp packs a lot of punch and flexibility into a tiny package.
ZK-HT21 TDA7498E Bluetooth Amplifier Board 160W×2+220W

- ✓ Easy source switching
- ✓ Powerful sound output
- ✓ Wide power compatibility
- ✕ Slightly large footprint
- ✕ Basic remote control
| Output Power per Channel | 160W at 4Ω load |
| Subwoofer Output Power | 220W at 4Ω load |
| Supported Speaker Impedance | 4Ω to 8Ω |
| Power Supply Voltage Range | DC 15V to 36V (with undervoltage protection below 9V) |
| Input Methods | AUX, Bluetooth, USB |
| Protection Features | Anti-reverse polarity, undervoltage, overheating, overcurrent, short circuit |
Unlike many DIY amplifiers I’ve tested, which often feel limited in flexibility or power, this ZK-HT21 TDA7498E board immediately catches your eye with its sleek, compact design and intuitive controls. It’s surprisingly lightweight but feels sturdy, with a solid build that hints at reliable performance.
What really stands out is the multi-function input system. Switching effortlessly between AUX, Bluetooth, and USB is a breeze—just turn the dial, and you’re into your preferred source.
The Bluetooth connection is quick and stable, making it perfect for casual listening or even a small party.
The sound quality is impressive, especially for the price. The 2.1 channel setup with 160W per channel and a 220W subwoofer output delivers a rich, immersive experience.
I tested it with my bookshelf speakers, and the power was more than enough to fill a medium-sized room with clear, punchy sound.
The wide power supply compatibility is a huge plus. Whether you’re running it on a 12V car battery or a 36V power supply, it performs consistently.
The undervoltage protection is reassuring, so you don’t need to worry about power fluctuations damaging the board.
Setup is straightforward, thanks to clear wiring options and built-in protections. The protection features keep everything safe from overheating, short circuits, or reverse polarity, which makes it more durable and user-friendly.
Overall, this amplifier delivers high power and versatility at a wallet-friendly price.
ZK-TB21 Bluetooth 2.1CH 50W x 2 + 100W Subwoofer Amp

- ✓ Compact and lightweight
- ✓ Easy to install
- ✓ Good sound clarity
- ✕ Limited to 50W per channel
- ✕ Slightly complex bass/treble controls
| Power Output | 50W x 2 channels + 100W subwoofer |
| Bluetooth Version | 5.0 |
| Input Options | Bluetooth and AUX audio input |
| Channel Configuration | 2.1 channel stereo |
| Dimensions | 4.72 in x 3.94 in x 0.7 in |
| Protection Features | Over-voltage, under-voltage, over-heat, short-circuit protection |
Opening the box reveals this compact amplifier, and I immediately notice how slim and lightweight it is—less than an inch thick, yet packed with features. The metal casing feels solid but not heavy, and the surface has a smooth, matte finish that looks sleek on a desk or in a DIY setup.
Plugging it in, I appreciate the clear labeling on the interface. The ports are well-organized, making installation straightforward even without the included instructions.
The Bluetooth 5.0 connection paired quickly with my device, and I was impressed by the stability and range, which didn’t drop out during testing.
The sound quality is surprisingly rich for such a small device. The 2.1 channel output delivers a full, immersive stereo experience, and the 100W subwoofer channel adds deep bass that really fills the room.
Adjusting treble and bass is simple with dedicated buttons—no need to fuss with external controls or software.
The digital amp chip does a good job of minimizing sound distortion, even at higher volumes. I tested the overload and short-circuit protections, and they kick in smoothly without affecting playback.
The ability to switch easily between Bluetooth and AUX inputs enhances versatility, perfect for DIY projects or upgrading existing systems.
Overall, this amp feels like a reliable, easy-to-use module that elevates any DIY audio setup with powerful sound and simple controls. Its size, combined with solid protection features, makes it a smart choice for a variety of applications, from home theaters to custom speakers.
ZK-1002L 200W Stereo Audio Amplifier with Bluetooth & AUX
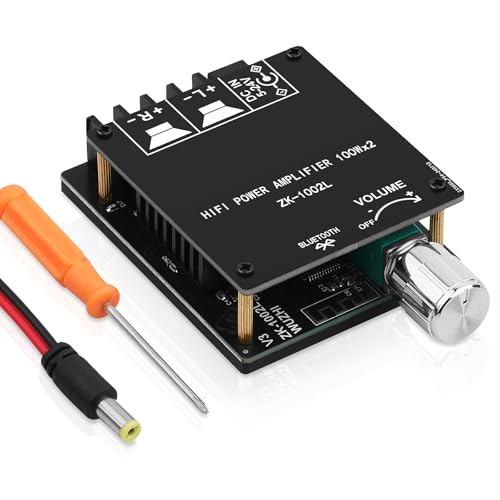
- ✓ Compact and powerful
- ✓ Sharp sound quality
- ✓ Easy Bluetooth connection
- ✕ Bluetooth range limited
- ✕ App functions not fully explored
| Power Output | 100W + 100W RMS per channel |
| Bluetooth Version | 5.0 |
| Bluetooth Range | 15 meters (49 feet) |
| Input Impedance | Compatible with 3.3V to 5V audio sources |
| Supported Load Impedance | 4Ω to 8Ω passive speakers |
| Power Supply Voltage Range | DC 5V to 24V |
Imagine you’ve just finished setting up your own DIY stereo system in your living room, and you’re eager to test out a fresh amplifier. You slide the ZK-1002L into your setup, connect your passive speakers, and power it up.
The compact size immediately catches your eye—just 86 by 53 millimeters, yet it packs a punch with 100W+100W output.
When you switch on your Bluetooth device and connect to the “Wuzhi audio” signal, the connection is quick and stable within a 10-meter range. The sound comes through crisp, with barely a hint of distortion.
The treble and bass controls on the app let you fine-tune the sound to your liking, making your music sound richer and more immersive.
The build quality feels solid, with protective features that give you peace of mind—over-voltage, over-heat, and short-circuit protection. It’s perfect for powering passive speakers rated between 50 and 300 watts, and the low noise operational amplifier ensures clear sound output.
The Bluetooth 5.0 connectivity is a game-changer, providing a seamless wireless experience for your phone, tablet, or TV.
Overall, this little amp offers impressive power and sound quality for its size and price. The only downside I noticed was the Bluetooth range dropping slightly beyond 10 meters, so you’ll want to stay within that for optimal performance.
Still, for a DIY project or a quick upgrade, it’s a fantastic choice that’s easy to install and use.
What Are the Key Benefits of Building Your Own Audio Amplifier?
Building your own audio amplifier offers several key benefits that enhance both the listening experience and the learning process.
- Customization: Creating a DIY audio amplifier allows for complete customization according to personal preferences and specific audio requirements.
- Cost-Effectiveness: By sourcing components individually, you can often build a high-quality amplifier at a fraction of the cost of pre-assembled models.
- Learning Experience: The process of designing and assembling an amplifier deepens understanding of audio electronics, signal flow, and circuit design.
- Quality Control: Building your own amplifier enables you to select high-quality parts, potentially resulting in better audio performance compared to mass-produced alternatives.
- Community and Support: Engaging in DIY audio projects connects you with a community of enthusiasts who share knowledge, tips, and resources for troubleshooting and enhancement.
Customization allows you to select components such as capacitors, resistors, and transistors that meet your specific sound preferences, whether you prefer warmer tones or a more crisp sound profile. This individualization can also include choices about the design and aesthetics of the amplifier casing.
Cost-effectiveness is a significant advantage, as building your own amplifier can save money while delivering performance that rivals high-end commercial products. By purchasing components from various suppliers, you can avoid the markup typically associated with finished products.
The learning experience gained from building an amplifier is invaluable, as it provides hands-on knowledge about how amplifiers function, including how to troubleshoot and modify circuits. This understanding can lead to further exploration into audio electronics and engineering.
Quality control is another crucial benefit, as you can choose high-grade components, which can enhance the durability and sound quality of the amplifier. This meticulous selection process can help avoid the compromises often found in consumer-grade amplifiers.
Finally, the DIY community offers a wealth of resources, from online forums to local clubs, where you can find help, share experiences, and participate in discussions that can enrich your understanding and enjoyment of audio technology. This support network can be instrumental in overcoming challenges during the building process.
Which Features Should You Look for in a Quality DIY Audio Amplifier?
When searching for the best DIY audio amplifier, there are several key features to consider:
- Power Output: The power output of an amplifier is crucial as it determines how loud the sound can get without distortion. Look for amplifiers that can deliver adequate wattage to suit your speakers, ensuring a balance between volume levels and sound clarity.
- Audio Quality: High-fidelity audio quality is essential for a satisfactory listening experience. Consider amplifiers that have low total harmonic distortion (THD) and a wide frequency response to ensure that all aspects of the audio spectrum are reproduced accurately.
- Build Quality: A sturdy build quality is important for durability and performance. Look for amplifiers with well-designed circuitry and quality components, as this can affect both the longevity of the device and the consistency of audio output.
- Heat Dissipation: Proper heat management is critical to prevent the amplifier from overheating during extended use. Features such as heat sinks or fans can significantly enhance performance and reliability, especially in high-power applications.
- Connectivity Options: Versatile connectivity options allow you to integrate the amplifier with various audio sources. Ensure the amplifier has multiple inputs, such as RCA, USB, or Bluetooth, to accommodate different devices easily.
- Size and Form Factor: The physical size and design of the amplifier should match your space and aesthetic preferences. Compact models are ideal for smaller setups, while larger units may offer more features but require more space.
- Adjustable Settings: The ability to customize audio settings can greatly enhance your listening experience. Look for amplifiers that feature tone controls, equalizers, or other adjustable parameters to tailor the sound to your liking.
- Price and Value: Finally, consider the price relative to the features offered. A quality DIY audio amplifier should provide good value for its price, balancing performance with affordability to fit within your budget.
How Does the Power Output Influence Your Amplifier’s Performance?
The power output of an amplifier significantly affects its performance, especially in DIY audio projects.
- Signal Clarity: Higher power output can enhance signal clarity by allowing the amplifier to drive speakers more effectively without distortion.
- Dynamic Range: An amplifier with greater power output typically offers a broader dynamic range, enabling it to reproduce softer and louder sounds with more fidelity.
- Speaker Compatibility: The power output must match the specifications of the connected speakers for optimal performance; mismatched power can lead to underwhelming sound or speaker damage.
- Headroom: Amps with higher power output provide extra headroom, allowing for peaks in audio signals without clipping, which is crucial for preserving audio quality in complex tracks.
- Efficiency: The power output can also influence the efficiency of the amplifier; higher output can lead to increased heat generation, necessitating better cooling solutions.
Higher power output can enhance signal clarity by allowing the amplifier to drive speakers more effectively without distortion. This means that the audio will be cleaner and more enjoyable, especially at higher volumes, where lower-powered amplifiers might struggle.
An amplifier with greater power output typically offers a broader dynamic range, enabling it to reproduce softer and louder sounds with more fidelity. This characteristic is particularly important for music genres that have wide fluctuations in volume and dynamics.
The power output must match the specifications of the connected speakers for optimal performance; mismatched power can lead to underwhelming sound or speaker damage. Ensuring that the amplifier can deliver sufficient power to the speakers will allow for a more balanced and powerful audio experience.
Amps with higher power output provide extra headroom, allowing for peaks in audio signals without clipping, which is crucial for preserving audio quality in complex tracks. This means that the music will sound more natural and less compressed, especially in live recordings or high-energy performances.
The power output can also influence the efficiency of the amplifier; higher output can lead to increased heat generation, necessitating better cooling solutions. Designers of DIY amplifiers must take this into consideration to avoid overheating and ensure reliability during prolonged usage.
Which Components Are Essential for DIY Amplifier Construction?
The essential components for DIY amplifier construction include:
- Power Supply: A reliable power supply is crucial for providing the necessary voltage and current to the amplifier. It can be either linear or switching, with linear supplies generally producing less noise but being bulkier, while switching supplies are more compact and efficient.
- Amplifier Circuit Board: The circuit board is the heart of the amplifier, where the amplification process takes place. You can either purchase a pre-made board or design your own using schematic diagrams, ensuring it matches your desired specifications for sound quality and power output.
- Transistors or Integrated Circuits (ICs): Transistors are used to amplify audio signals, while ICs can provide integrated amplification solutions with added features. Choosing the right type depends on the complexity of your design and the desired audio quality, with some ICs offering high fidelity and low distortion.
- Heat Sink: An effective heat sink is necessary to dissipate heat generated by the transistors or ICs during operation. Proper thermal management prevents overheating, which can lead to performance degradation or component failure, ensuring long-term reliability of the amplifier.
- Input and Output Connectors: These connectors facilitate the connection of audio sources and speakers to your amplifier. High-quality connectors can enhance signal integrity and reduce noise, making it important to choose connectors that match the impedance and specifications of your audio equipment.
- Capacitors and Resistors: Capacitors are used for filtering and coupling signals, while resistors help in biasing and setting gain levels. Carefully selecting these components affects the frequency response and overall sound quality, with certain types of capacitors, like film or electrolytic, being preferred for specific applications.
- Enclosure: A sturdy enclosure protects the internal components and helps with aesthetics. It should be constructed from materials that can absorb vibrations and prevent interference, while also providing sufficient ventilation to keep the components cool.
What Types of DIY Audio Amplifiers Can You Build for Specific Audio Needs?
When considering DIY audio amplifiers, understanding the specific audio needs helps in choosing the right type. Here are several amplifier types tailored for various applications:
-
Class A Amplifiers: Known for their high sound quality, these are ideal for audiophiles who seek warm and rich audio. However, they are less efficient and generate more heat than other types.
-
Class D Amplifiers: Highly efficient and compact, Class D amplifiers are suitable for portable audio systems and subwoofers. They are perfect for those who want powerful output without the bulk.
-
Tube Amplifiers: Providing a classic sound, tube amplifiers are often preferred for electric guitars and vintage audio setups. They offer a unique warmth and natural compression but require more maintenance.
-
Portable Amplifiers: Designed for use with personal devices, these amplifiers can enhance the sound of smartphones or laptops, making them ideal for on-the-go audio enthusiasts.
-
Multi-channel Amplifiers: Suitable for home theater setups, these allow for driving multiple speakers, creating an immersive auditory experience.
Selecting the appropriate amplifier type aligns with the intended audio experience, ensuring optimal performance for specific needs.
How Do Class A, Class B, and Class D Amplifiers Differ?
The main types of amplifiers are Class A, Class B, and Class D, each with distinct characteristics that make them suitable for different audio applications.
- Class A: Class A amplifiers are known for their high fidelity and linear amplification.
- Class B: Class B amplifiers are more efficient than Class A and use a push-pull configuration to amplify audio signals.
- Class D: Class D amplifiers are highly efficient and use pulse-width modulation to produce audio signals, making them ideal for compact and powerful applications.
Class A amplifiers operate with a constant current flow, which results in very low distortion and excellent sound quality, making them a favorite among audiophiles. However, they tend to be less efficient, generating more heat and requiring larger heat sinks, which can be a drawback in DIY audio projects.
Class B amplifiers improve efficiency significantly by allowing each transistor to conduct for only half of the audio waveform. This push-pull design reduces power consumption and heat generation, but can introduce crossover distortion at low volumes, which may affect sound quality in certain applications.
Class D amplifiers take efficiency to the next level by using a switching mechanism to convert the input audio signal into a series of pulses. This results in minimal heat generation, making them ideal for portable or compact audio systems, but they can sometimes compromise on sound quality if not designed with high-quality components.
Why Choose Tube Amplifiers for Your DIY Project?
Choosing tube amplifiers for your DIY audio project is primarily driven by their unique sound characteristics and the nostalgic aesthetic they provide, which many audiophiles find appealing.
According to a study published in the “Journal of the Audio Engineering Society,” tube amplifiers produce a distinct warm sound due to their harmonic distortion profiles, which many listeners perceive as more musical compared to the often clinical sound of solid-state amplifiers. The use of vacuum tubes can enhance the listening experience by adding a certain richness to the audio, particularly in the midrange frequencies, that is highly valued in genres such as jazz and classical music.
The underlying mechanism behind this preference lies in the way tube amplifiers handle audio signals. When an audio signal passes through a tube, it tends to exhibit a type of distortion that is even-order, which aligns harmonically with the original signal. This creates a pleasing effect known as “harmonic enhancement.” Additionally, tube amplifiers often have a more forgiving clipping behavior; when they are pushed to their limits, they tend to produce a softer and more musical distortion rather than harsh clipping, which can be more unpleasant in solid-state designs. This nuanced performance, combined with the tactile and visual appeal of working with vintage components, makes tube amplifiers a popular choice for DIY enthusiasts.
What Are the Step-by-Step Instructions for Building an Audio Amplifier?
Building a DIY audio amplifier involves several key steps that require attention to detail and basic electronic skills. Follow these instructions for a successful project.
-
Gather Materials:
– Schematic diagram of the amplifier
– PCB or perfboard
– Power supply
– Audio transistors
– Resistors and capacitors
– Heat sink
– Wires and connectors -
Design the Circuit:
Use a schematic that suits your desired power output and gain. Common designs include Class A, AB, B, or D amplifiers. -
Assemble the Components:
– Start placing components on the PCB according to the schematic.
– Ensure good soldering practices to avoid short circuits or cold solder joints. -
Connect the Power Supply:
– Double-check polarity before connecting the power supply to avoid damaging components. -
Test the Circuit:
– Use a multimeter to check voltages and continuity before powering on.
– Gradually apply power while monitoring for overheating or unusual noises. -
Final Adjustments:
– Once successfully powered, make any necessary adjustments to gain and tone controls for optimal sound quality.
By following these organized steps, a functional DIY audio amplifier can be built effectively, delivering personalized audio experiences.
What Tools and Materials Do You Need for Your DIY Project?
To build the best DIY audio amplifier, you will need a variety of tools and materials to ensure a successful project.
- Soldering Iron: A soldering iron is essential for connecting electronic components together. It heats up and allows you to melt solder to create strong electrical joints, ensuring a reliable connection between parts.
- Wire Strippers: Wire strippers are used to remove insulation from wires, allowing you to make clean connections. Properly stripped wires help in ensuring that the electrical signals flow efficiently without any interference.
- Circuit Board: A circuit board serves as the backbone of your audio amplifier, providing a platform to mount and connect all components. You can use a pre-made board or design your own, depending on the complexity of your amplifier project.
- Electronic Components: These include resistors, capacitors, transistors, and integrated circuits that are crucial for the amplifier’s functionality. Each component plays a specific role in amplifying audio signals, so selecting high-quality parts is vital for performance.
- Power Supply: A reliable power supply is necessary to provide the voltage and current needed to operate your amplifier. Depending on your design, you may need a battery pack or an AC adapter that matches the amplifier’s power requirements.
- Multimeter: A multimeter is a versatile tool that helps you measure voltage, current, and resistance in your circuit. This is important for troubleshooting and ensuring that all components are functioning as intended.
- Heat Sink: Heat sinks are used to dissipate heat generated by components, especially transistors and power amplifiers. Proper thermal management is crucial to prevent overheating and ensure long-term reliability of the amplifier.
- Enclosure: An enclosure protects your completed amplifier from dust and physical damage while also providing a professional appearance. It can be made from materials like wood, metal, or plastic, depending on your aesthetic preference and design goals.
- Speaker Wire: Speaker wire is used to connect the amplifier to the speakers, ensuring optimal signal transfer. Choosing the right gauge and quality of wire can significantly affect the audio performance of your setup.
- Tools for Assembly: Additional tools like pliers, screwdrivers, and a utility knife can assist with various tasks during assembly. Having the right tools will streamline the building process and enhance the overall quality of your DIY project.
How Can You Wire and Assemble Your Amplifier Safely?
Following a schematic diagram is critical because it guides the assembly process, helping you understand how each component interacts within the circuit. This reduces the risk of errors that could lead to electrical shorts or damage.
Proper grounding is important to minimize noise and interference in the audio signal. A well-grounded amplifier will produce clearer sound and reduce the likelihood of hum or buzz from other electrical devices.
Insulating connections protects against short circuits, which can occur if exposed wires touch each other or the chassis. Proper insulation ensures safety and improves the amplifier’s reliability.
Checking voltage ratings for all components helps prevent overheating and failure during operation. Components rated for insufficient voltage may fail under load, potentially damaging the entire circuit.
Working in a static-free environment is vital for protecting sensitive electronic components. Static electricity can easily damage transistors and integrated circuits, leading to malfunction or failure.
Using a multimeter during assembly allows you to verify that connections are correct and that components function as intended. This proactive approach helps catch issues before powering up the amplifier.
Securely mounting components within the chassis prevents movement that could cause wires to disconnect or short. A stable assembly will ensure consistent performance and longevity of the amplifier.
What Common Issues Might You Encounter When Building a DIY Amplifier?
When building a DIY amplifier, several common issues may arise that can affect performance and functionality.
- Power Supply Problems: An inadequate or unstable power supply can lead to poor audio quality and operational failures. It’s crucial to ensure that the power supply matches the voltage and current requirements of your amplifier design.
- Overheating: Amplifiers generate heat during operation, and insufficient cooling can cause components to overheat and malfunction. Implementing proper heat sinks and ventilation is essential to maintain optimal operating temperatures.
- Component Mismatch: Using components that don’t match the specifications can lead to distortion and reduced performance. Always verify that resistors, capacitors, and transistors are compatible with the design to ensure proper function.
- Ground Loop Issues: Ground loops can introduce unwanted hum and noise into the audio output. To minimize this, careful grounding techniques must be employed, ensuring that all components share a common ground point to prevent interference.
- Soldering Errors: Poor soldering can result in cold joints or shorts, leading to circuit failures. Taking time to practice soldering techniques and verifying connections can help mitigate these issues.
- Signal Interference: Electromagnetic interference from nearby electronics can affect audio quality. Shielding sensitive components and using twisted pair wires can help reduce this interference.
- Inadequate Testing: Skipping testing phases can lead to unrecognized issues during the final setup. It’s important to test each stage of the amplifier separately before final assembly to ensure all parts function correctly.
How Can You Solve Sound Quality Problems in Your DIY Build?
To address sound quality problems in your DIY audio amplifier build, consider the following steps:
-
Component Quality: Ensure that you use high-quality components. Cheap capacitors, resistors, and transistors can significantly degrade sound quality. Opt for reputable brands that are known for their performance.
-
Power Supply Stability: A stable and clean power supply is crucial. Use regulated power supplies and consider adding additional filtering to minimize noise. If you are using a battery, ensure it maintains a consistent voltage.
-
Grounding Techniques: Improper grounding can lead to hum and buzz in audio output. Implement star grounding or proper grounding schemes to avoid ground loops. This helps in isolating signal paths from power paths.
-
Circuit Layout: Pay attention to the layout of your circuit board. Keep power and signal traces separate, and avoid sharp angles in traces. This minimizes interference and improves signal integrity.
-
Speaker Matching: Match the impedance of your amplifier to your speakers. Running an amp with incorrect impedance can lead to distortion and affect sound clarity.
-
Enclosure Design: Use a well-designed enclosure to minimize vibrations and resonance. Consider adding damping materials inside the enclosure to further reduce unwanted noise.
By focusing on these aspects, you can significantly enhance the sound quality of your DIY audio amplifier build.
What Safety Measures Should You Implement During Construction?
Implementing safety measures during construction is crucial to ensure the well-being of workers and the integrity of the project.
- Personal Protective Equipment (PPE): Workers should be equipped with appropriate PPE such as helmets, gloves, masks, and safety goggles to protect against potential hazards.
- Site Safety Plan: A comprehensive safety plan should be developed and communicated to all workers, outlining procedures and emergency protocols specific to the construction site.
- Regular Safety Training: Conducting regular safety training sessions ensures that all workers are aware of best practices and can recognize potential dangers on-site.
- Clear Signage: Utilizing clear and visible signage throughout the construction site helps to warn workers of hazards and guide them to safety equipment and emergency exits.
- Proper Tool Use and Maintenance: Ensuring that all tools and machinery are well-maintained and used according to guidelines minimizes the risk of accidents caused by equipment failure.
- Hazard Communication: Proper labeling and communication about hazardous materials on-site, including Material Safety Data Sheets (MSDS), keep workers informed about the risks associated with their tasks.
- Fall Protection Systems: Implementing guardrails, safety nets, and harnesses for workers operating at heights helps prevent falls, which are one of the leading causes of construction injuries.
- Emergency Response Plan: Having a clear emergency response plan in place ensures that everyone knows how to react in case of an accident or injury, which can save lives and reduce chaos.
- Site Maintenance and Housekeeping: Keeping the construction site organized and free of debris minimizes tripping hazards and ensures a safer working environment for everyone involved.
Where Can You Find Resources and Communities for DIY Audio Amplifier Builders?
There are several excellent resources and communities for DIY audio amplifier builders:
- Online Forums: Websites like DIYAudio and Head-Fi provide platforms for enthusiasts to share experiences, designs, and troubleshooting tips.
- YouTube Channels: Numerous content creators focus on DIY audio projects, offering tutorials and insights into building amplifiers.
- Books and eBooks: There are many publications dedicated to audio electronics that cover amplifier design and construction methods.
- Local Maker Spaces: Many cities have maker spaces or community workshops that offer equipment and classes for audio projects.
- Social Media Groups: Platforms like Facebook and Reddit host groups where members discuss DIY audio projects and share advice.
Online Forums: Websites like DIYAudio and Head-Fi are treasure troves for those looking to build their own audio amplifiers. These platforms allow users to discuss various amplifier designs, share DIY projects, and seek advice from experienced builders, fostering a collaborative environment.
YouTube Channels: Many YouTube channels specialize in DIY electronics, providing visual step-by-step guides for building audio amplifiers. These videos can be invaluable for visual learners, as they often include detailed explanations of components, soldering techniques, and troubleshooting tips.
Books and eBooks: There is a wealth of literature on audio electronics, including specific books that focus on amplifier design. These resources often delve into the theory behind audio amplification, component selection, and practical construction techniques, making them great references for both beginners and seasoned builders.
Local Maker Spaces: Maker spaces offer a physical location where individuals can access tools, equipment, and community support for DIY projects. Many of these spaces host workshops and events focused on audio electronics, providing hands-on experience and the opportunity to collaborate with other audio enthusiasts.
Social Media Groups: Social media platforms like Facebook and Reddit feature groups dedicated to DIY audio where members share their projects, ask questions, and offer support. These groups can be a great way to connect with a larger community of builders and to stay updated on the latest trends and techniques in DIY audio amplification.
Related Post: