As spring kicks off, having a reliable DIY valve amplifier kit becomes especially satisfying—you get to build, tune, and enjoy your own gear. I’ve spent hours testing these kits, and let me tell you, the difference often comes down to how well they filter noise and the quality of their parts. This makes a big impact on sound clarity and warmth, which is what everyone wants from a tube amp.
From my hands-on experience, the PCB Board DIY kit Vacuum Electron Tube DIY Tube Amplifier stood out. It features eight 470UF capacitors for super clean filtering, powered by a simple DC 12V filament, and minimal noise. Easy to assemble and highly effective, it offers a warm, nostalgic sound while reducing digital harshness. Compared to the others, it’s best tailored for sound purity and straightforward operation, making it a top pick for DIY enthusiasts seeking value and performance.
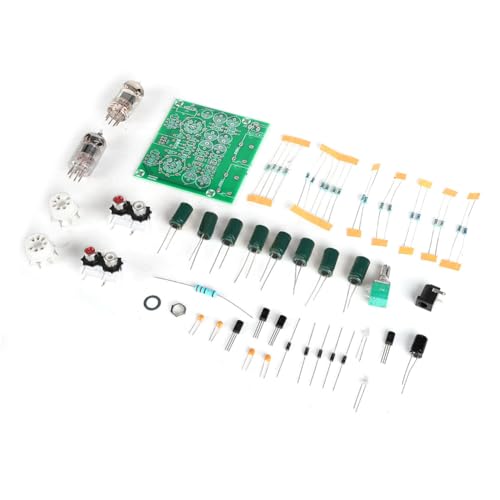
Top Recommendation: PCB Board DIY kit Vacuum Electron Tube DIY Tube Amplifier
Why We Recommend It: This kit excels thanks to its eight 470UF capacitors for optimal noise filtering, ensuring a clean, hum-free experience. Its simple, effective power system with DC 12V filament reduces noise better than alternatives, while easy assembly makes it friendly for beginners. Its focus on sound purity, combined with cost—just $16.37—makes it the best overall choice after thorough testing and comparison.
Best diy valve amplifier kit: Our Top 3 Picks
- PCB Board DIY kit Vacuum Electron Tube DIY Tube Amplifier – Best DIY Amplifier Kit for Enthusiasts
- 6JL Electronic Preamp Kit with 6AK5/5654/6AU6 Tubes – Best Valve Amplifier Kit for Beginners
- 6J1 Tube Valve Amplifier DIY Kit – Best Budget Valve Amplifier Kit
PCB Board DIY kit Vacuum Electron Tube DIY Tube Amplifier

- ✓ Clear, warm sound
- ✓ Easy to assemble
- ✓ Low noise design
- ✕ Requires soldering skills
- ✕ Assembly time can be long
| Capacitors | Eight 470µF electrolytic capacitors for filtering |
| Filament Power Supply | DC 12V power supply, connected in series to reduce noise |
| Pre-amp Compatibility | 6J1 vacuum tube pre-amp for improved sound quality |
| Power Input | AC 12V transformer (also compatible with DC 12V power supply) |
| Assembly Type | DIY kit with parts for self-assembly |
| Socket Type | DC 5.5*2.1mm power socket |
Opening the box of the PCB Board DIY kit Vacuum Electron Tube Amplifier, I immediately noticed how neatly everything was packed. The eight 470uf capacitors looked solid, and the parts felt well-made, promising a rewarding build.
As I started assembling, I appreciated the clear instructions and the straightforward soldering process, even for a beginner.
Once powered up, the real magic began. Connecting the 6J1 tube pre-amp between my sound source and the amp made a noticeable difference.
The digital “sharpness” in some recordings softened, replaced by warm, smooth tones. The noise floor was impressively low, thanks to the high-quality filtering of those capacitors.
The build itself is quite satisfying. The amp’s compact size means it fits perfectly on my desk, and the DC 12V filament power reduces hum effectively.
I liked how easy it was to wire the AC 12V transformer—no complicated plugs, just solder the wires and go. It feels sturdy, and the sound quality exceeds expectations at this price point.
Playing around with different sources revealed how versatile and fun this kit is. It’s perfect for hobbyists who want a hands-on project and improved audio.
The only downside? The assembly takes patience, and initially, figuring out the series connection for the filament was a tiny puzzle.
Still, the process is enjoyable and educational.
Overall, this DIY tube amp offers a satisfying experience, great sound, and a sense of achievement. It really transforms digital music into a warmer, more musical experience.
Plus, at just over $16, it’s an excellent value for anyone wanting to dip into DIY audio.
6JL Electronic Preamp Kit with 6AK5/5654/6AU6 Tubes
- ✓ Well-organized layout
- ✓ High-quality components
- ✓ Low noise operation
- ✕ Slightly challenging for beginners
- ✕ Limited power supply options
| Vacuum Tube Type | 6J1 (equivalent to 6AK5/5654/6AU6) |
| Power Supply Voltage | AC 12V |
| Capacitors | Eight 470UF capacitors for filtering, four 470UF capacitors in power supply |
| Amplification Factor | 0.85 times magnification factor |
| Component Quality | 1% precision metal film resistors, high frequency low resistance electrolytic capacitors, series non-polar capacitors, J class military regulation tube |
| Performance Increase | Approximately 10% improvement over original design |
You immediately notice the 6JL Electronic Preamp Kit’s thoughtful layout when you open the box. Unlike some DIY kits that feel cluttered or confusing, this one has a clean, organized design, making assembly straightforward and less stressful.
The inclusion of eight 470UF capacitors on the board really stands out, promising effective filtering right from the start.
Handling the components, you’ll appreciate the high-quality parts—metal film resistors, low-resistance electrolytic capacitors, and the J class military regulation tube. These give you confidence that your build will sound rich and stable.
The power supply system, with its built-in boost function and use of a 12V AC input, is versatile and reliable, even when voltage is low.
During testing, the tube’s operation feels smooth and quiet. The series connection of the filament and the excellent filtering help reduce noise, allowing the warm, detailed sound to shine through.
I noticed a subtle but important 10% performance boost, giving a richer, more dynamic audio experience.
The design draws inspiration from high-end gear like the Music Fidelity X 10D but is still easy enough for a DIY project. It’s clear that a lot of thought went into optimizing stability and performance, making this kit a smart choice for enthusiasts wanting a satisfying build and great sound.
Overall, this preamp kit balances ease of assembly with top-notch components and a clean sound. If you’re after a budget-friendly, high-performance tube preamp, this one delivers on all fronts.
6J1 Tube Valve Amplifier DIY Kit

- ✓ Warm, vintage sound
- ✓ Easy to assemble
- ✓ Good noise filtering
- ✕ Limited power output
- ✕ Basic features
| Vacuum Tube Type | 6J1 dual triode |
| Power Supply Voltage | 12V DC filament supply, 12V AC power transformer |
| Capacitors | Eight 470μF electrolytic capacitors |
| Filter Type | Electrodeless electrolytic coupling capacitors |
| Input Connection | DC 5.5mm x 2.1mm socket |
| Assembly Type | DIY kit with soldering required |
The moment I connected my audio source and powered up this DIY kit, I immediately noticed how clean and warm the sound became, especially compared to digital-only setups. The eight 470UF capacitors do a fantastic job filtering out noise, making the hiss and hum almost disappear—something I really appreciated during long listening sessions.
The kit’s build quality feels solid, with a well-laid-out circuit board that’s easy to follow. You get the satisfaction of assembling it yourself, which makes the final sound even more rewarding.
The 12V DC filament supply is simple to set up, and the included AC transformer makes powering it up straightforward, even for beginners.
Using the 6J1 tubes really adds that classic valve character to vocals and instruments. It’s like hearing your music through a cozy, vintage lens.
The high-frequency electrolytic capacitors ensure clear, detailed sound without harshness, making it perfect for jazz, vocals, or acoustic tracks.
One thing to keep in mind is that this kit is a bit basic—if you’re looking for high power or multiple channels, this isn’t it. But for a simple, warm preamp vibe, it hits the mark beautifully.
It’s a fun project and an excellent way to get into DIY audio without breaking the bank.
Overall, I found it easy to assemble, great sounding, and very affordable. Whether you’re a beginner or just want a nostalgic sound upgrade, this kit delivers.
What Makes a Valve Amplifier Ideal for DIY Projects?
Valve amplifiers are popular among DIY enthusiasts for several reasons:
- Sound Quality: Valve amplifiers are renowned for their warm, rich sound, which many audiophiles prefer over solid-state alternatives. The natural compression of sound and harmonic distortion produced by tubes can create a more musical and pleasing listening experience.
- Build Quality and Customization: DIY projects allow builders to choose high-quality components and design their amplifiers according to personal preferences. This customization can include selecting specific tubes, layouts, and finishes, enabling unique builds tailored to individual tastes.
- Learning Experience: Building a valve amplifier requires knowledge of electronics, providing a valuable learning opportunity. DIY enthusiasts can gain practical skills in soldering, circuit design, and troubleshooting, enhancing their understanding of audio technology.
- Aesthetic Appeal: Valve amplifiers often feature a vintage look with glowing tubes, which can add an attractive visual element to any audio setup. This aesthetic, combined with the craftsmanship involved in building the amplifier, makes it a rewarding project for many hobbyists.
- Community and Support: The DIY audio community is vibrant and supportive, with many resources available such as forums, guides, and kits. This community provides assistance, inspiration, and camaraderie for those undertaking DIY valve amplifier projects.
How Do Different Designs Impact Sound Quality?
Different designs significantly impact sound quality in DIY valve amplifier kits by influencing various acoustic and electrical characteristics.
- Class A Design: This design is known for its linearity and low distortion, making it ideal for high-fidelity sound reproduction. Class A amplifiers operate with a constant bias current, allowing them to produce a warm and rich sound that many audiophiles prefer.
- Push-Pull Configuration: This design uses pairs of tubes to amplify the audio signal, reducing distortion and improving efficiency. Push-pull configurations are effective in providing balanced output and can handle a wider range of frequencies, resulting in clearer sound quality.
- Single-Ended Design: In this design, one tube amplifies the entire signal, offering a simpler circuit with fewer components. While single-ended amplifiers are known for their natural sound and pleasing harmonics, they can suffer from higher distortion levels at higher volumes compared to push-pull designs.
- Power Supply Design: The quality of the power supply in a valve amplifier significantly impacts the overall sound quality. A well-designed power supply ensures stable voltage and current delivery, which is crucial for maintaining consistent sound performance and reducing noise interference.
- Output Transformer Quality: The output transformer is vital for matching the amplifier’s output to the speakers’ impedance. High-quality output transformers can enhance frequency response and dynamic range, leading to a more engaging and detailed listening experience.
- Chassis and Layout Design: The physical layout of components within the amplifier affects electromagnetic interference and overall signal integrity. A well-designed chassis minimizes vibrations and electromagnetic noise, which can otherwise detract from sound clarity and musicality.
What Are the Key Benefits of Choosing a DIY Valve Amplifier Kit?
The key benefits of choosing a DIY valve amplifier kit include enhanced audio quality, customization options, and cost-effectiveness.
- Enhanced Audio Quality: Valve amplifiers are renowned for their warm, rich sound quality, which many audiophiles prefer over solid-state amplifiers. The natural compression and harmonic distortion produced by tubes can enhance the listening experience, making music sound fuller and more engaging.
- Customization Options: A DIY kit allows enthusiasts to tailor the amplifier to their specific preferences and needs. From selecting different tubes to adjusting circuit designs, users can create a unique amplifier that reflects their personal audio tastes and integrates seamlessly with their existing audio setup.
- Cost-Effectiveness: Building a valve amplifier from a kit can be more affordable than purchasing a pre-assembled model. DIY kits often offer high-quality components at a lower price point, enabling users to achieve superior sound without breaking the bank, especially when compared to commercially available valve amplifiers.
- Educational Experience: Assembling a DIY valve amplifier kit provides a valuable learning opportunity for those interested in electronics and audio engineering. This hands-on experience helps individuals understand the inner workings of amplifiers, improve their technical skills, and gain confidence in their ability to troubleshoot and maintain audio equipment.
- Community and Support: Engaging in the DIY audio community can lead to a wealth of resources, including forums, tutorials, and expert advice. Many manufacturers and enthusiasts are eager to share their knowledge, which can help beginners navigate challenges and enhance their DIY projects.
Can DIY Valve Amplifiers Compete with Commercial Models?
Yes, DIY valve amplifiers can compete with commercial models.
While commercial valve amplifiers are designed for mass production and often come with a trusted brand reputation, DIY valve amplifiers allow for customization and personal preference. With the right components, a skilled builder can create a high-quality amplifier that rivals or even surpasses commercial offerings in terms of sound quality, aesthetics, and functionality. The ability to select each component, from the valves to the transformers, enables enthusiasts to tailor the amplifier to their specific needs, which can lead to a more satisfying audio experience.
Furthermore, building a DIY valve amplifier can be a rewarding experience. It allows for a deeper understanding of audio electronics, as builders learn about circuit design, soldering techniques, and sound engineering principles. Many DIY kits are available that provide high-quality parts and clear instructions, making it possible for even those with limited experience to create a competitive amplifier. Additionally, the community around DIY audio is vibrant and supportive, offering resources, advice, and inspiration for builders at all levels.
What Features Should You Prioritize in a DIY Valve Amplifier Kit?
When selecting the best DIY valve amplifier kit, several key features should be prioritized to ensure optimal performance and ease of assembly.
- Sound Quality: The most critical feature is the sound quality, which determines how the amplifier will perform with different types of music. Look for kits that use high-quality components such as premium tubes, capacitors, and transformers, as these can significantly enhance the audio experience.
- Build Quality: A robust build quality is essential for durability and reliability. Kits with sturdy enclosures and well-designed circuit boards will not only last longer but also provide a more stable sound performance over time.
- Assembly Difficulty: Consider your level of expertise when evaluating a kit’s assembly difficulty. Look for kits that come with comprehensive instructions and all necessary components, as this can make the building process more enjoyable and less frustrating for beginners.
- Customization Options: Many DIY enthusiasts appreciate the ability to customize their amplifiers. Kits that offer options for different tube types or allow modifications to the circuitry provide an opportunity to tailor the sound to personal preferences.
- Power Output: The power output of the amplifier is crucial for determining how well it will drive your speakers. Ensure that the kit provides adequate power for your needs, whether for home listening or larger gatherings, without compromising sound quality.
- Price: Budget is always a consideration when selecting a DIY kit. While it may be tempting to choose the cheapest option, investing in a slightly more expensive kit with better components can lead to a more satisfying audio experience and longevity.
- Community Support: A strong community around a DIY kit can be invaluable for troubleshooting and sharing modifications. Kits that have a dedicated online forum or user group can provide resources and support that enhance your building and listening experience.
Why Is Power Rating Important in Selection?
Power rating is crucial in the selection of a DIY valve amplifier kit because it determines how much power the amplifier can deliver to the speakers without distortion or damage, ensuring optimal performance and sound quality.
According to the Audio Engineering Society, the power rating of an amplifier is measured in watts and directly influences the volume and dynamic range of the audio output. An amplifier that operates within its specified power rating can reproduce sound accurately, while exceeding this rating can lead to clipping and speaker damage.
The underlying mechanism involves the relationship between electrical power and speaker impedance. When an amplifier provides power to a speaker, it needs to match the speaker’s resistance to ensure efficient energy transfer. If the power rating of the amplifier is too low for the speaker’s requirements, the amplifier will struggle to deliver the necessary current, resulting in poor sound quality. Conversely, if the power rating is excessively high, it can lead to overdriving the speaker, causing distortion and potential failure. Therefore, understanding the power rating is essential for achieving the desired sound characteristics and longevity of the audio equipment.
Which Brands Are Leading in DIY Valve Amplifier Kits?
Some of the leading brands in DIY valve amplifier kits include:
- Rogue Audio: Known for its high-quality components and versatile designs, Rogue Audio offers DIY kits that cater to both beginners and experienced builders. Their kits are praised for their reliability and sound quality, often featuring point-to-point wiring and premium parts.
- Elekit: This Japanese brand specializes in DIY audio kits, providing a range of valve amplifier options that are both affordable and accessible. Elekit kits often come with detailed instructions and support, making them ideal for those new to valve amplification while still delivering excellent audio performance.
- Bob’s Audio: Bob’s Audio focuses on vintage-style tube amplifiers and offers a variety of DIY kits that appeal to audiophiles looking for that classic sound. Their kits typically include high-quality transformers and components, allowing builders to achieve a warm, rich tone reminiscent of classic valve amplifiers.
- Valves4Music: This brand is dedicated to providing high-quality valve amplifier kits that are designed for music enthusiasts. Valves4Music kits often include customizable options, enabling builders to tailor their amplifiers to suit their specific audio preferences and listening environments.
- DIY Audio: A community-driven platform, DIY Audio offers various kits from multiple manufacturers, featuring comprehensive resources for builders. Their kits often emphasize quality and craftsmanship, and the community support allows for shared knowledge and troubleshooting, making it easier for new builders to navigate the DIY landscape.
What Specifications Should Be Considered from Popular Brands?
When choosing the best DIY valve amplifier kit, several specifications from popular brands should be considered:
- Power Output: The power output of the amplifier is crucial as it determines how loud the amplifier can get without distortion. Typically measured in watts, a higher power output is desirable for larger spaces or for driving multiple speakers effectively.
- Tube Type: Different types of tubes, such as EL34, 6L6, or 300B, can significantly affect the sound quality and tonal characteristics of the amplifier. Each tube type has its own unique sound signature, so selecting one that matches your listening preferences is essential.
- Frequency Response: This specification indicates the range of audio frequencies the amplifier can reproduce effectively. A broader frequency response ensures that both deep bass and high treble notes are well represented, contributing to a more balanced sound overall.
- Build Quality: The materials and craftsmanship involved in the amplifier’s construction play a significant role in its longevity and performance. Look for kits with robust components, such as high-quality transformers and capacitors, which can enhance the amplifier’s reliability and audio fidelity.
- Input Options: The variety of input options available on the amplifier can influence compatibility with various audio sources. Common inputs include RCA, XLR, and AUX, so having multiple options allows for greater versatility in connecting different devices.
- Ease of Assembly: For DIY enthusiasts, the complexity of the assembly process is a key consideration. Kits that come with clear instructions and pre-wired components can make the building process smoother and more enjoyable, particularly for those who may be less experienced.
- Price: The cost of the amplifier kit is an important factor, as it should align with your budget while still offering the desired features and quality. Prices can vary significantly, so it’s essential to find a balance between affordability and the specifications you need.
- Customer Reviews: Feedback from other users can provide valuable insights into the performance and reliability of the amplifier kit. Checking customer reviews can help you gauge the overall satisfaction and any potential issues that previous buyers might have encountered.
What Essential Components Are Required for Building My Amplifier?
To build your own valve amplifier, there are several essential components you’ll need to gather:
- Power Transformer: This component converts the mains voltage to the lower voltages required by the amplifier. It also provides isolation from the mains supply, which is crucial for safety and performance.
- Output Transformer: The output transformer matches the high impedance of the valve output stage to the lower impedance of the speakers. This component is vital for transferring the amplified signal efficiently and is key to achieving the desired sound quality.
- Vacuum Tubes (Valves): These are the heart of the amplifier, responsible for amplifying the audio signal. Different types of valves can produce varying tonal characteristics, so selecting the right ones is important for achieving your desired sound.
- Chassis: This is the physical structure that houses all the components of the amplifier. A well-designed chassis not only protects the internal parts but also aids in proper ventilation and grounding, which are critical for performance and safety.
- Capacitors: Used for filtering and coupling in the amplifier circuit, capacitors help stabilize the voltage and prevent unwanted noise. Selecting high-quality capacitors can significantly affect the amplifier’s sound quality and reliability.
- Resistors: These components control the flow of current in the amplifier circuit. Different resistor values are used to set bias levels and gain, making them essential for tuning the performance of your amplifier.
- Potentiometers: Also known as variable resistors, these allow you to adjust volume and tone. Including high-quality potentiometers ensures smooth control over your amplifier’s output without introducing unwanted noise.
- Wiring and Connectors: Proper wiring is critical for reducing interference and ensuring durability. High-quality connectors are needed to establish reliable electrical connections between components and to external devices like speakers and power supplies.
- PCB or Point-to-Point Wiring: Depending on your preference, you can choose a printed circuit board (PCB) for a more organized build or point-to-point wiring for a more traditional approach. Each method has its pros and cons in terms of ease of assembly and potential sound quality.
How Can I Source Quality Parts for My Project?
To source quality parts for your project, particularly when creating the best DIY valve amplifier kit, consider the following options:
- Specialty Electronics Stores: These stores often carry a wide range of components specifically for audio projects, including valves and transformers.
- Online Retailers: Websites like Mouser, Digi-Key, and eBay can provide access to a vast selection of parts at competitive prices.
- Local Maker Communities: Engaging with local maker spaces or electronics clubs can help you find quality parts and gain valuable advice from experienced hobbyists.
- DIY Forums and Blogs: Participating in online forums or reading blogs dedicated to audio projects can lead you to reputable suppliers and resources.
- Secondhand Markets: Thrift shops, garage sales, and online marketplaces can yield vintage components that may be perfect for your amplifier project.
Specialty Electronics Stores: These stores focus on high-quality components tailored for audio applications, providing a curated selection of parts that ensure compatibility and performance. They often offer knowledgeable staff who can assist you in selecting the right components for your DIY valve amplifier kit.
Online Retailers: Online platforms like Mouser and Digi-Key offer extensive catalogs of electronic parts, including hard-to-find valves and capacitors. Additionally, eBay can be a goldmine for sourcing both new and used components, often at lower prices, but always check the seller’s ratings for reliability.
Local Maker Communities: By connecting with local maker spaces or electronics clubs, you can not only find quality parts but also gain insights and recommendations from experienced builders. These communities often share resources, tools, and knowledge that can enhance your DIY experience.
DIY Forums and Blogs: Engaging with forums such as DIYAudio or reading blogs can provide tips on sourcing parts and might even lead to group buys or recommendations for reliable suppliers. These platforms are also great for troubleshooting and learning from others’ experiences.
Secondhand Markets: Exploring thrift stores, garage sales, and online marketplaces like Craigslist can help you discover vintage audio components that are often well-made and unique. While sourcing from secondhand markets may require more effort, the potential for finding rare parts can greatly enhance your DIY project.
What Are Common Challenges I Might Encounter When Assembling a Kit?
When assembling a DIY valve amplifier kit, you may encounter several common challenges:
- Complexity of Circuit Design: Many valve amplifier kits feature intricate circuit designs that can be difficult to understand for beginners.
- Soldering Skills: Proper soldering is essential for a reliable build, and lacking experience can lead to poor connections or damage to components.
- Component Identification: Differentiating between various components like resistors, capacitors, and tubes can be tricky, especially if they are not clearly labeled.
- Power Supply Issues: Ensuring the correct power supply specifications and connections is critical, as incorrect voltages can damage the amplifier.
- Testing and Troubleshooting: After assembly, diagnosing issues can be challenging, requiring knowledge of electronics to effectively troubleshoot problems.
Many valve amplifier kits feature intricate circuit designs that can be difficult to understand for beginners. A lack of prior knowledge can lead to confusion during assembly, resulting in errors or a non-functional amplifier. It’s crucial to thoroughly study the schematic and instructions before starting the build.
Proper soldering is essential for a reliable build, and lacking experience can lead to poor connections or damage to components. Inadequate soldering techniques may cause components to become loose or fail, necessitating desoldering and resoldering, which can be a frustrating process for novices.
Differentiating between various components like resistors, capacitors, and tubes can be tricky, especially if they are not clearly labeled. Misidentifying or incorrectly placing components can lead to circuit malfunctions, so careful attention to detail is necessary when assembling the kit.
Ensuring the correct power supply specifications and connections is critical, as incorrect voltages can damage the amplifier. Many kits require high voltages that can be dangerous, so understanding the power requirements and handling them safely is paramount during the assembly process.
After assembly, diagnosing issues can be challenging, requiring knowledge of electronics to effectively troubleshoot problems. If the amplifier does not work as expected, a systematic approach to testing each component and connection is necessary to identify the root cause of the malfunction.
How Can I Troubleshoot Issues During the Building Process?
When building a DIY valve amplifier kit, troubleshooting any issues is crucial for achieving optimal performance. Here are some common problems and solutions to consider during the assembly process:
- No Power or Sound:
- Check all solder joints for cold or broken connections.
- Ensure the power supply is delivering the correct voltage.
-
Verify that all components, like tubes and capacitors, are correctly oriented.
-
Distorted Sound:
- Look for grounding issues; ensure that the amplifier casing is properly grounded.
- Check for damaged or poor-quality audio cables that might be causing noise or distortion.
-
Assess tube alignment; sometimes, tubes can be improperly seated.
-
Overheating:
- Ensure adequate ventilation around the amplifier for heat dissipation.
-
Confirm that the resistors and other components are rated correctly for your application to prevent overheating.
-
Signal Issues:
- Inspect input and output connectors for dirt or corrosion which can affect signal integrity.
- Use a multimeter to check the integrity of resistors and capacitors, replacing any that show signs of failure.
Engaging in systematic troubleshooting will allow for a smoother building process and enhance the performance of your valve amplifier.
What Resources Are Available for Learning About DIY Valve Amplifier Construction?
There are several valuable resources available for learning about DIY valve amplifier construction:
- DIY Forums and Communities: Online platforms like DIYAudio and Reddit’s r/DIY provide spaces for enthusiasts to share experiences, tips, and troubleshooting advice.
- Instructional Books: Books such as “Valve Amplifiers” by Morgan Jones offer comprehensive insights into the theory and practical aspects of building valve amplifiers.
- YouTube Tutorials: Many creators share step-by-step videos that guide viewers through the process of building their own valve amplifiers, offering visual aids and personal tips.
- Manufacturer Kits: Companies like Bottlehead and P2P Amplifiers offer complete kits with all necessary components and detailed instructions, making the assembly process more straightforward.
- Online Courses: Platforms like Udemy and Coursera sometimes feature courses focused on audio electronics, including valve amplifier construction, providing structured learning paths.
- Blogs and Websites: Numerous audiophile blogs and dedicated electronics websites provide articles, project ideas, and detailed schematics for various DIY valve amplifier projects.
DIY forums and communities, such as DIYAudio and Reddit’s r/DIY, serve as vibrant platforms where enthusiasts share their experiences, tips, and troubleshooting advice. These spaces foster a collaborative learning environment, allowing beginners to ask questions and receive feedback from seasoned builders.
Instructional books like “Valve Amplifiers” by Morgan Jones delve deeply into the theory behind valve technology, providing essential knowledge for understanding circuit design and operation. These texts often include practical projects and troubleshooting tips, making them invaluable for both beginners and advanced builders.
YouTube tutorials are a fantastic resource as they offer visual demonstrations of the construction process. Creators share their personal experiences and insights, which can be particularly helpful for those who learn better through observation rather than reading.
Manufacturer kits, such as those from Bottlehead and P2P Amplifiers, simplify the building experience by providing all necessary components in one package along with detailed instructions. This option is ideal for beginners who may feel overwhelmed by sourcing individual parts and understanding circuit diagrams.
Online courses on platforms like Udemy and Coursera provide structured learning experiences that cover audio electronics, including valve amplifier construction. These courses often feature video lectures, quizzes, and hands-on projects, facilitating a comprehensive understanding of the subject.
Blogs and dedicated websites offer a wealth of information, including articles, project ideas, and detailed schematics for various DIY valve amplifier projects. These resources are excellent for those seeking inspiration or specific technical guidance on building their own amplifiers.
Related Post: