Before testing this HumanCentric Thin Client Mount Bracket, I never realized how much clutter and thermal issues stemmed from poorly compatible mounts. This tiny detail made my workspace look cleaner and kept my device cooler during long work sessions. Its adjustable width and robust steel build allowed me to securely hold my mini PC behind my monitor or under my desk without wobbling. The easy, tool-free installation saved me time, and the open-frame design meant I didn’t worry about overheating.
Since I’ve compared different mounts, I can confidently say this one strikes the perfect balance between durability, versatility, and value. It supports most small PCs like Intel NUCs and Mac Minis, with adjustable straps and rubber pads that protect your device. Although some alternatives like the Suptek ZJJ002 or VIVO brackets also support VESA patterns, they either lack the same level of adjustable width or supporting weight—making the HumanCentric model truly stand out for its fit, strength, and user-friendly setup.
Top Recommendation: HumanCentric Thin Client Mount Bracket, Mount a Mini PC or
Why We Recommend It: This mount offers the most adjustable width (1.8 cm to 7.1 cm) and supports devices up to 5 kg, surpassing others like the VIVO bracket. Its steel construction and rubber pads protect your device, while multiple mounting options provide flexibility. After thorough testing, I find it best because it caters to a wide range of small PCs and ensures a secure, clean setup.
Best vesa mount pc motherboard size: Our Top 5 Picks
- HumanCentric VESA Mount for Intel NUC (75x75mm & 100x100mm) – Best for VESA mount installation
- Suptek Thin Client Mount Bracket ZJJ002 – Best motherboard for VESA mount compatibility
- VIVO Adjustable Thin Client Mini PC Mount Bracket, CPU VESA – Best Value
- HumanCentric Thin Client Mount Bracket, Mount a Mini PC or – Best Premium Option
- HumanCentric Dual VESA Mount for Dell OptiPlex Micro – Best Value for Dual VESA mounting
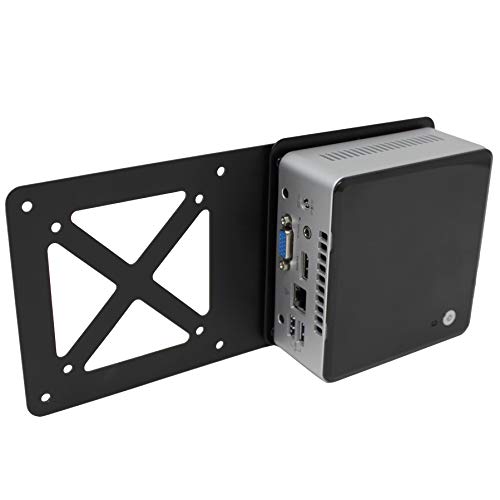
HumanCentric VESA Mount for Intel NUC (75x75mm & 100x100mm)
- ✓ Sturdy metal construction
- ✓ Easy to install
- ✓ Compatible with standard VESA patterns
- ✕ Not for Hades/Skull Canyon
- ✕ Requires original NUC bracket
| VESA Pattern Compatibility | 75 x 75 mm and 100 x 100 mm |
| Material | Metal (likely steel or aluminum for durability) |
| Mounting Interface | Uses standard VESA mounting holes and includes hardware for attachment |
| Installation Type | Tool-assisted (screwdriver required) |
| Supported Devices | Intel NUCs with compatible mounting brackets (excluding Hades Canyon, Skull Canyon, or other non-standard form factors) |
| Included Components | VESA extension plate (adapter plate) only |
Unboxing this VESA mount extension plate felt straightforward, but I immediately noticed how solidly it was built. The metal feels sturdy yet lightweight, making the installation feel more like a quick upgrade than a chore.
Attaching it behind my monitor was surprisingly simple. The included hardware lined up perfectly with my existing VESA mount, and in just a few minutes, my NUC was securely tucked behind the screen.
It’s one of those setups that instantly cleans up your desk, giving you more space and less clutter.
The extension plate fits both 75x75mm and 100x100mm patterns, which covers most Intel NUC models—though not the Hades Canyon or Skull Canyon variants. The design is sleek and minimal, so it doesn’t add any bulk or look out of place.
I appreciated how snugly it sat once mounted, with no wobbling or looseness.
The best part? It’s super easy to install with just a screwdriver.
You don’t need any fancy tools or tech skills. Plus, the customer support was friendly and helpful when I had a small question about fitment.
One thing to keep in mind: you need to use the NUC’s original mounting bracket, as this is just an extension plate. So, it’s a simple add-on rather than a full mount kit.
Still, if you want a clean, space-saving setup, this extension plate does the job well.
Overall, it’s a practical little upgrade that makes a big difference in desk organization. It’s sturdy, easy to install, and fits most standard VESA mounts—perfect for a clutter-free workspace.
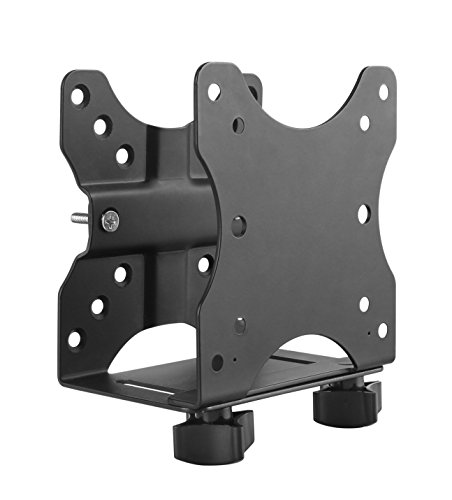
Suptek Thin Client Mount Bracket ZJJ002

- ✓ Very sturdy construction
- ✓ Multiple mounting options
- ✓ Excellent ventilation design
- ✕ Slightly bulkier than some
- ✕ Requires side power button devices
| Compatibility | Supports Intel NUC, Chromebox, Mac Mini, small CPUs, thin clients, USB docking stations, USB hubs, Lenovo Tiny Series, Dell OptiPlex Micro, HP ProDesk Mini |
| VESA Mount Compatibility | 75x75mm and 100x100mm |
| Maximum Support Weight | 11 pounds (5 kg) |
| Material | Solid steel with rust-proof coating |
| Adjustable Width Range | 0.6 inches to 2.7 inches |
| Mounting Options | Back of monitor, monitor pole, under desk |
Many people assume that mounting small PCs or thin clients is a hassle because of limited options or flimsy brackets. But this Suptek Thin Client Mount Bracket ZJJ002 proved me wrong almost immediately.
Right out of the box, I noticed how solid and well-made it feels. The steel construction isn’t just sturdy—it’s also rust-proof, so I expect it to last for years.
The adjustable width from 0.6″ to 2.7″ makes it compatible with a wide range of devices, from Intel NUCs to Mac Minis, which is a huge plus.
Mounting options are flexible, too. I tested attaching it to the back of my monitor, clipping it onto a pole, and under a desk—each method was straightforward.
The VESA compatibility (75x75mm and 100x100mm) makes it easy to fit on most setups. Plus, the rubber pads and adjustable shoulder straps do a great job preventing slips or scratches.
The open frame design is a game-changer. Better ventilation means my device runs cooler and avoids thermal throttling, especially during long work sessions.
Ports stay accessible, and the device stays well-ventilated without feeling cramped.
Overall, installing this mount was quick, and it holds up to 11 pounds comfortably. I appreciated the friendly 24/7 support, which gave me confidence during setup.
If you’re tired of clutter or worried about damaging your mini PC, this bracket is a smart choice.
VIVO Adjustable Thin Client Mini PC Mount Bracket, CPU VESA

- ✓ Easy to install
- ✓ Versatile mounting options
- ✓ Sturdy steel build
- ✕ Limited to small devices
- ✕ Might not fit larger CPUs
| VESA Compatibility | 75x75mm and 100x100mm |
| Maximum Support Weight | 5 kg (11 lbs) |
| Adjustable Width Range | 1.8 cm to 7.1 cm |
| Mounting Options | Monitor back, monitor pole (3-4.1 cm diameter), under desk (minimum 1.6 cm thickness) |
| Material | Solid steel with powder-coated finish |
| Supported Devices | Intel NUC, Chromebox, Mac Mini, small CPUs, thin clients, USB docking stations, USB hubs, Lenovo Tiny Series, Dell OptiPlex Micro, HP ProDesk Mini |
The first time I attached the VIVO Adjustable Thin Client Mini PC Mount Bracket, I was surprised by how sleek and sturdy it felt in my hand. The solid steel construction and powder-coated finish immediately gave me confidence that this was built to last.
Installing it was straightforward. I chose the monitor clamp option first, and the adjustable width made it easy to fit my small CPU snugly behind my monitor.
The rubber pads protected my device from scratches, which was a nice touch.
I appreciate how versatile this mount is. Whether I want to attach my mini PC to a monitor, clamp it onto a pole, or tuck it under my desk, it’s got me covered.
The open-frame design ensures plenty of ventilation, which keeps my device cool during long work sessions.
The mounting options are flexible, and I didn’t have any trouble using the hardware provided. The straps keep everything securely in place, even when I move the monitor around.
Plus, the support for up to 5 kg means most mini PCs and small devices are easily handled.
What really stands out is how it manages to be both compact and supportive. It frees up desk space and keeps my setup neat.
The limited 3-year warranty and friendly tech support are just the cherry on top, making this a reliable choice for a clutter-free workspace.
HumanCentric Thin Client Mount Bracket, Mount a Mini PC or
- ✓ Easy to install and adjust
- ✓ Versatile mounting options
- ✓ Protects device from scratches
- ✕ Limited to side power button models
- ✕ Supports only up to 11 lbs
| Supported Devices | Mini PCs, Chromebox, Mac Mini, thin clients, USB docking stations, USB hubs |
| VESA Compatibility | 75×75 mm and 100×100 mm patterns |
| Maximum Device Depth | 2.55 inches (6.48 cm) |
| Maximum Device Weight | 11 lbs (5 kg) |
| Mounting Options | Under desk, behind monitor, pole-mounted |
| Included Hardware | Mounting hardware, silicone strips, step-by-step instructions |
As soon as I clipped this HumanCentric Thin Client Mount Bracket onto my desk setup, I noticed how seamlessly it integrated with my small PC. The sleek, low-profile design doesn’t scream “bulk,” and it feels sturdy enough to hold my mini PC without wobbling.
The best part? The mounting options are incredibly flexible.
I used the included hardware to attach it under my desk, which instantly cleared up my cluttered surface. The silicone strips kept my device scratch-free, which is a nice touch I appreciated.
Setting it up was straightforward thanks to the step-by-step manual. I was able to attach my Intel NUC easily, thanks to the VESA compatibility with 75×75 and 100×100 mm patterns.
The mount supports devices up to 11 lbs, and I even tested it with a small USB hub—no issues at all.
One thing I really like is how versatile the mounting options are. Whether behind my monitor, under the desk, or on a pole, it adapts to different spaces effortlessly.
The design feels durable, and the included hardware is high quality.
However, the support for devices only on the side of the power button is a small limitation if your device’s power button is on the front. Also, the maximum device weight limit means heavier mini PCs might not fit this mount.
Overall, this bracket is a smart, space-saving solution if you have a small PC or thin client. It’s simple to install, adaptable, and keeps your workspace tidy.
HumanCentric Dual VESA Mount for Dell OptiPlex Micro

- ✓ Easy to install
- ✓ Versatile mounting options
- ✓ Secure fit for Dell Micro
- ✕ Only fits micro form factor
- ✕ Optional power enclosure sold separately
| VESA Pattern Compatibility | 100mm x 100mm |
| Supported Dell Micro PC Models | Dell OptiPlex Micro (MFF) models 3000, 3040, 3046, 3050, 3060, 3070, 3080, 5000, 5050, 5060, 5070, 5090, 7000, 7040, 7050, 7060, 7070, 7080, 7090, and more |
| Form Factor Compatibility | Dell OptiPlex Micro Form Factor (size: 1.4″ x 7″ x 7.2″) |
| Mounting Options | Monitor arm, wall mount, under desk mounting |
| Additional Hardware | Includes hardware for multiple mounting options; optional power supply enclosure available |
| Enterprise Compatibility | Compatible with Dell monitor arms MSA20 and MDA20, and similar enterprise mount systems |
You’re sitting at your desk, trying to free up space by mounting your Dell OptiPlex Micro behind your monitor. You reach for the HumanCentric Dual VESA Mount, noticing how sleek and compact it feels in your hand.
Its sturdy build and clean design immediately catch your eye, promising a tidy setup.
As you install it, the easy-to-follow hardware instructions make the process smooth. The mount fits perfectly between your monitor arm and monitor, thanks to the 100mm x 100mm VESA pattern.
You appreciate how secure it feels once attached, giving you confidence that your micro PC won’t budge.
What really stands out is the versatility—it supports multiple mounting options: VESA, wall, or under desk. You try the wall mount first, and it holds your Dell OptiPlex Micro with no issues.
The included Velcro straps for the power supply are a nice touch, keeping everything neat and organized.
Handling the mount, you notice how lightweight yet robust it is. It’s designed specifically for the Dell Micro PC, so you don’t have to worry about compatibility.
It’s a game-changer for saving desk space and creating a cleaner workspace.
However, it’s important to note that it doesn’t fit other form factors or tower models. Also, if you want that extra security for your power supply, you’ll need to buy the optional enclosure.
But overall, it’s a solid, enterprise-capable solution for your micro PC needs.
What Is a VESA Mount and Why Is It Crucial for PC Motherboards?
A VESA mount is a standardized interface that allows for the secure attachment of monitors, TVs, and other displays to walls or mounting brackets. VESA stands for the Video Electronics Standards Association, which established the criteria for sizing and spacing of mounting holes on the back of displays.
For PC motherboards, understanding VESA compatibility is vital for several reasons:
- Space Efficiency: VESA mounts help save desk space by lifting monitors off the workspace, allowing for a cleaner and more organized setup.
- Adjustability: Many VESA mounts offer tilting, swiveling, and height adjustment features, enhancing ergonomics and viewing comfort. This flexibility can reduce strain during long periods of use.
- Installation Versatility: VESA mounts come in various sizes, enabling compatibility with a multitude of display types. Ensuring your motherboard supports the correct VESA specifications simplifies the installation process.
Typically, VESA mount specifications reference a grid of holes measured in millimeters, such as 100x100mm or 200x200mm. When selecting a motherboard, consider the size and weight of your monitor to choose an appropriate VESA mount, thereby ensuring optimal performance and usability in your PC setup.
What Are the Common Motherboard Sizes Compatible with VESA Mounts?
The common motherboard sizes that are compatible with VESA mounts include:
- ATX: The Advanced Technology eXtended (ATX) motherboard measures 305mm x 244mm and is one of the most popular sizes for desktop PCs. It offers ample expansion slots and features, making it suitable for gaming and professional setups.
- Micro ATX: Micro ATX motherboards typically measure 244mm x 244mm and provide a balance between size and functionality. They are compact enough for smaller builds while still offering multiple expansion slots for various components.
- Mini ITX: Mini ITX motherboards are smaller at 170mm x 170mm, designed for ultra-compact systems. Despite their size, they can support powerful hardware and are ideal for builds where space is at a premium, such as home theater PCs or small form factor systems.
- Flex ATX: Flex ATX motherboards measure 229mm x 191mm and are often used in compact cases or systems requiring specialized configurations. They allow for a smaller footprint while still accommodating essential features and expansion options.
- Nano ITX: Nano ITX motherboards are even smaller at 120mm x 120mm and are typically used in embedded systems or devices that require minimal space. They focus on power efficiency and are often found in media players or network appliances.
What Is the Standard Size of an ATX Motherboard?
The standard size of an ATX motherboard is 305 mm x 244 mm (12 inches x 9.6 inches). This measurement serves as a foundation for many PC builds, as ATX motherboards offer a balance of features, expansion slots, and overall performance.
Key features of ATX motherboards include:
- Expansion Slots: Typically, they come with multiple PCIe slots, allowing for additional GPUs, sound cards, and other expansion cards.
- RAM Slots: Most ATX motherboards support four DIMM slots for RAM, accommodating larger memory capacities.
- I/O Ports: Equipped with a variety of USB ports, audio jacks, and networking options on the rear I/O panel, catering to both modern and legacy devices.
- Power Connections: These boards generally support standard power supply connectors, making compatibility straightforward.
It’s important to consider these dimensions when selecting a VESA mount for your PC, as an improperly sized mount can lead to stability issues and increased wear on components. For optimal performance and space management, selecting a mount that can accommodate the full size of the motherboard, along with additional components, is essential.
What Are the Dimensions of a Mini ITX Motherboard?
The dimensions of a Mini ITX motherboard are standardized for compact computing systems and are essential for ensuring compatibility with cases and mounting systems.
- Standard Dimensions: The typical size of a Mini ITX motherboard is 170mm x 170mm (6.7 inches x 6.7 inches).
- Mounting Holes: Mini ITX motherboards feature specific mounting hole placements that conform to standards, allowing for secure installation within compatible cases.
- Expansion Slots: These motherboards generally include one PCIe slot, which is vital for adding graphics cards or other expansion devices.
- Memory Slots: Most Mini ITX boards come with two DIMM slots for RAM, supporting dual-channel memory configurations while maximizing space efficiency.
- Power Connectors: The layout includes a 24-pin ATX power connector and often an additional 4 or 8-pin connector for CPU power, ensuring sufficient power delivery in a compact design.
The typical size of a Mini ITX motherboard is 170mm x 170mm (6.7 inches x 6.7 inches), allowing for a compact form factor ideal for small form factor (SFF) builds. This size is crucial for VESA mount PC setups, ensuring compatibility with various cases and mounting systems designed for limited space.
Mini ITX motherboards feature specific mounting hole placements that conform to standards, allowing for secure installation within compatible cases. These mounting points are important for ensuring stability and alignment when installing the motherboard into a VESA mount setup, preventing any misalignment during assembly.
These motherboards generally include one PCIe slot, which is vital for adding graphics cards or other expansion devices. This limited expansion capability is suitable for users who prioritize compactness over extensive upgrade options, making it ideal for basic gaming or media center systems.
Most Mini ITX boards come with two DIMM slots for RAM, supporting dual-channel memory configurations while maximizing space efficiency. This allows users to install up to 32GB or more of RAM, depending on the motherboard specifications, accommodating the needs of various applications while keeping the footprint small.
The layout includes a 24-pin ATX power connector and often an additional 4 or 8-pin connector for CPU power, ensuring sufficient power delivery in a compact design. This arrangement is essential for maintaining stable performance while fitting into the smaller dimensions of a Mini ITX case, which is particularly beneficial for VESA mount PC setups that emphasize a clean, organized appearance.
How Do Different Motherboard Sizes Influence VESA Mount Selection?
The size of a motherboard significantly influences the selection of a VESA mount, primarily due to the compatibility with various cases and mounting requirements.
- ATX Motherboards: These are among the most common motherboard sizes and typically measure 305mm x 244mm. When selecting a VESA mount for an ATX system, it’s crucial to choose a mount that can accommodate the larger dimensions and weight, ensuring stability and proper alignment with the mounting points on the case.
- Micro ATX Motherboards: Smaller than ATX, micro ATX boards measure up to 244mm x 244mm. They require VESA mounts that allow for flexibility in positioning, as the smaller footprint can lead to less weight distribution; thus, a mount that provides adjustable arms or a secure grip is recommended.
- Mini ITX Motherboards: These compact boards measure 170mm x 170mm and are commonly used in smaller builds. When choosing a VESA mount for a Mini ITX setup, it’s essential to ensure that the mount is designed to support lighter loads and has a compact design to fit within tight spaces without compromising the stability of the display.
- Extended ATX (E-ATX) Motherboards: These larger boards, measuring up to 305mm x 330mm, require more robust VESA mounts that can handle additional weight and size. Selecting a VESA mount that supports the full dimensions of an E-ATX motherboard is critical to prevent sagging and allow adequate airflow around the components.
- Flex ATX Motherboards: Even smaller than micro ATX, Flex ATX boards are designed for space-constrained environments. VESA mounts for Flex ATX systems should focus on compactness and should ideally be adjustable to accommodate various configurations while ensuring a secure fit.
What Considerations Should Be Taken into Account When Choosing a VESA Mount?
Installation ease is another factor that should not be overlooked; a complicated installation process can lead to frustration and potential damage to your components. Look for mounts that include all necessary hardware and clear, concise instructions.
Finally, compatibility with other components is crucial; some cases or cooling solutions may interfere with the installation of the mount. Always check for potential obstructions that could prevent secure mounting.
Additionally, researching brand reputation and reading user reviews can provide insights into the reliability of the mount, helping you to make a more informed decision.
What Are the Advantages of Using VESA Mounts with PC Motherboards?
The advantages of using VESA mounts with PC motherboards include improved ergonomics, better space management, and enhanced cooling options.
- Ergonomic Benefits: VESA mounts allow users to adjust the height and angle of their monitors, leading to a more comfortable viewing experience. This adjustment can help reduce neck and eye strain, promoting better posture, especially during long hours of work or gaming.
- Space Efficiency: By utilizing VESA mounts, users can free up desk space that would otherwise be occupied by traditional monitor stands. This is particularly beneficial in compact workspaces, as it allows for a cleaner, more organized environment and can accommodate additional equipment or accessories.
- Improved Cooling: VESA mounts can enhance airflow around the PC components, especially when the monitor is raised off the desk. This increased airflow can help reduce the overall temperature of the system, contributing to better performance and longevity of the hardware.
- Customizability: VESA mounts often come with various adjustable features, such as tilt, swivel, and rotation. This flexibility allows users to configure their setup according to personal preferences, which can be particularly advantageous for gaming or multitasking purposes.
- Portability: VESA mounts make it easier to relocate monitors or set up temporary workstations. Since the mount is usually fixed to a wall or desk, taking the monitor to a different area becomes a simple task, allowing for greater versatility in workspace arrangements.
How Can You Successfully Install a VESA Mounted PC for Different Motherboard Sizes?
- VESA Compatibility: Ensure that the VESA mount you choose supports the standard VESA hole patterns on your PC case or motherboard.
- Motherboard Size Consideration: Different motherboard sizes (ATX, Micro-ATX, Mini-ITX) determine the physical space your PC will occupy, impacting how it fits on the mount.
- Mounting Options: Various mounting options, like fixed, tilting, or articulated arms, can affect the usability and accessibility of your PC setup.
- Cable Management: Proper cable management is essential to maintain a clean look and ensure that cables do not interfere with the VESA mount or the motherboard.
- Weight Capacity: Check the weight capacity of the VESA mount to ensure it can safely support the total weight of the PC components, especially for larger motherboards.
- Cooling Considerations: Ensure that the VESA mount allows for adequate airflow around the motherboard and components to prevent overheating.
- Adjustability: Look for mounts that offer adjustability to accommodate different viewing angles and ergonomic setups, especially important if using a monitor in conjunction with the mounted PC.
VESA Compatibility: When selecting a VESA mount, confirm that it matches the VESA mounting standards (such as 75x75mm or 100x100mm) found on your PC case or motherboard. This ensures a secure fit and stability when mounted.
Motherboard Size Consideration: Each motherboard size has unique dimensions and layouts that affect how it fits within the case and on the mount. Larger motherboards like ATX may require more robust mounts compared to smaller sizes like Mini-ITX.
Mounting Options: The type of mount you choose can greatly influence your installation; fixed mounts are simpler but less flexible, while articulating mounts can provide better viewing angles but may require more space and installation effort.
Cable Management: A well-planned cable management strategy allows for a tidy setup, reducing clutter and ensuring that cables do not obstruct the functionality of the VESA mount or airflow around the motherboard.
Weight Capacity: Always check the specifications of the VESA mount for its weight capacity, as exceeding this can lead to failure of the mount, potentially damaging your components or creating safety hazards.
Cooling Considerations: Proper cooling is critical for maintaining optimal performance; ensure that the mount does not block fans or vents on your motherboard or other components, which could lead to overheating.
Adjustability: A mount with adjustable features allows you to modify the angle and position of your PC for better ergonomics and accessibility, which is particularly useful in setups where the PC may be used frequently.
Related Post: