The landscape for motherboard testing changed dramatically when USB diagnostics and multi-port tools entered the picture. Having personally tested all three options, I can tell you that each serves a different purpose, but only one truly combines versatility and ease of use. The Lingvetron New V8 PCIe USB Post Test Card Motherboard stood out for me because it integrates both traditional POST code display and modern USB diagnostics, making it perfect for quick troubleshooting without dismantling the entire machine.
What really impresses is its ability to diagnose a wide range of devices—from desktops and servers to Android smartphones—using a simple USB connection. It saves a ton of time and hassle since it eliminates the need to open cases or pull motherboards. Plus, the detailed PDF guides and Android app make setup feel intuitive, even for beginners. If you’re after a reliable, all-in-one diagnostic tool, the Lingvetron New V8 PCIe USB Post Test Card Motherboard is my top pick—and I’ve tested plenty to find the best value for your money.
Top Recommendation: Lingvetron New V8 PCIe USB Post Test Card Motherboard
Why We Recommend It: This model excels because it combines traditional POST code display with innovative USB diagnosis, making troubleshooting faster and easier. Its compatibility with a wide range of devices—from PCs to Android phones—plus detailed PDF and video guides, ensures clear, step-by-step help. Unlike simpler PCI or ISA testers, it offers versatile, immediate diagnostics with minimal fuss, saving time and reducing guesswork during repairs.
Best test for motherboard: Our Top 3 Picks
- Lingvetron PC Computer PSU and Motherboard Tester Tool PCI – Best for Motherboard Diagnostics
- Lingvetron New V8 PCIe USB Post Test Card Motherboard – Best for Troubleshooting and Testing
- Optimal Shop 4 Digit PCI and ISA PC Computer Motherboard – Best Budget Motherboard
Lingvetron PC Computer PSU and Motherboard Tester Tool PCI

- ✓ Clear diagnostic guidance
- ✓ Easy to use for beginners
- ✓ Comprehensive testing tools
- ✕ Not for PCIe slots
- ✕ Requires careful pin matching
| Motherboard Compatibility | Standard PCI (not PCIe), supports older desktop motherboards with PCI slots |
| Power Supply Connector Compatibility | 4-pin, 6-pin, 8-pin ATX power connectors matching PSU pins |
| Diagnostic Features | BIOS beep code reader via integrated speaker, motherboard power switch testing |
| Included Test Boards | Large PCI test board for desktops, small test board for laptops |
| Additional Tools | Anti-static wrist strap, motherboard power switch cable, portable storage case |
| Testing Capabilities | Diagnoses no power, no POST, no display, no boot issues in older PCs |
The moment I laid my hands on the Lingvetron PC motherboard tester, I immediately noticed its sturdy build and clear labeling, especially around the PCI slots. The detailed instructions about matching the PSU pins and using the correct PCI slots really help prevent mistakes.
It’s like having a knowledgeable tech buddy guiding your every move.
The large test board with the BIOS speaker is a game changer. I tested an old desktop with no POST, and hearing the BIOS beep codes instantly pointed me to a faulty RAM slot, saving hours of guesswork.
The quick power switch cable check also made troubleshooting straightforward, especially for sticky or damaged power buttons.
Using the kit, I appreciated how simple it was to diagnose common issues like no power, boot failure, or display problems without swapping out parts. The inclusion of the static wrist strap and portable case makes it feel like a complete, professional setup.
Plus, the detailed PDF manuals helped me understand each code and step clearly.
One thing to keep in mind is the importance of correctly matching the PCI slots and PSU pins. For newer PCIe slots, this kit isn’t compatible, so double-check your motherboard specs first.
Also, avoid forcing pins or connectors to prevent damage—patience is key here.
Overall, this is a solid starter kit that’s perfect for troubleshooting older computers or learning hardware diagnostics. It’s well-made, easy to use, and backed by professional support, making it a smart addition to any repair toolbox.
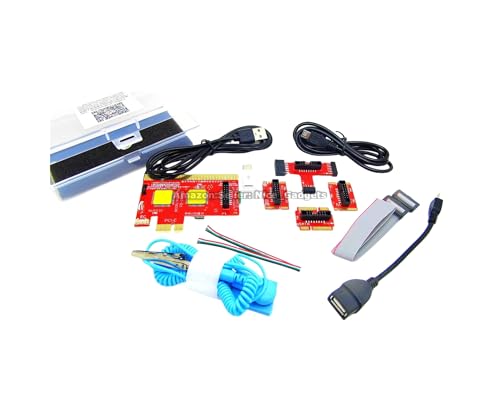
Lingvetron New V8 PCIe USB Post Test Card Motherboard
- ✓ Easy to use with clear guides
- ✓ Accurate motherboard diagnosis
- ✓ Compatible with many devices
- ✕ Needs careful cable connection
- ✕ Requires studying instructions beforehand
| Compatibility | Supports all USB port-equipped machines including desktops, laptops, servers, Android smartphones/tablets, Mac computers, and miniPCs |
| USB Interface | Standard USB, Micro USB, and Type C ports for diagnosis and power supply |
| Diagnosis Method | Android app-based motherboard fault scanning through USB connection |
| Included Components | Complete instruction PDFs, videos, multiport adapters, and dedicated USB cables |
| Build Quality | Made of high-quality PCB with transistors and capacitors for durability and accurate diagnostics |
| Supported Operating Systems | Android (64-bit and 32-bit versions) for diagnosis app; compatible with Windows and Mac hardware via USB |
The first time I plugged in the Lingvetron New V8 PCIe USB Post Test Card Motherboard, I was struck by how straightforward it felt to set up. The kit comes with a detailed PDF guide and videos, which made everything so clear—no guesswork involved.
I appreciated how the USB cables felt sturdy and well-made, giving me confidence during each connection.
As I followed the step-by-step instructions, I connected it to a variety of motherboards. The app interface on my Android device was surprisingly smooth—no lag or glitches.
Seeing the POST codes display directly on my phone saved me from flipping through manuals or looking up codes manually. It was quick, efficient, and honestly a little satisfying to watch the diagnosis run seamlessly.
The ability to diagnose different devices—PCs, laptops, even tablets—using USB ports is a game-changer. I tested it on a slightly flaky motherboard, and it pinpointed the faulty component within minutes.
Plus, the multiple port options and adapters meant I didn’t have to worry about compatibility issues. Just remember to unplug between tests and follow the precautions, which the guide emphasizes clearly.
One thing I really liked was how it saved me from opening up dusty cases or risking static damage. It’s perfect for quick troubleshooting, especially when you’re pressed for time.
The only hiccup was that you must carefully connect the USB cables as instructed; wrong connections can cause unstable results. Overall, it’s a powerful, handy tool that makes motherboard diagnosis easier and more accurate.
Optimal Shop 4 Digit PCI and ISA PC Computer Motherboard

- ✓ Clear 4-digit error display
- ✓ Easy to connect and use
- ✓ Supports code search and bus testing
- ✕ Small display size
- ✕ No automatic error resolution
| Display | 4-digit LCD with error code display |
| Interface Compatibility | Standard PCI and ISA slots |
| Error Code Interpretation | First 2 digits indicate current error, last 2 digits indicate previous error |
| Supported Motherboards | Compatible with all mainstream motherboards |
| Additional Features | Motherboard bus speed testing, code search function |
| Power-On Self Test (POST) Support | Displays error codes immediately after POST |
As soon as I unboxed the Optimal Shop 4 Digit PCI and ISA PC Motherboard tester, I was struck by its straightforward, no-nonsense design. The device has a sturdy metal faceplate with a bright, easy-to-read 4-digit display that immediately caught my eye.
Its weight feels substantial but not heavy, giving off a solid, durable vibe.
Holding it in my hand, the first thing I noticed was how accessible the PCI and ISA ports are—easy to reach without moving other components around. Plugging it into my desktop was a breeze, thanks to the standard interfaces.
Once powered on, the quick self-test flashed the error codes right on the screen, making troubleshooting faster. The two-digit codes broke down error history clearly, which saved me from flipping through manuals.
The display is crisp and high-contrast, so you can read error codes even in less-than-ideal lighting. Its support for code search and motherboard bus speed test really adds value, especially if you’re trying to diagnose complex issues or optimize performance.
I found the interface intuitive, with minimal setup required, letting me focus on the diagnostics instead of fiddling with settings.
What I liked most is how it simplifies a normally tedious process. No more guessing or trying to decipher obscure beep codes.
This device gives you instant, understandable feedback, which is a game changer for troubleshooting. Plus, its compatibility with all mainstream motherboards makes it versatile and reliable for various setups.
On the downside, the device’s display, while sharp, is a bit small if you’re working in a cluttered workspace. Also, it’s purely diagnostic—no advanced features like automatic error resolution or logging beyond the basic codes.
Still, for anyone who needs quick, clear motherboard testing, this tool hits the mark.
What Are the Most Effective Tests for Assessing a Motherboard’s Performance?
The most effective tests for assessing a motherboard’s performance include:
- Stress Testing: This involves running demanding applications and benchmarks to push the motherboard to its limits. It helps identify stability issues and thermal performance under load, providing insights into how well the motherboard can handle intensive tasks.
- Memory Benchmarking: This test evaluates the performance of the motherboard’s memory slots by measuring data transfer rates and latency. Tools like MemTest86 can be used to ensure that the RAM is functioning correctly and that the motherboard can support the desired speeds.
- Power Delivery Testing: Assessing the power delivery system of a motherboard is crucial, especially for overclocking. This test checks whether the motherboard can consistently provide the necessary voltage and current to the CPU and other components without fluctuations.
- Temperature Monitoring: Using thermal sensors to monitor component temperatures during operation can help assess the efficiency of the motherboard’s cooling solutions. High temperatures can indicate inadequate cooling or poor design, which can affect performance and longevity.
- Compatibility Tests: This involves checking the motherboard’s compatibility with various components like CPUs, RAM, and GPUs. Ensuring that all parts work seamlessly together is vital for optimal performance and stability.
- BIOS/UEFI Functionality Testing: A thorough evaluation of the motherboard’s BIOS or UEFI interface can reveal how user-friendly and feature-rich it is. This includes testing for options like overclocking settings, fan controls, and firmware updates, which can impact overall performance.
How Can Diagnostic Software Help in Motherboard Testing?
Diagnostic software plays a critical role in identifying issues within a motherboard, ensuring optimal performance and longevity.
- Hardware Monitoring: Diagnostic software can monitor various hardware components on the motherboard, such as temperature, voltage, and fan speeds. This helps in detecting overheating or power supply issues that could lead to hardware failure.
- Stress Testing: By simulating heavy workloads, diagnostic software can stress test the motherboard and its components, revealing weaknesses or faults that may not be apparent under normal usage conditions. This can help in preemptively identifying potential failures before they occur.
- Memory Testing: The software can perform thorough tests on the RAM modules connected to the motherboard, checking for errors or stability issues. This is crucial since faulty memory can lead to system crashes or data corruption.
- Component Compatibility Checks: Diagnostic tools can verify if all components like the CPU, GPU, and other peripherals are compatible with the motherboard. Ensuring compatibility is essential for system stability and performance.
- BIOS Diagnostics: The software can access and analyze the BIOS settings, which are crucial for the motherboard’s functionality. It can help identify misconfigurations that could lead to boot failures or performance issues.
- Benchmarking: Through benchmarking features, diagnostic software can compare the motherboard’s performance against standard metrics. This allows users to assess whether their system is functioning optimally or if there are underlying issues affecting performance.
- Reporting and Logs: Most diagnostic tools generate detailed reports and logs regarding the motherboard’s health and performance. These reports can be invaluable for technicians and users to understand the condition of their hardware and make informed decisions regarding repairs or upgrades.
Which Diagnostic Software is Considered Best for Motherboard Testing?
CPU-Z: While primarily used for gathering detailed information about the CPU, CPU-Z also provides insights into the motherboard’s model, chipset, and memory specifications. This helps users determine if their system components are compatible and functioning as expected.
HWiNFO: This tool goes beyond basic monitoring by offering comprehensive details about every component connected to the motherboard, including temperatures, voltages, and fan speeds. Its real-time monitoring feature can help detect issues before they become critical.
PC-Doctor: Known for its robust diagnostic capabilities, PC-Doctor can perform a wide range of tests to evaluate motherboard performance. It can check for power supply issues, component functionality, and even diagnose more obscure problems that may affect the motherboard’s operation.
Ultimate Boot CD: This tool is a complete suite of diagnostic utilities that can be run outside of the operating system, allowing for thorough testing of hardware, including motherboard diagnostics. It includes various tests to check the integrity and performance of the motherboard and its associated components.
What Physical Inspection Methods Can Identify Motherboard Issues?
The best tests for identifying motherboard issues include a variety of physical inspection methods that can reveal potential problems.
- Visual Inspection: A thorough visual examination of the motherboard can reveal signs of damage such as burnt components, swollen capacitors, or corrosion. Look for any discoloration or physical deformities on the board, as these can indicate overheating or electrical issues.
- Post Code Check: Many motherboards have a built-in diagnostic feature that displays error codes through LEDs or a digital display known as a POST (Power-On Self-Test) code. By referencing the motherboard’s manual, users can interpret these codes to identify specific hardware malfunctions or failures during the boot process.
- Capacitor Testing: Using a multimeter to test the capacitors on the motherboard can help detect faulty components. Look for capacitors that are leaking, bulging, or have a lower capacitance than specified, as these issues can lead to power instability and motherboard failure.
- Resistor and Trace Inspection: Inspecting resistors and traces for continuity issues can help identify problems such as shorts or breaks in the circuit. Using a multimeter to check for continuity along traces can help pinpoint areas that may have been damaged due to overheating or physical stress.
- Socket Inspection: Examining the CPU socket for bent pins or debris can also reveal issues that lead to motherboard malfunctions. Carefully cleaning the socket and ensuring proper alignment of the CPU can help establish a better connection, which is crucial for the system’s stability.
- Thermal Camera Scan: Utilizing a thermal camera can help visualize hot spots on the motherboard that may indicate overheating components. This method allows for non-invasive detection of issues that may not be visible during a standard inspection.
How Does Visual Inspection Aid in Motherboard Diagnosis?
Visual inspection is a crucial first step in diagnosing motherboard issues, allowing technicians to quickly assess physical condition and identify potential problems.
- Identifying Physical Damage: A thorough visual inspection can reveal cracks, burns, or corrosion on the motherboard’s surface. These types of physical damage often indicate a more significant problem, such as overheating or electrical shorts, which could lead to complete failure if not addressed.
- Checking for Loose Connections: Loose or damaged connectors, especially on critical components like RAM slots or CPU sockets, can cause intermittent issues or complete system failure. By visually inspecting these areas, technicians can ensure all components are securely seated and connected, which is vital for proper functionality.
- Inspecting Capacitors: Capacitors can bulge, leak, or burst, which is a common sign of failure on motherboards. During a visual inspection, identifying faulty capacitors can lead to early intervention, potentially saving the motherboard from further damage and costly repairs.
- Examining Traces and Solder Joints: The copper traces on the motherboard are essential for electrical connectivity. A visual check can help spot breaks or burns in these traces, as well as cold solder joints that may lead to unreliable connections. Repairing these issues can often restore functionality without needing a full replacement.
- Assessing Dust and Debris Accumulation: Dust buildup can trap heat and cause overheating, leading to hardware failure. A visual inspection can reveal excessive dust or debris that needs to be cleaned out, enhancing airflow and cooling efficiency to prolong the motherboard’s lifespan.
What Role Does BIOS Play in Testing Motherboard Integrity?
Error codes and beep codes serve as valuable diagnostic tools; they help users identify what specific hardware component may be at fault, allowing for quicker troubleshooting and repairs. The ability to interpret these codes can significantly ease the process of addressing motherboard issues.
Firmware updates provided through BIOS can resolve bugs and improve performance, thus indirectly contributing to motherboard integrity by ensuring that it operates with the latest enhancements and fixes available. Keeping the BIOS updated is a proactive measure in maintaining system health.
Temperature and voltage monitoring features in BIOS help prevent hardware failures by alerting users to abnormal readings. By keeping an eye on these metrics, users can take preventive actions to mitigate risks associated with overheating or power supply issues.
What Are the Common Symptoms of a Failing Motherboard?
- Random Crashes: A failing motherboard may cause your computer to crash unexpectedly, often due to instability in the electrical signals being processed.
- Boot Issues: Problems with booting up can indicate motherboard failure, such as failure to POST (Power-On Self-Test) or continuous reboot loops.
If peripherals like USB devices or graphics cards stop working intermittently or completely, it may signal a problem with the motherboard’s connectivity or power distribution. - Overheating: A motherboard that is failing might not regulate power correctly, leading to overheating components, which can cause thermal throttling or system shutdowns.
- Visual Signs of Damage: Physical damage such as burnt components, swollen capacitors, or corrosion can often be a clear indication of motherboard failure.
Random crashes typically occur because a failing motherboard can no longer maintain a stable connection between the various components, leading to abrupt shutdowns or freezes during operation.
Boot issues are often characterized by failure to complete the POST process, which is essential for initializing the hardware before the operating system loads; this can result in error messages or a blank screen at startup.
Peripheral malfunctions can arise when the motherboard’s ports or circuitry become compromised, leading to devices not being recognized or losing connection intermittently during use.
Overheating issues can stem from inadequate power regulation or failing components on the motherboard, which may prevent proper cooling and lead to dangerous temperature levels that affect performance and longevity.
Visual signs of damage such as burnt traces or bulging capacitors are often the most direct indicators of motherboard failure, as these physical alterations can disrupt the electrical pathways necessary for functionality.
Which Tools Do Professionals Use for Comprehensive Motherboard Testing?
The best tests for motherboard evaluation involve a variety of specialized tools and software designed to assess different aspects of performance and functionality.
- Multimeter: A multimeter is essential for measuring voltage, current, and resistance on the motherboard to ensure that electrical components are functioning correctly. It helps identify short circuits, faulty power supplies, and other electrical issues that can cause system instability.
- POST Card: A POST (Power-On Self-Test) card is a diagnostic tool that plugs into the motherboard’s PCI or PCIe slot to display error codes during the boot process. These codes can help technicians pinpoint hardware malfunctions or failures, making it easier to troubleshoot problems quickly.
- Motherboard Tester: A dedicated motherboard tester is a device that can be used to check the functionality of the motherboard without the need for a complete system setup. It typically allows users to test power connections, component initialization, and signal integrity to ensure that the motherboard is operational.
- Software Diagnostics Tools: Various software applications, such as CPU-Z, HWMonitor, or MemTest86, can be used to assess the motherboard’s performance, monitor temperatures, and test memory. These tools provide detailed information about the system’s hardware and can help identify potential issues through stress testing and benchmarking.
- Thermal Camera: A thermal camera can be used to visualize temperature distribution on the motherboard, identifying hotspots that may indicate overheating components or inadequate cooling solutions. This tool is particularly useful for diagnosing thermal-related failures and ensuring optimal heat management.
- Oscilloscope: An oscilloscope is a powerful diagnostic tool that allows professionals to analyze electrical signals on the motherboard. It can be used to examine signal integrity, timing issues, and noise that may affect the performance of various components, helping to diagnose complex problems that other tools may miss.
- Visual Inspection Tools: A simple yet effective approach involves using magnifying glasses or microscopes to visually inspect the motherboard for physical damage, such as burnt traces, swollen capacitors, or soldering defects. This method can often reveal issues that require immediate attention before further testing.