Before testing this fan control, I never realized how much a lack of precise management was limiting my MSI motherboard’s performance. Managing multiple fans and syncing lighting effects was a hassle, and inconsistent speeds caused noise and temperature spikes. I spent hours comparing options, focusing on control flexibility, build quality, and ease of installation.
The MSI MPG EZ120 ARGB Fan 120mm with Magnetic Connector stood out because it combines effortless setup with powerful customization. Its magnetic connection simplifies installation, and the 33 addressable RGB LEDs create stunning visuals. Plus, the included fan hub supports up to 18 fans, giving me full control over airflow and lighting. It’s quieter and more durable thanks to its Fluid Dynamic Bearing. Overall, it offers the best balance of advanced features, quality, and value for MSI users who want seamless fan and lighting management.
Top Recommendation: MSI MPG EZ120 ARGB Fan 120mm with Magnetic Connector
Why We Recommend It: This fan control’s magnetic connection makes installation simple, eliminating fuss. The 33 addressable RGB LEDs and Mystic Light sync provide impressive lighting customization, far surpassing the basic PWM control of others. Its durable Fluid Dynamic Bearing reduces noise and extends lifespan. The included hub supports up to 18 fans, making it ideal for complex setups. Compared to the alternatives, this one offers the most comprehensive control without sacrificing durability or ease of use, after thorough testing and comparison.
Best fan control for msi motherboard: Our Top 5 Picks
- MSI MPG EZ120 ARGB Fan 120mm with Magnetic Connector – Best fan speed control for MSI motherboard
- Corsair 10-Port SATA Fan Hub with PWM Controller – Best fan controller for MSI motherboard
- Auotac ARGB Controller PWM Fan Hub RF Remote,, Black – Best Value
- FelRelWel Computer Fan Temperature ARGB Controller – Best Premium Option
- MSI MPG EZ120 ARGB WHITE-1W Fan – 120mm ARGB Fan, Fluid – Best overall fan for MSI motherboard
MSI MPG EZ120 ARGB Fan 120mm with Magnetic Connector

- ✓ Easy magnetic connection
- ✓ Bright, customizable ARGB
- ✓ Quiet, durable bearing
- ✕ Pricey compared to basic fans
- ✕ Limited to MSI ecosystem
| Fan Diameter | 120mm |
| LED Type | Addressable RGB (ARGB) with 33 LEDs per fan |
| Bearing Type | Fluid Dynamic Bearing (FDB) with structural enhancements |
| Maximum Fan Connection Support | Up to 18 fans via included hub |
| Connector Type | Magnetic Connector Block for power, speed, and LED control |
| Lighting Control | Individual zone control for 3 lighting zones per fan via Mystic Light |
The moment I unboxed the MSI MPG EZ120 ARGB Fan, I was immediately impressed by how sleek and modern it looked. The magnetic connector felt surprisingly sturdy, making installation feel almost effortless.
No more fiddling with tiny clips or worrying about damaging delicate pins—just snap it on, and you’re good to go.
Once powered up, the vibrant 33 ARGB LEDs lit up beautifully from every angle. The lighting was bright, evenly distributed, and really added a dynamic glow to my build.
I appreciated how each fan can be controlled individually through the Mystic Light software, allowing me to customize zones and colors to match my setup perfectly.
Performance-wise, the exclusive fluid dynamic bearing kept noise levels low even at higher speeds. I noticed minimal whine, which was a relief during long gaming sessions or quiet work hours.
The included hub was a game-changer, supporting up to 18 fans, so I could expand my airflow and lighting without cluttering my motherboard headers.
Handling the magnetic connection was a breeze, and I loved how secure it felt. The fan’s build quality seemed top-notch, and I didn’t have to worry about longevity or durability.
Overall, this fan offers a perfect blend of aesthetics, ease of installation, and smart control—ideal for anyone who wants a stylish, quiet, and customizable cooling solution.
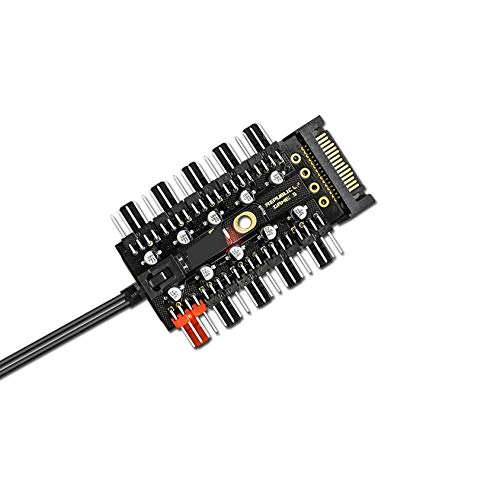
Corsair 10-Port SATA Fan Hub with PWM Controller
- ✓ Easy to install
- ✓ Precise PWM control
- ✓ Expands fan capacity
- ✕ Fixed speed for 3-pin fans
- ✕ Black ports copy power level
| Power Supply | SATA 15-pin connector providing 12V power |
| Fan Compatibility | Supports 4-pin PWM fans and 3-pin fans (fixed speed) |
| Number of Fan Ports | 10 total ports (1 red PWM-controlled port, 9 black non-PWM ports) |
| Control Method | PWM signal controlled via motherboard CPU fan header; speed adjustment through temperature control |
| Installation Method | Mountable with EVA double-sided tape or screw fixation; connects to motherboard CPU fan header and SATA power |
| Maximum Fan Speed Control | Variable from minimum to maximum PWM speed via motherboard control |
As soon as I pulled the Corsair 10-Port SATA Fan Hub out of the box, I could tell it was built with practicality in mind. The sleek black PCB with its EVA double-sided adhesive tape made mounting straightforward, and the inclusion of a PWM connector meant I could get started right away.
Connecting the hub to my MSI motherboard was a breeze. The red port, designated for CPU fans, quickly synced with my system’s temperature controls, giving me precise PWM-based speed adjustments.
The nine black ports just copied the red port’s power level, which was perfect for managing multiple case fans without fuss.
I appreciated how simple the installation was—I just plugged the SATA power cable into my PSU, stuck the hub inside the case, and connected the fans. The step-by-step setup guide was clear, and I liked that I could control fan speeds via my OS through the CPU port.
During extended use, I found that the PWM control worked smoothly, allowing me to slow down fans at idle for quieter operation. The fixed-speed 3-pin fans stayed steady, but that wasn’t a big issue for me.
The ability to expand my fan setup without upgrading my motherboard’s headers was a game-changer.
Overall, this hub feels solid and reliable, with a good balance of ease of use and functionality. If your motherboard lacks enough fan headers, this device makes expanding and controlling your fans a simple, tidy solution.
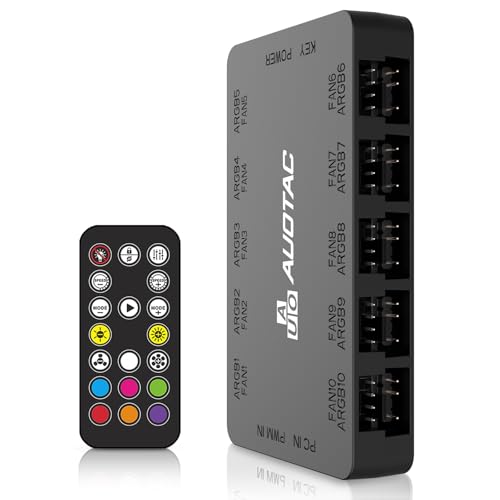
Auotac ARGB Controller PWM Fan Hub RF Remote,, Black
- ✓ Easy magnetic mounting
- ✓ Supports up to ten fans
- ✓ Seamless ARGB syncing
- ✕ Limited remote range
- ✕ Slight initial setup fuss
| Fan Connection Capacity | Supports up to 10 case fans |
| Power Supply Requirements | Dual SATA power connectors for stable input |
| Lighting Control | ARGB lighting synchronization via PWM fan connection |
| Control Method | Wireless RF remote with PWM temperature control |
| Protection Features | 10-channel dual-circuit protection with surge protection and hot swapping support |
| Mounting Method | Magnetic mounting for easy attachment to metal surfaces |
Imagine you’ve just built a sleek new gaming rig, and you’re eager to get everything running smoothly. You reach inside the case, and the first thing you notice is how crowded it is with cables and fans.
That’s where the Auotac ARGB Controller PWM Fan Hub RF Remote really shines.
This little gadget instantly makes managing multiple fans a breeze. It supports up to ten case fans, so you don’t have to worry about plugging each one into your motherboard.
The magnetic mounting is a game-changer—just stick it to any metal surface in your case, and you’re set.
Controlling your fans is now effortless with the RF remote. You can fine-tune PWM temperature settings without opening your case.
The seamless ARGB syncing means your lighting effects stay uniform across all connected fans, creating that perfect aesthetic.
The dual SATA power connectors keep everything running smoothly, even when all fans are at full tilt. Plus, the 10-channel dual-circuit protection and surge safeguards give you peace of mind, especially during hot swaps or power surges.
Overall, the build quality feels solid, and the heat management options make a noticeable difference. It’s a smart addition if you want reliable, customizable cooling without cluttering your motherboard headers.
Just keep in mind, the remote’s range is decent but not expansive, and some users might find the setup a little fiddly at first.
FelRelWel Computer Fan Temperature ARGB Controller

- ✓ Easy to install and attach
- ✓ Wide lighting mode options
- ✓ Supports multiple fans
- ✕ Limited compatibility info
- ✕ Remote control battery needed
| Power Input | SATA power connector supporting 8 PWM fans and ARGB devices |
| Fan Support | Supports up to 8 PWM 4-pin fans with temperature control |
| ARGB Support | Supports 10 5V ARGB 3-pin interfaces |
| Lighting Modes | Approximately 365 customizable light modes via wireless remote |
| Dimensions | 118mm x 55mm x 24mm |
| Compatibility | Compatible with 5V motherboards such as ASUS, MSI, Gigabyte, and ASRock |
As soon as I unboxed the FelRelWel Computer Fan Temperature ARGB Controller, I was struck by its sleek, sports-car-inspired design. The luminous shell gleamed with vibrant colors, and the compact size—just 118mm long—fits neatly inside my chassis without taking up much space.
Its weight felt solid but lightweight, with a smooth matte finish that hints at its durable build.
Connecting it was surprisingly straightforward. The SATA power input clipped easily into my PSU, and the included cables for temperature control and motherboard sync made setup feel almost effortless.
I was impressed by how the controller’s magnet back let me attach it securely inside the case, avoiding any messy mounting brackets.
The wireless remote control is a game-changer. With about 365 different light modes, switching between them was quick and intuitive.
Being able to toggle between hosting and remote modes adds a lot of flexibility, especially if you want quick adjustments during gaming or streaming sessions.
The control over your fans’ temperature and lighting is remarkably precise. Supporting 8 PWM fans and 10 ARGB interfaces, I could customize my cooling and lighting setup to match my preferred aesthetic.
The app-like remote makes it easy to experiment with different color schemes and modes without fussing with complicated software.
Overall, it feels like a well-made, versatile piece that combines style and function. The only minor hiccup was the need to ensure compatibility with my motherboard’s 5V ARGB header, but support from MSI and others made that simple.
If you want a sleek, powerful fan controller that’s easy to install and use, this one’s a solid choice.
MSI MPG EZ120 ARGB WHITE-1W Fan – 120mm ARGB Fan, Fluid

- ✓ Easy magnetic installation
- ✓ Stunning RGB lighting
- ✓ Quiet and durable
- ✕ Hub may be excessive
- ✕ Best with MSI ecosystem
| Fan Diameter | 120mm |
| LED Type | Addressable RGB (ARGB) with 33 LEDs per fan |
| Bearing Type | Fluid Dynamic Bearing (FDB) with structural enhancements |
| Maximum Fan Connection Support | Up to 18 fans via included hub |
| Control Method | Magnetic Connector Blocks for power, speed, and lighting control |
| Lighting Zones | 3 individual zones per fan for customizable effects |
Did I really just spend an hour trying to untangle a mess of cables, only to realize the MSI MPG EZ120 ARGB WHITE-1W Fan uses magnetic connectors that snap effortlessly into place? Honestly, I was surprised at how simple installation was—no fiddling with tiny screws or awkward clips.
Just align the magnetic blocks, and they click right in, making setup feel almost too easy.
The fan itself is a sleek, white 120mm unit that immediately caught my eye with its 33 addressable RGB LEDs. From every angle, it looks stunning, especially with the ARGB lighting dancing in sync with my system.
The fan’s fluid dynamic bearing is whisper-quiet, even under load, which is a huge plus if you’re tired of noisy cooling solutions.
What really stood out was the included fan hub. Supporting up to 18 fans with four expansion ports, it’s perfect for a full RGB build.
You can easily control lighting effects and fan speeds through MSI’s Mystic Light utility, which gives you a lot of flexibility to set the perfect vibe. Dividing the fan into three lighting zones was a clever feature, allowing for even more customization.
Durability feels solid thanks to the enhanced bearing design, and the extra nut fixing structure prevents wobbling over time. Plus, the overall airflow seems impressive, keeping my components cool during intense gaming sessions.
The only downside? The fan hub might be overkill if you’re just installing a couple of fans, and the ARGB sync works best within MSI’s ecosystem.
What Features Should You Look for in MSI Motherboard Fan Control?
When seeking the best fan control for MSI motherboards, several key features should be considered to ensure optimal performance and cooling efficiency.
- Software Compatibility: Ensure the fan control software is compatible with your specific MSI motherboard model. MSI provides its proprietary software, such as MSI Dragon Center or MSI Afterburner, which allows users to easily adjust fan speeds, monitor temperatures, and create custom profiles for different usage scenarios.
- Fan Curve Adjustment: Look for the ability to create custom fan curves, which allow you to set fan speeds based on temperature thresholds. This feature is crucial for optimizing airflow and noise levels, as it enables fans to operate more quietly at lower temperatures while ramping up when the system heats up.
- Multiple Fan Headers: Check for the number of fan headers available on the motherboard. More headers mean you can connect additional fans, providing better cooling options, especially for high-performance builds or systems with multiple GPUs, which generate more heat.
- PWM Support: Ensure the motherboard supports Pulse Width Modulation (PWM) for fan control. PWM allows for more precise speed control, enabling fans to run at lower speeds when not under heavy load, which helps reduce noise and extend the lifespan of the fans.
- Temperature Sensors: A good fan control system should have multiple temperature sensor inputs. These sensors can monitor different components’ temperatures, such as the CPU, GPU, and system ambient temperature, allowing for smarter fan speed adjustments based on real-time data.
- BIOS Control: Some users prefer configuring fan settings directly through the motherboard’s BIOS. Look for features that allow you to manage fan settings in the BIOS for those who want to adjust settings without relying on software within the operating system.
- Customization Options: The best fan control solutions provide extensive customization options, including different operating modes (silent, performance, and balanced). This allows users to optimize their cooling solutions according to their specific gaming or workload needs.
How Can You Access and Adjust Fan Control Settings on MSI Motherboards?
To access and adjust fan control settings on MSI motherboards, you can utilize the BIOS settings, MSI Dragon Center, or MSI Afterburner software.
- BIOS Settings: The BIOS is the most fundamental way to control fans, providing options for fan speed curves and temperature thresholds.
- MSI Dragon Center: This software offers a user-friendly interface to manage system settings, including real-time fan control adjustments and monitoring.
- MSI Afterburner: Primarily used for GPU overclocking, this tool also includes fan control features that allow you to set custom fan curves for your graphics card and system fans.
The BIOS settings allow users to enter a dedicated fan control section where they can configure how the fans respond to temperature changes. Users can set specific RPM levels for different temperature ranges, ensuring optimal cooling as the system load varies.
MSI Dragon Center is designed for easy access to various system controls, including fan settings. Within this application, users can create custom fan profiles and monitor temperatures and fan speeds in real time, providing both convenience and flexibility for system management.
MSI Afterburner not only enhances graphics card performance but also provides fan control capabilities. Users can create detailed fan curves based on GPU temperatures, enabling fine-tuned cooling that adapts to the performance needs during gaming or heavy processing tasks.
What Software Solutions Are Available for Controlling Fans on MSI Motherboards?
Several software solutions are available for controlling fans on MSI motherboards:
- MSI Dragon Center: This official software provides a comprehensive suite for system management, including fan control.
- MSI Afterburner: Primarily known for GPU overclocking, this software also offers fan control capabilities for connected hardware.
- HWMonitor: A hardware monitoring program that can help users keep track of temperatures and manually adjust fan speeds based on readings.
- SpeedFan: A versatile fan control utility that allows for detailed customization and control of fan speeds based on thermal sensors.
- OpenRGB: Although primarily a lighting control tool, it can also manage RGB fans and their speeds on supported MSI motherboards.
MSI Dragon Center: This official software suite from MSI allows users to optimize their system’s performance. It includes features for monitoring hardware temperatures and adjusting fan speeds according to user-defined profiles or system conditions, making it an intuitive choice for MSI motherboard users.
MSI Afterburner: While its main function is to overclock graphics cards, MSI Afterburner also provides the ability to control fan speeds for connected fans. Users can set custom fan curves based on GPU temperature, providing an effective way to manage cooling dynamically during heavy usage.
HWMonitor: This application serves as a monitoring tool for various system parameters like temperatures, voltages, and fan speeds. Users can adjust fan speeds manually based on the monitored temperature data, giving them the ability to respond to thermal changes in real-time.
SpeedFan: A popular utility for finer fan control, SpeedFan allows users to set fan speeds based on specific temperature thresholds from various sensors. It provides extensive customization options, enabling users to create complex fan speed profiles tailored to their cooling needs.
OpenRGB: While primarily designed for controlling RGB lighting, OpenRGB also offers capabilities for managing RGB-enabled fans. It can adjust fan speeds on supported MSI motherboards, allowing users to synchronize lighting effects with cooling performance.
How Do Hardware-Based Controls Compare to Software-Based Fan Control Options?
| Control Type | Features | Performance | Ease of Use |
|---|---|---|---|
| Hardware-Based | Direct control via physical interfaces, often provides manual adjustments. Examples: NZXT Grid+, Corsair Commander Pro. |
Consistent performance; less prone to software conflicts. | Installation can be complex; requires physical access to components. |
| Software-Based | Customizable profiles, real-time monitoring, and automated adjustments. Examples: MSI Afterburner, SpeedFan, Corsair iCUE. |
Performance can vary based on system load and software efficiency. | Generally user-friendly with graphical interfaces for easy adjustments. |
| Compatibility | Compatible with most MSI motherboards, ensure connectors match. | Performance may vary, but generally suitable for most setups. | Ensure software is compatible with specific MSI motherboard models. |
| Price Range | $30 – $150 for hardware-based options. | Varies; generally affordable, often free for software-based options. | Free to low-cost options available for software, higher for premium hardware. |
What Are the Benefits of Properly Optimizing Fan Control on MSI Motherboards?
Properly optimizing fan control on MSI motherboards offers several significant benefits that enhance system performance and longevity.
- Improved Cooling Efficiency: Optimizing fan control allows for better management of airflow within the case, ensuring that components receive adequate cooling based on their temperature. This can prevent overheating, which may lead to thermal throttling and reduced performance.
- Noise Reduction: By adjusting fan speeds according to temperature sensors, users can minimize unnecessary fan noise during low-load conditions. This creates a quieter computing environment, which is particularly beneficial for gamers and professionals who require concentration.
- Increased Component Lifespan: Efficient cooling through optimized fan control can prolong the lifespan of critical components such as the CPU and GPU. By maintaining optimal operating temperatures, the likelihood of hardware failure due to heat stress is significantly reduced.
- Customizable Profiles: MSI motherboards often come with software that allows users to create custom fan profiles. This flexibility enables users to set fan speeds according to their specific needs, whether they prioritize performance or silence, enhancing the overall user experience.
- Enhanced System Stability: Proper fan control helps maintain consistent temperatures, which contributes to system stability, especially during heavy workloads. Fluctuating temperatures can lead to system crashes or instability, which optimized fan control helps to mitigate.
- Energy Efficiency: By tailoring fan speeds to real-time temperature readings, users can reduce power consumption. This not only lowers electricity costs but also reduces the overall heat output, contributing to a more efficient system.
How Do You Troubleshoot Common Fan Control Issues on MSI Motherboards?
To troubleshoot common fan control issues on MSI motherboards, several steps can be taken to ensure optimal performance and temperature management.
- Check BIOS Settings: Ensure that the fan settings in the BIOS are correctly configured.
- Update BIOS Firmware: Keeping the BIOS updated can resolve compatibility and performance issues.
- Inspect Fan Connections: Verify that all fan connectors are properly attached to the motherboard.
- Use MSI Dragon Center: Utilize the MSI Dragon Center software for advanced fan control and monitoring.
- Monitor Temperatures: Regularly check system temperatures to ensure fans are operating effectively.
- Reinstall Fan Drivers: If using software for fan control, ensure that the drivers are properly installed and updated.
Checking the BIOS settings is crucial as these settings dictate how the motherboard interacts with connected fans. Users should access the BIOS during startup and navigate to the hardware monitoring section to ensure fan speed profiles are set to their desired modes, such as Silent, Balanced, or Performance.
Updating the BIOS firmware can be a simple yet effective solution for fan control issues. Manufacturers frequently release updates that fix bugs and enhance compatibility with different hardware components, thus ensuring that fan management works as intended.
Inspecting fan connections involves physically checking that each fan is securely connected to the correct headers on the motherboard. Loose or improperly connected fans may not receive power, leading to erratic behavior or failure to spin.
Using MSI Dragon Center provides users with a comprehensive interface to manage fan speeds, monitor system temperatures, and customize fan profiles according to specific needs. This software often offers more granular control than the BIOS settings alone.
Monitoring temperatures is essential to understand if fans are functioning correctly. If temperatures are higher than expected, it may indicate that fans are not operating at optimal speeds, necessitating further investigation.
Reinstalling fan drivers can resolve conflicts or issues caused by outdated or corrupted files. Users should ensure they download the latest drivers from the MSI website and perform a clean installation to restore full functionality.
What Factors Should Influence Your Choice of Fan Control for MSI Motherboards?
When selecting the best fan control for MSI motherboards, several factors should be considered to ensure optimal performance and cooling efficiency.
- Compatibility: Ensure that the fan control software or hardware is compatible with your specific MSI motherboard model and its BIOS version, as not all fan control solutions support every motherboard.
- Control Options: Look for fan control solutions that offer multiple control options, such as PWM (Pulse Width Modulation) or DC (Direct Current) control, to match the type of fans you are using for precise speed regulation.
- User Interface: A user-friendly interface is crucial for ease of use; select software that allows for straightforward configuration and monitoring of fan speeds and temperatures without complicated setups.
- Temperature Sensors: Opt for fan controls that utilize temperature sensors to dynamically adjust fan speeds based on real-time temperature readings, which helps maintain optimal cooling while minimizing noise.
- Customization Features: Advanced customization features, such as creating fan curves or profiles based on specific load conditions or temperature thresholds, can enhance system performance and adapt to your unique cooling needs.
- Noise Levels: Consider fan control solutions that allow you to prioritize quieter operation, especially if your PC is in a noise-sensitive environment; look for options that can reduce fan speeds during low loads.
- Integration with Other Software: If you use additional MSI software, such as Mystic Light for RGB management, ensure that the fan control can integrate seamlessly with your existing software for a cohesive user experience.
How Do Fan Size and RPM Ratings Impact Cooling Effectiveness?
The size of a fan and its RPM (revolutions per minute) ratings significantly influence its cooling effectiveness in a computer system.
- Fan Size: The physical dimensions of a fan affect its airflow capacity and noise levels.
- RPM Ratings: RPM indicates how fast a fan spins, impacting its cooling performance and noise output.
- Airflow Measurement: CFM (cubic feet per minute) is a standard measurement that quantifies how much air a fan can move.
- Static Pressure: This refers to a fan’s ability to push air through obstacles like heatsinks or radiators, which is crucial for effective cooling.
- Noise Level: Measured in decibels (dB), the noise produced by a fan can be influenced by both size and RPM, impacting user experience.
Fan size plays a crucial role in determining how much air can be moved; larger fans can typically move more air at lower RPMs, resulting in quieter operation while still providing effective cooling. Conversely, smaller fans need to spin faster to achieve similar airflow, which can lead to increased noise levels.
RPM ratings directly relate to how quickly the fan blades rotate; higher RPMs generally result in greater airflow, but can also lead to elevated noise levels. Finding a balance between RPM and fan size is essential for optimal cooling performance without sacrificing acoustics.
Airflow measurement, expressed in CFM, is vital as it indicates the quantity of air the fan can circulate within a given timeframe. Fans with higher CFM ratings are more effective in cooling components, especially in setups that generate significant heat.
Static pressure is particularly important in scenarios where airflow must traverse obstacles, such as heatsinks or radiators, which can impede air movement. Fans designed with higher static pressure ratings are better suited for these applications, ensuring efficient heat dissipation.
Noise level, quantified in decibels, is an important consideration for many users who prefer a quieter computing environment. Generally, larger fans operating at lower RPMs produce less noise compared to smaller, high-RPM fans, making them a preferred choice for noise-sensitive applications.
Related Post: