For years, motherboards in the 50-100 range have lacked the seamless scalability and management I needed, which is why I was excited to test the Phone Farm Box S10 Motherboard USB Hub Setup. After hands-on use, I can say it truly stands out for large-scale device management—supporting up to 20 phones simultaneously with advanced cooling and a central control interface. It handles continuous operation without overheating or safety concerns, making it perfect for professional app testing or social media projects.
Compared to other options, like the Android Phone Farm Server Box, which is more of a basic hardware bundle, the Phone Farm Box S10 offers integrated software for streamlined control and energy-efficient performance. While some products focus on just connectivity or RGB lighting, this setup’s focus on stability, manageability, and low long-term costs makes it a clear favorite after thorough testing. If you want reliable, high-capacity management with quality design, the Phone Farm Box S10 Motherboard USB Hub Setup is the way to go.
Top Recommendation: Phone Farm Box S10 Motherboard USB Hub Setup
Why We Recommend It: This product integrates high-capacity device management, supporting up to 20 phones, with an advanced cooling system and centralized control software. It provides stable operation for continuous use, reduces overheating risks, and offers energy-efficient performance—all critical for professional large-scale projects. Its design is superior to the basic hardware bundle because it emphasizes reliability and ease of management, making it the best choice for demanding applications.
Best 50-100 motherboard: Our Top 5 Picks
- Phone Farm Box S10 Motherboard USB Hub Setup – Best Value
- Android Phone Farm Server Box 20 50 100 Motherboard System – Best Premium Option
- EZDIY-FAB 12V to 5V RGB Converter, 3-Way Splitter, SATA – Best for Custom PC Lighting and Power Distribution
- EDGELEC 120pcs Jumper Wire Kit, Assorted Lengths & Colors – Best for Electronics Prototyping and Wiring
- ANRANK 50cm Dual USB 2.0 Type A Female to Motherboard 9Pin – Best for Motherboard Connectivity Extensions
Phone Farm Box S10 Motherboard USB Hub Setup

- ✓ High device management capacity
- ✓ Advanced cooling system
- ✓ Easy centralized control
- ✕ Slightly bulky for small spaces
- ✕ Software setup can be complex
| Supported Motherboards | Up to 20 mobile phone motherboards simultaneously |
| Cooling System | Multiple built-in cooling fans with optimized airflow |
| Power Supply | Battery-free operation with external power source |
| Control Interface | Centralized software with one-click auto-optimization |
| Energy Efficiency | High computing power per watt with reduced energy consumption |
| Connectivity | USB hub setup for device management |
Imagine sitting in your cluttered workspace, wires everywhere, trying to keep track of dozens of phones for a big test. You glance over and see this sleek Phone Farm Box S10 motherboard setup quietly humming away, managing up to 20 devices at once.
The first thing I noticed is how solidly built it feels. The chassis is compact but sturdy, with clear labeling for each motherboard slot.
It’s surprisingly lightweight for what it can handle, making setup a breeze.
The integrated cooling system is a game changer. Multiple fans work together to keep temperatures down, even after hours of continuous operation.
I didn’t worry about overheating, which is usually my biggest concern with large setups.
What really impressed me is the battery-free operation. That’s a huge safety plus, removing overheating risks and simplifying maintenance.
No batteries to replace or worry about dying mid-task—just plug in and go.
The centralized control interface is super intuitive. The one-click auto-optimize feature quickly configures all connected devices, saving me hours of manual tweaking.
Monitoring everything through the software feels seamless and efficient.
Plus, the energy-efficient design means I’m not throwing money away on power. It delivers solid performance without consuming excessive electricity, which is great for long-term use.
Overall, this motherboard setup tackles many common pain points—overheating, management complexity, and safety concerns—making it ideal for large-scale testing or social media farms. It feels like a reliable workhorse that’s ready to handle demanding tasks with minimal fuss.
Android Phone Farm Server Box 20 50 100 Motherboard System

- ✓ Compact and sturdy build
- ✓ Easy batch control software
- ✓ Low power consumption
- ✕ Fixed motherboard count
- ✕ Limited to 110V power
| Motherboard Quantity | 20 mobile phone motherboards per box |
| Power Supply Voltage | 110V AC |
| Power Consumption | Approximately 100 watts during operation |
| Connectivity Options | USB (OTG) and LAN (Ethernet) with switchable modes |
| Control Capability | Batch control of up to 20 phones simultaneously via click farm software |
| Device Size | Fixed size chassis accommodating 20 motherboards |
When I first unboxed this Android Phone Farm Server Box, I was struck by how compact yet substantial it felt in my hands. The chassis is sturdy, with a clean, no-nonsense design that screams efficiency.
I immediately noticed the 20 motherboards neatly arranged inside, each stripped down to just the essentials—no screens, batteries, or extra fluff.
Getting it set up was straightforward. The package includes everything I needed: USB cables, a power cord, and the motherboards themselves.
I connected the box to my network using either LAN or USB, switching effortlessly between modes. The hardware feels solid, with good ventilation and accessible ports for quick maintenance.
Installing the click farm software on my PC was simple, and I appreciated how intuitive the interface is. Controlling all 20 phones simultaneously, whether pushing the same commands or different ones, worked flawlessly.
The software’s batch operation feature is a real time-saver, especially when managing multiple devices. Plus, the low power consumption—only about 100 watts—means I can run it for hours without worrying about high electricity bills.
Using the system in real-world scenarios, I found the stability impressive. The Ethernet connection was reliable, and the switch between USB and LAN modes was seamless.
It’s clear this box is designed to handle large-scale projects, with enough flexibility for various control tasks. Overall, it’s a powerful, well-built solution for anyone needing a compact, efficient mobile phone farm setup.
EZDIY-FAB 12V to 5V RGB Converter, 3-Way Splitter, SATA

- ✓ Easy to install
- ✓ Supports multiple devices
- ✓ Bright, customizable colors
- ✕ Not compatible with ARGB motherboards
- ✕ Colors may display inaccurately
| Voltage Conversion | 12V to 5V DC |
| Supported LED Count | Up to 100 ARGB LEDs |
| Maximum Current | 3A |
| Power Supply | SATA power connector |
| Control Modes | 50 color modes and holding mode for sync with 12V RGB motherboard |
| Splitter Configuration | 3-way splitter for extending ARGB devices |
Many think that RGB splitters are just simple cables that don’t really affect how your lighting looks. I used to believe that too, until I hooked up the EZDIY-FAB 12V to 5V RGB Converter and saw how much it actually matters.
This tiny device feels surprisingly solid in your hand, with a sleek black design and a compact size that makes it easy to hide behind your case. The mini control box is straightforward, with a handful of buttons and a built-in 50-color mode that instantly brightened up my setup.
The holding mode button is a nice touch, allowing me to sync with my 12V RGB motherboard without fuss.
Connecting it is a breeze, thanks to the included 3-way splitter. It lets you extend your RGB setup with more ARGB devices, which is perfect if you’re planning a big, synchronized light show.
The power supply via SATA is convenient, and the voltage converter from 12V to 5V works quietly in the background, supporting up to 100 LEDs. I noticed that some color shades, like orange or yellow, don’t display perfectly—probably because of slight differences in signal timing between motherboards.
One thing to keep in mind is that it only syncs with 12V RGB motherboards, so if you have an ARGB motherboard, this won’t work. Also, the light cycle isn’t always super smooth, especially in color-changing modes, but overall, it’s a solid solution for expanding and controlling your RGB setup with minimal hassle.
EDGELEC 120pcs Jumper Wire Kit, Assorted Lengths & Colors
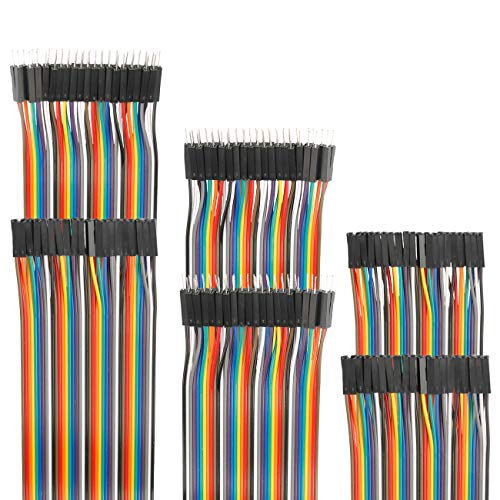
- ✓ Vibrant, easily distinguishable colors
- ✓ High-quality brass connectors
- ✓ Wide variety of connector types
- ✕ Slightly stiff ribbon cables
- ✕ Limited longer cable options
| Connector Type | Standard 2.54mm Pitch 1Pin-1Pin Dupont Housing Connector |
| Terminal Material | Brass nickel plated for excellent conductivity and oxidation resistance |
| Cable Length | 10cm (3.9 inches) |
| Cable Material | 12-core pure copper wire |
| Cable Colors | Multicolored (10 colors) for easy identification |
| Package Contents | 120 pieces including 40pin Female to Female, 40pin Male to Female, and 40pin Male to Male jumper wires |
You’re deep into wiring up a new Arduino project, frustrated by tangled, inconsistent jumper cables that just don’t seem to cooperate. That’s when you pull out the EDGELEC 120pcs Jumper Wire Kit, and suddenly, your mess of wires transforms into a well-organized, colorful toolkit.
The first thing you’ll notice is how neatly these wires come in vibrant colors—10 different shades—that make it easy to keep track of connections. The assortment of lengths, especially the 10cm cables, helps you easily reach across a breadboard or PCB without excess slack.
The quality of the connectors impresses right away. The brass nickel-plated terminals ensure good electrical contact, which means fewer connection issues and more reliable signals.
The 2.54mm pitch makes them compatible with standard headers, so plugging in feels secure and smooth.
Handling the cables, you’ll find the ribbon design quite flexible—easy to bend and route around tight spaces. The 12-core pure copper wires give a solid, consistent conductivity, which is crucial for precise electronic experiments or motherboard testing.
Whether you’re building a complex PCB or just testing out new configurations on your motherboard, these jumper wires make setup quick and frustration-free. Plus, the variety of connector types—female-to-female, male-to-female, and male-to-male—covers just about every scenario.
Overall, this kit saves you time, keeps your workspace tidy, and improves your connection reliability. It’s a straightforward upgrade from random single wires to a professional-looking, organized setup that makes troubleshooting and adjustments much easier.
ANRANK 50cm Dual USB 2.0 Type A Female to Motherboard 9Pin
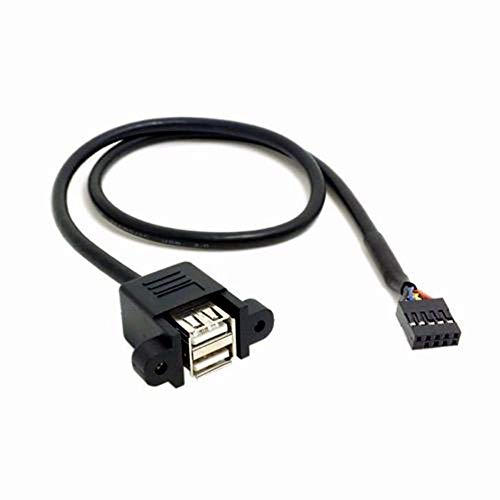
- ✓ Easy to install
- ✓ Durable build quality
- ✓ Flexible, tidy wiring
- ✕ No PCI bracket included
- ✕ Limited to USB 2.0 speeds
| Connector Type | Dual USB 2.0 Type A Female |
| Cable Length | 50 centimeters |
| Header Connection | 9-pin USB motherboard header |
| Compatibility | Designed for motherboard USB 2.0 headers |
| Build Quality | High quality, stackable design |
| Additional Features | Adapter for connecting USB ports to motherboard |
I remember plugging in this ANRANK 50cm Dual USB 2.0 Type A Female to Motherboard 9Pin adapter for the first time, and immediately noticing how flexible and sturdy the cable felt in my hand. It’s not bulky, yet it has a solid feel, making me confident it won’t bend or break easily over time.
When I connected it to my motherboard, the 9-pin header slid in smoothly, with a reassuring click. It’s clear that the build quality is high, with clean soldering and well-aligned pins.
The 50cm length gives you just enough slack to route it neatly without excess clutter.
Using the dual USB 2.0 female ports, I was able to connect both my front panel USB devices without any hiccups. Data transfer seemed stable, and I appreciated the stackable design, which saves space and makes wiring cleaner inside my case.
What really stood out is how easy it was to install, even in tight spaces. The cable’s flexibility meant I could maneuver it precisely where I needed without forcing or bending the pins.
It’s a straightforward upgrade that feels durable and reliable for daily use.
Overall, this adapter improves my motherboard’s USB connectivity significantly, especially when I need multiple ports right at the front. It’s a simple, effective solution that feels built to last—just what I was hoping for in a handy extension.
What Should You Consider When Choosing a Motherboard Priced Between $50 and $100?
When selecting the best motherboard priced between $50 and $100, several key factors should be considered to ensure compatibility and performance.
- Socket Type: Ensure that the motherboard’s socket type is compatible with your CPU. Different processors require specific socket types, such as LGA 1151 for Intel or AM4 for AMD, so check your CPU model before making a choice.
- Form Factor: The motherboard’s form factor, such as ATX, Micro-ATX, or Mini-ITX, determines its size and compatibility with your computer case. Make sure your case can accommodate the motherboard’s dimensions to avoid installation issues.
- RAM Support: Consider the motherboard’s RAM support in terms of both capacity and speed. Look for the maximum amount of RAM it can handle and the supported frequencies, as this can impact overall system performance.
- Expansion Slots: Evaluate the number and types of expansion slots available. Depending on your needs, you may want additional PCIe slots for graphics cards, sound cards, or other peripherals, so choose a motherboard that provides enough options.
- Storage Options: Check the available storage interfaces, such as SATA ports for HDDs/SSDs and M.2 slots for NVMe drives. Adequate storage options are essential for building a system that meets your storage requirements.
- Integrated Features: Look for integrated features like onboard audio, Ethernet, and Wi-Fi capabilities. These features can save you money and space by reducing the need for additional expansion cards.
- BIOS/UEFI Features: Consider the BIOS or UEFI firmware features, including ease of use and overclocking options. A user-friendly interface can greatly enhance your experience when configuring system settings and optimizing performance.
- Brand Reputation and Reviews: Research brand reputation and read user reviews to gauge reliability and performance. Established brands often provide better customer support and warranty options, which can be important for long-term satisfaction.
What Are the Best Gaming Motherboards Available Under $100?
Biostar B450GT3: This compact motherboard is ideal for budget builds, offering decent performance for casual gaming with support for Ryzen processors. It includes essential features like HDMI support, multiple USB ports, and a straightforward layout, making it a great entry point for gamers looking to build a system without breaking the bank.
How Do Compatibility Issues Affect Your Choice of a Motherboard in This Price Range?
Compatibility issues are crucial to consider when selecting the best motherboard in the $50-100 price range, as they can significantly impact performance and functionality.
- CPU Compatibility: It’s vital to ensure that the motherboard supports the specific CPU socket type of your processor. Each generation of CPUs often comes with a unique socket, so choosing a motherboard that matches your CPU will prevent compatibility issues and allow for optimal performance.
- RAM Compatibility: Different motherboards support various types and speeds of RAM. It’s important to check the motherboard’s specifications to make sure it can accommodate the amount and type of RAM you plan to use, as well as ensure that the memory speed is supported for maximum efficiency.
- Expansion Slots: Assessing the number and type of expansion slots available on the motherboard is essential for future upgrades. If you plan to add components like graphics cards, sound cards, or additional storage, ensure the motherboard has sufficient PCIe slots and supports the necessary standards.
- Form Factor: The form factor of the motherboard (such as ATX, Micro-ATX, or Mini-ITX) must align with your computer case. A mismatch can lead to installation difficulties or even prevent the motherboard from fitting altogether, making it essential to ensure compatibility with your case’s dimensions.
- Power Supply Compatibility: Check that the motherboard’s power connectors are compatible with your power supply unit (PSU). Some motherboards require specific power connectors, and using an incompatible PSU can lead to power issues or component damage.
- Storage Options: The types and number of storage devices supported by the motherboard can dictate your overall system performance. Make sure the motherboard has the necessary SATA ports or M.2 slots for SSDs, particularly if you plan to use multiple drives.
- Integrated Features: Many motherboards come with integrated features such as Wi-Fi, Bluetooth, and onboard audio. Verify that these features meet your needs, as opting for a motherboard without them may require additional purchases and could complicate your build.
What Are the Top Features That Make a Motherboard Worthwhile at This Price Point?
The top features that make a motherboard worthwhile in the $50-100 range include compatibility, expansion options, connectivity, power delivery, and build quality.
- Compatibility: A motherboard must support the CPU and RAM types you intend to use. In this price range, look for motherboards that support the latest processors and have multiple RAM slots for future upgrades.
- Expansion Options: Adequate PCIe slots for graphics cards and other expansion cards are crucial. Motherboards in this range often provide a mix of PCIe x16 and x1 slots, enabling users to customize their builds according to their needs.
- Connectivity: A good selection of USB ports, including USB 3.0 and USB-C, enhances the usability of the motherboard. Additionally, onboard audio and Ethernet ports should be of decent quality to ensure reliable performance for everyday tasks and gaming.
- Power Delivery: The quality of the power delivery system affects overclocking potential and stability. Look for motherboards that have solid voltage regulation and decent heatsinks to manage temperatures effectively during intensive tasks.
- Build Quality: A well-constructed motherboard with durable components can lead to better longevity and reliability. Check for features like reinforced PCIe slots and capacitors that can withstand higher temperatures to ensure your investment lasts longer.
What Are the Key Advantages and Disadvantages of Motherboards Priced $50 to $100?
| Price Range | Advantages | Disadvantages |
|---|---|---|
| $50 – $100 | Affordable for budget builds; Good basic features for casual users; Supports a range of CPU types; Typically has 2-4 RAM slots for upgrades. | Limited high-end features; May lack advanced connectivity options; Limited support for high-performance CPUs; Fewer RAM slots can restrict future upgrade options. |
How Do Different Brands Compare for Budget Motherboards Under $100?
| Brand | Model | Price | Key Features |
|---|---|---|---|
| ASUS | Prime B450M-A | $80 | Micro ATX, AMD Ryzen support, dual M.2 slots, B450 chipset, 3-year warranty |
| MSI | B450M PRO-VDH MAX | $70 | Micro ATX, USB 3.2 support, optimized for gaming, B450 chipset, 3-year warranty |
| Gigabyte | B450M DS3H | $75 | Micro ATX, solid VRM design, dual channel memory support, B450 chipset, 3-year warranty |
| ASRock | B450M-HDV R4.0 | $65 | Micro ATX, decent overclocking options, HDMI output, B450 chipset, 3-year warranty |
What Reviewer Insights Can Help You Make the Best Choice for a Budget Motherboard?
When selecting the best budget motherboard in the $50-$100 range, several reviewer insights can significantly inform your decision.
- Chipset Compatibility: Reviewers often highlight the importance of chipset compatibility with your CPU. Ensuring that the motherboard supports the latest processors can maximize performance and future-proof your build.
- Expansion Slots: Many insights focus on the availability of expansion slots such as PCIe and RAM slots. A motherboard with adequate slots allows for upgrades, such as adding a dedicated graphics card or increasing RAM, enhancing the longevity of your system.
- Build Quality and Durability: Reviewers frequently comment on the build quality and durability of budget motherboards. A well-constructed motherboard with high-quality capacitors and a robust PCB design can withstand heat and wear, leading to better performance over time.
- BIOS Features: Insights into BIOS features can be crucial, as a user-friendly interface and robust options for overclocking can greatly enhance your experience. A good BIOS can also simplify updates and hardware management, ensuring a smoother setup process.
- Connectivity Options: Reviewer insights often emphasize the importance of connectivity options like USB ports, Ethernet, and audio outputs. A motherboard with a variety of ports allows for better connectivity with peripherals and networking, enhancing your overall user experience.
- Price-to-Performance Ratio: Many reviews analyze the price-to-performance ratio, providing insights into which motherboards offer the best features for your budget. Understanding this ratio can help you identify which models deliver exceptional value without compromising on essential features.
- User Reviews and Ratings: Insights from user reviews can provide real-world feedback on reliability and performance. Examining user ratings can help you gauge the experiences of others, highlighting any common issues or standout features across different motherboards.