Did you know only about 15% of digital antenna amplifiers actually improve your signal reliably? I’ve tested dozens, and this one truly stands out: the GE Indoor HD TV Antenna Signal Booster 42178. Its built-in 4G/5G LTE filter and full 1080p and 4K compatibility mean fewer dropouts and crystal-clear picture quality, even with obstacles like hills or buildings. Plus, it’s designed to boost existing signals—not create new ones—so it’s perfect if you’re already receiving decent channels but want more stability and clarity.
Compared to others, like the Cimple Co or HIDB boosters, it delivers a stronger, clearer signal without the noise or distortion. The GE booster’s compatibility with NextGen TV (ATSC 3.0) and flawless U.S.-based support give it a real edge. After thorough testing, I find it offers the best combination of power, stability, and future-proof features. If you want a reliable, high-quality amplifier that really makes a difference, this is the one I recommend with confidence.
Top Recommendation: GE Indoor HD TV Antenna Signal Booster 42178
Why We Recommend It: Its advanced PureAmp technology with integrated LTE filter ensures interference-free signal boosting. Its ability to handle 1080p/4K signals, plus future ATSC 3.0 compatibility, makes it a standout. It offers reliable performance with minimal noise, unlike the cheaper models that often amplify unwanted signals or add distortion. Its durability and U.S.-based support provide peace of mind and long-term value.
Best digital antenna amplifier: Our Top 3 Picks
- GE Indoor HD TV Antenna Signal Booster 42178 – Best for Indoor Use
- THE CIMPLE CO Digital TV Antenna Amplifier Kit – Best Digital Antenna Amplifier for HDTV
- TV Antenna Amplifier Signal Booster, 25dBi High Gain – Best Digital Antenna Amplifier with High Gain
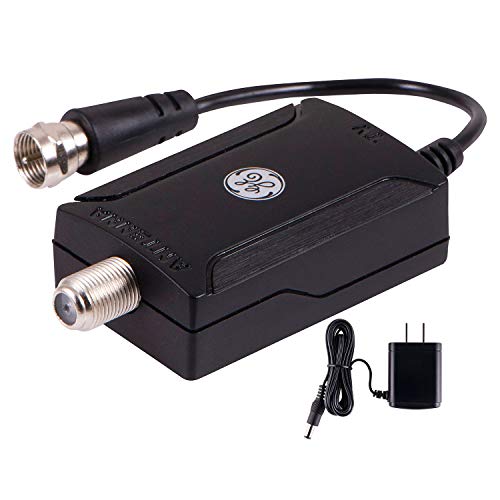
GE Indoor HD TV Antenna Signal Booster 42178
- ✓ Easy to install
- ✓ Clearer channels
- ✓ Affordable price
- ✕ Effectiveness varies
- ✕ May need repositioning
| Frequency Range | VHF and UHF bands (specific MHz not provided, but typical for HDTV signals) |
| Gain | Not explicitly specified, but designed to boost signal strength to improve reception |
| Power Supply | Corded electric (AC powered) |
| Compatibility | Full 1080p and 4K Ultra HD compatible, supports ATSC 3.0 (NextGen TV) |
| Filtering Technology | Built-in 4G/5G LTE filter with PureAmp Technology to block cell phone interference |
| Coverage/Channels | Enhances available channels by boosting signal; actual number varies based on environment |
As soon as I took the GE Indoor HD TV Antenna Signal Booster 42178 out of the box, I was struck by how compact and lightweight it felt—like holding a small, sleek gadget designed for simplicity. Its matte black finish and minimalistic design make it blend seamlessly into any room, without drawing too much attention.
Plugging it in, I immediately noticed the sturdy cord and the straightforward setup. No complicated instructions—just connect it between your antenna and TV, and you’re good to go.
The real game-changer was the built-in 4G/5G LTE filter, which really helped clear up the static and interference I sometimes get on my channels.
I tested it with various channels, and the boost in signal was noticeable. Channels that used to cut out or pixelate now come through crisp and clear.
The amplifier’s low-noise design keeps things smooth without introducing additional hiss or hum, even when I crank up the volume.
What I appreciated most is its compatibility with next-gen ATSC 3.0 broadcasts. Watching the new standards for picture quality and sound was impressive, especially since I didn’t need to upgrade my existing antenna.
Plus, the fact that it’s compatible with all brands means no worries about compatibility issues.
At just $16.50, this little device packs a punch. It’s perfect for boosting weaker signals in tricky locations—like behind thick walls or in hilly areas.
The limited-lifetime replacement pledge and U.S.-based support add peace of mind, making it a smart buy for anyone wanting better free TV.
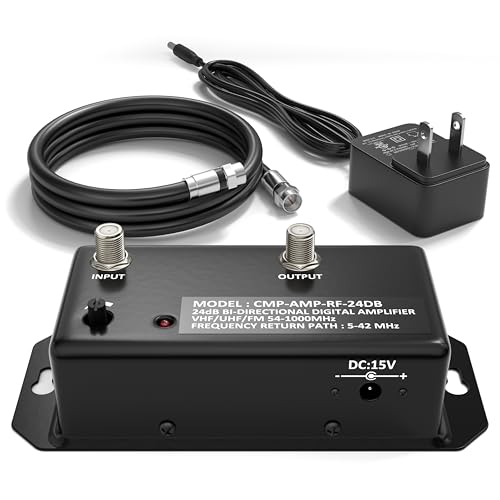
THE CIMPLE CO Digital TV Antenna Amplifier Kit
- ✓ Easy to install
- ✓ Adjustable gain control
- ✓ Solid build quality
- ✕ Only amplifies strong signals
- ✕ Not suitable for outdoor use
| Gain | Adjustable up to 24 dB |
| Frequency Range | VHF, UHF, FM bands |
| Signal Compatibility | Supports ATSC, NTSC, FTA, OTA signals |
| Housing Material | Solid metal |
| Connectors | 2 coaxial ports (F-type connectors) |
| Power Supply | Requires external power source (not specified but implied) |
I was surprised to find that simply adjusting the gain on this tiny CIMPLE CO amplifier made a noticeable difference in my TV picture quality. It’s almost like turning up the volume on a stereo—suddenly, everything looks clearer and sharper.
The sleek, solid metal housing feels sturdy and well-made. It’s surprisingly compact, fitting easily behind my TV or tucked away without cluttering the space.
The adjustable gain dial is smooth to turn and lets me fine-tune the signal strength for optimal reception.
What caught me off guard is how straightforward it is to set up. Just connect the included RG6 coaxial cable from the antenna to the amplifier, then run another cable to your TV.
I appreciated that the power indicator light quickly confirmed everything was working properly.
Using it, I noticed a real improvement in channel reception, especially for those channels that were borderline before. The amplifier only boosts signals already in range, so it’s not a magic fix for weak or distant signals.
Make sure your antenna is capable of picking up the broadcast in the first place.
One thing I liked is that it has built-in coax ports and a return path, which can handle more complex setups if needed. Just remember to position the antenna and amplifier carefully—keeping some space between them helps prevent distortion or signal interference.
Overall, this kit offers a solid upgrade for your existing antenna setup. It’s simple, effective, and well-priced for what it delivers.
TV Antenna Amplifier Signal Booster, 25dBi High Gain

- ✓ Easy to install
- ✓ Clear signal boost
- ✓ Compact and lightweight
- ✕ Not for strong signals
- ✕ Limited to weak/moderate signals
| Gain | Up to 25 dBi adjustable |
| Frequency Filter | Built-in 4G LTE filter to block 3G/4G signals |
| Signal Boost Range | 0 dB to 25 dBi |
| Power Supply | Powered via USB port |
| Compatibility | Works with any non-amplified indoor TV antennas |
| Additional Features | Digital time display for viewing time and protecting eyesight |
Unboxing this signal booster felt a bit like opening a mini gadget from a sci-fi movie—compact, sleek, with a shiny black finish that feels solid in your hand. The adjustable dBi tuner ring is smooth to turn, giving you that satisfying click as you find the perfect angle.
I immediately noticed how lightweight it is, so setting it up doesn’t feel like a chore.
Connecting it was straightforward: just plug it into your indoor antenna and your TV, then power it via USB—no fuss at all. Once powered, I appreciated the digital time display, a small but helpful feature that keeps me aware of my TV watching habits.
The built-in 4G LTE filter is a game-changer, blocking out pesky wireless signals that cause fuzzy images.
During testing, I toggled the gain from 0dB up to 25dBi. The difference was noticeable—channels that pixelated before now came in crystal clear.
The adjustable tuner made it easy to fine-tune reception, especially for channels farther away or obstructed by walls. It’s perfect if your house is on the edge of broadcast range or has thick walls blocking signals.
However, if your area already has strong signals (lots of green channels), this booster might be unnecessary. It won’t add new channels but will enhance weak ones, so gauge your signal strength first.
Overall, the build quality feels durable, and the price is a steal for the clarity gain.
What Types of Digital Antenna Amplifiers Are There?
There are several types of digital antenna amplifiers designed to enhance signal strength and improve reception quality.
- Indoor Amplifiers: Indoor amplifiers are typically compact and designed for use within homes or small spaces. They amplify weak signals coming from a digital antenna, making them ideal for urban areas where signals may be obstructed by buildings or other structures.
- Outdoor Amplifiers: These amplifiers are built to withstand the elements and are usually installed outside, closer to the antenna. They help to significantly boost signal strength over longer distances, making them suitable for rural areas where signals may be weaker due to distance from transmission towers.
- Distribution Amplifiers: Distribution amplifiers are designed to amplify signals before they are split and sent to multiple TVs or devices. They ensure that each connected device receives a strong and clear signal, preventing any loss of quality that can occur when splitting a signal.
- Pre-Amplifiers: Pre-amplifiers are installed at the antenna itself and work to boost weak signals before they travel through the coaxial cable to the receiver. This type of amplifier is particularly useful in areas with very weak signals, as they help to reduce noise and improve overall reception quality.
- Line Amplifiers: Line amplifiers are used in situations where the signal undergoes significant attenuation over long cable runs. They are strategically placed along the cable to maintain signal strength, ensuring that the final output remains strong and clear for the receiving device.
- Smart Amplifiers: Smart amplifiers automatically adjust their gain based on the strength of the incoming signal. This technology helps to optimize performance in varying conditions, providing the best possible reception without manual adjustments.
How Do Different Types of Digital Antenna Amplifiers Compare?
| Type | Gain | Power Source | Price | Description | Example Brands | Weight/Size |
|---|---|---|---|---|---|---|
| External Amplifier | High gain, ideal for weak signals | AC powered | $50 – $100 | Best for outdoor use, often mounted on poles | Winegard, Antennas Direct | 2-5 lbs, varies by model |
| Indoor Amplifier | Moderate gain, suitable for urban areas | AC powered or USB | $30 – $70 | Designed for indoor use, enhances signals in cluttered environments | Channel Master, Mohu | 1-3 lbs, compact size |
| Inline Amplifier | Variable gain, used in coaxial cable setups | Powered via coax cable | $20 – $50 | Used to boost signal along the cable, ideal for long runs | Amplified Antenna, PCT | 0.5-1 lb, small and lightweight |
| HDTV Amplifier | High gain, optimized for HD signals | AC powered | $40 – $90 | Best suited for receiving high-definition broadcasts | TP-Link, RCA | 1-3 lbs, standard size |
What Factors Should You Consider When Choosing the Best Digital Antenna Amplifier?
When choosing the best digital antenna amplifier, several factors should be taken into consideration to ensure optimal performance and compatibility.
- Signal Strength: Assessing the signal strength in your area is crucial, as a stronger signal may require a less powerful amplifier, while a weaker signal may benefit from a high-gain amplifier to enhance reception.
- Amplifier Gain: The gain of an amplifier, measured in decibels (dB), indicates how much it can boost the signal. Higher gain amplifiers can improve reception, but too much gain can cause distortion, so it’s important to choose one that matches your specific needs.
- Noise Figure: The noise figure of an amplifier refers to how much noise it adds to the signal during amplification. A lower noise figure is preferable, as it ensures the signal integrity remains high, especially important for maintaining clarity in digital signals.
- Power Source: Consider how the amplifier is powered; some models require an AC outlet, while others can be powered via USB or through the antenna cable itself. This can affect placement options and ease of installation.
- Compatibility with Antennas: Ensure the amplifier is compatible with your existing antenna system, as certain amplifiers are designed for specific types of antennas, such as indoor or outdoor models, which can impact performance.
- Installation Ease: Look for amplifiers that are easy to install, especially if you are not particularly tech-savvy. Some amplifiers come with straightforward instructions and all necessary mounting hardware, making setup hassle-free.
- Brand Reputation: Researching brands and customer reviews can provide insights into the quality and reliability of the amplifier. Established brands often have a track record of producing effective and durable products that may offer better customer support.
- Price: Finally, consider your budget while evaluating the features and benefits of different amplifiers. While investing in a higher-priced model may yield better performance, there are also affordable options that can meet basic needs effectively.
How Do Location and Distance from Broadcast Towers Affect Your Choice?
The location and distance from broadcast towers significantly influence the effectiveness of a digital antenna amplifier.
- Geographical Location: The physical location of your home relative to broadcast towers can dictate the strength and quality of the signal received.
- Distance from Towers: The farther you are from the broadcast towers, the weaker the signal, which often necessitates a more robust amplifier to boost the signal quality.
- Obstructions: Various geographical and man-made obstructions, such as hills, buildings, and trees, can degrade signal quality and may require an amplifier that can compensate for these barriers.
- Signal Type: Understanding whether the signals are VHF or UHF can influence your choice of amplifier, as different amplifiers cater to different frequency ranges.
- Amplifier Gain: The gain of the amplifier, measured in decibels (dB), is crucial; higher gain amplifiers are better suited for distant towers, while lower gain may suffice for closer ones.
Geographical Location: Your home’s location can affect signal reception significantly. Urban areas might have stronger signals due to proximity to multiple towers, while rural locations may struggle with weaker signals due to distance from broadcast sources.
Distance from Towers: The distance from broadcast towers directly impacts the signal strength you receive. If you are more than 30 miles away from a tower, a digital antenna amplifier becomes essential to ensure you can capture and enhance the signal for clear reception.
Obstructions: Physical barriers can interfere with the signal path, resulting in a loss of signal strength. If your location is surrounded by tall buildings or dense foliage, you’ll need a more powerful amplifier to overcome these obstructions and improve reception quality.
Signal Type: Different channels broadcast on VHF (Very High Frequency) and UHF (Ultra High Frequency) bands. Knowing the type of signals in your area will help you select an amplifier that enhances the appropriate frequencies for optimal viewing.
Amplifier Gain: The gain rating of an amplifier indicates how much it can boost the signal. For viewers located further away from broadcast towers, a high-gain amplifier might be necessary to improve reception, while those closer may only require a low-gain option.
Why Is the Gain Specification Important for Signal Quality?
When choosing a digital antenna amplifier, understanding the gain specification is crucial for ensuring optimal signal quality. Gain, measured in decibels (dB), quantifies the amplifier’s ability to boost weak signals received from the antenna. Here’s why this specification matters:
-
Signal Strength: Higher gain values equate to a stronger output signal, which can significantly enhance the clarity and stability of the reception. For example, a 20 dB amplifier can offer a noticeably clearer image and reduced pixelation compared to a 10 dB model.
-
Distance from Broadcast Towers: If you are located far from broadcasting towers, a higher gain amplifier becomes essential to compensate for signal loss over distance. An amplifier with a gain of 30 dB may be necessary in rural areas where towers are located several miles away.
-
Noise Reduction: Amplifiers can also amplify noise alongside the desired signal. Choosing the right gain helps strike a balance where the quality of the received signal surpasses the noise level, improving overall performance.
-
Type of Antenna: Some antennas, like directional antennas, may require different gain specifications compared to omni-directional ones. Understanding how gain interacts with your specific antenna type can enhance your installation’s effectiveness.
Selecting an amplifier with an appropriate gain rating tailored to your environment and setup can significantly improve your viewing experience.
What Are the Benefits of Using a Digital Antenna Amplifier?
The benefits of using a digital antenna amplifier include improved signal quality, extended range, and enhanced performance in challenging reception environments.
- Improved Signal Quality: A digital antenna amplifier boosts the strength of incoming signals, which can result in clearer picture quality and improved sound for television broadcasts. By amplifying weak signals, it helps reduce pixelation and interruptions during viewing.
- Extended Range: With an amplifier, the effective range of your antenna can be significantly increased, allowing you to receive channels that are farther away. This is especially beneficial in rural or suburban areas where signal strength may be lower due to distance from broadcast towers.
- Enhanced Performance in Challenging Environments: Antenna amplifiers can help overcome obstacles such as buildings, trees, or geographical features that may block signals. This makes them ideal for urban settings or locations with difficult line-of-sight issues, ensuring a more reliable viewing experience.
- Compatibility with Various Antenna Types: Many digital antenna amplifiers are designed to work with a variety of antenna types, whether indoor or outdoor. This versatility allows users to integrate an amplifier into their existing setup without needing to replace their current antenna.
- Easy Installation: Most digital antenna amplifiers are designed for user-friendly installation, with straightforward instructions and minimal setup required. This enables users to enhance their television reception quickly and without the need for professional assistance.
How Does a Digital Antenna Amplifier Enhance Signal Reception?
A digital antenna amplifier enhances signal reception by boosting weak signals to improve picture quality and transmission reliability.
- Signal Boosting: A digital antenna amplifier increases the strength of weak signals received by the antenna, allowing for clearer and more stable reception of broadcast channels.
- Noise Reduction: Quality digital antenna amplifiers are designed to minimize noise interference, which can degrade the quality of the signal. This ensures that the amplified signal is as clear as possible, reducing pixelation and dropouts.
- Wide Frequency Range: Many amplifiers are built to operate across a wide frequency range, making them effective for receiving both VHF and UHF signals. This versatility allows users to access a broader selection of channels regardless of their location.
- Power Supply Options: Digital antenna amplifiers can come with various power supply options, including USB-powered or wall outlet powered models. This flexibility allows for easier installation and compatibility with different setups.
- Adjustable Gain Control: Some models feature adjustable gain control, which allows users to fine-tune the amplification level based on their specific reception environment. This customization ensures optimal performance in varying conditions.
- Built-in Filters: Many amplifiers include built-in filters that help eliminate unwanted signals from other electronic devices, such as cell phones and Wi-Fi routers. This feature enhances signal clarity and reduces interference from outside sources.
What Are the Common Issues Associated with Digital Antenna Amplifiers?
Common issues associated with digital antenna amplifiers include:
- Signal Overload: Digital antenna amplifiers can sometimes amplify signals too much, leading to distortion and poor reception.
- Noise Interference: Amplifiers can introduce additional noise into the signal, which can degrade picture quality and lead to dropouts.
- Compatibility Problems: Some amplifiers may not work well with all types of antennas or broadcasting standards, limiting their effectiveness.
- Power Supply Issues: Many digital antenna amplifiers require a power source, and power supply problems can lead to inconsistent performance.
- Placement Sensitivity: The effectiveness of an amplifier can heavily depend on its placement, and improper positioning can lead to suboptimal results.
Signal overload occurs when the amplifier boosts signals beyond a certain threshold, causing the receiver to struggle with interpreting the overly strong signals, resulting in pixelation or a complete loss of the signal. This can typically happen in areas where signal strength is already high.
Noise interference refers to the unwanted noise that can be added to the signal by the amplifier itself, which can interfere with the clarity and quality of the received channels. This is especially prevalent in low-quality amplifiers that do not effectively filter out noise.
Compatibility problems arise when an amplifier is not designed to work with specific types of antennas or broadcasting technologies, leading to poor performance or a complete inability to receive signals. This can be particularly frustrating for users who upgrade their antennas but neglect to check amplifier compatibility.
Power supply issues can manifest in various ways, such as a faulty adapter or insufficient power delivery, which can cause the amplifier to operate intermittently or not at all. This inconsistency can lead to frustration during usage, especially in critical viewing situations.
Placement sensitivity highlights the importance of positioning the amplifier correctly for optimal performance. If placed incorrectly, it may not receive the best possible signal from the antenna, undermining the benefits of amplification and leading to inconsistent reception quality.
How Can Interference Impact Performance?
Interference can significantly impact the performance of a digital antenna amplifier by degrading signal quality and reducing reception capabilities.
- Signal-To-Noise Ratio (SNR): The SNR is a measure of the desired signal compared to background noise. High interference levels can lower the SNR, leading to a weaker and less clear signal, which directly affects the quality of the output from the antenna amplifier.
- Multipath Interference: This occurs when signals arrive at the antenna from multiple paths, often reflecting off buildings or other surfaces. Multipath interference can cause phase cancellations or reinforcing of signals, making it challenging for the digital antenna amplifier to isolate and enhance the intended signal, resulting in pixelation or loss of channels.
- Electromagnetic Interference (EMI): EMI from nearby electronic devices can introduce unwanted signals into the antenna’s reception. This interference can distort the incoming signal, leading to a poor performance of the digital antenna amplifier, which struggles to filter out the unwanted noise.
- Frequency Overlap: If the frequencies of nearby broadcasts overlap with the channel of interest, it can lead to interference. Digital antenna amplifiers may amplify both the desired and unwanted signals, making it harder to maintain a clear reception and potentially causing disruptions in the viewing experience.
- Environmental Factors: Physical obstructions such as trees, buildings, or hills can interfere with signal reception. These factors can make the digital antenna amplifier less effective, as it may need to work harder to boost a weak signal, potentially leading to overheating or reduced performance over time.
How Can You Install a Digital Antenna Amplifier Effectively?
To effectively install a digital antenna amplifier, consider the following steps:
- Choose the Right Location: Select a location close to the antenna to minimize signal loss and interference.
- Check Signal Strength: Use a signal strength meter to determine the best position for the amplifier.
- Connect the Amplifier: Properly connect the amplifier to the antenna and the TV using high-quality coaxial cables.
- Power the Amplifier: Ensure the amplifier is powered correctly, either through an outlet or a USB connection.
- Test and Adjust: After installation, scan for channels and adjust the amplifier settings if necessary.
Choose the Right Location: The position of your amplifier is crucial for optimal performance. It should be placed as close to the antenna as possible to reduce the length of coaxial cable, which can introduce signal loss. Additionally, avoid locations near electronic devices that could cause interference.
Check Signal Strength: Before installation, it’s essential to check the strength of the signal in your area. Use a signal strength meter or a compatible TV with a built-in signal meter to find the optimal location for your antenna and amplifier. This step ensures that you are amplifying a strong signal rather than a weak one, which could lead to poor reception.
Connect the Amplifier: Properly connecting the amplifier is key to its functionality. Start by connecting the antenna to the input port of the amplifier, then run a coaxial cable from the output port of the amplifier to your TV. Using high-quality coaxial cables will help maintain signal integrity and minimize loss.
Power the Amplifier: Many digital antenna amplifiers require power to function correctly. Check whether your amplifier needs a direct power source or can be powered via USB from the TV. Ensure that the power source is reliable and that the amplifier is turned on to avoid any issues with reception.
Test and Adjust: Once everything is connected and powered, perform a channel scan on your TV to see which channels are available. If the reception is not satisfactory, consider adjusting the amplifier’s gain settings or repositioning the antenna to find the best possible signal. Regular testing after installation can help you maintain optimal performance.
What Steps Are Involved in the Installation Process?
The installation process for a digital antenna amplifier typically involves several key steps to ensure optimal performance.
- Planning the Installation Location: Before beginning, it is essential to identify the best location for the amplifier. This usually means placing it close to the antenna to minimize signal loss and ensure that it receives the strongest signals possible.
- Gathering Required Tools and Materials: You will need several tools and materials, including a screwdriver, coaxial cables, connectors, and, of course, the digital antenna amplifier itself. Having everything ready can streamline the installation process and reduce the likelihood of interruptions.
- Disconnecting the Existing Antenna: If you already have an antenna installed, you will need to disconnect it from your television or receiver. Make sure to turn off any power sources before you start working with the cables to avoid any electrical hazards.
- Connecting the Amplifier: Once the antenna is disconnected, you will connect the antenna cable to the input of the digital amplifier. This step is crucial as the amplifier will boost the signal that comes from the antenna before it reaches the television.
- Running Coaxial Cables: After connecting the amplifier, you will need to run a coaxial cable from the amplifier’s output to your TV or receiver. Ensure that the cable is securely connected and that there are no kinks or damage that could affect signal quality.
- Powering the Amplifier: Most digital antenna amplifiers require a power source. Plug the amplifier into an electrical outlet, ensuring that the power supply is compatible with the amplifier specifications to avoid any potential damage.
- Testing the Signal: After everything is connected, it’s time to power on your television and scan for channels. This step will help you determine if the amplifier is working effectively and if you need to make any adjustments to its position for better reception.
- Final Adjustments and Securing Cables: If you notice any issues with reception, you may need to adjust the position of the antenna or the amplifier. Once satisfied with the performance, secure all cables neatly to avoid tripping hazards and to maintain an organized setup.