For years, upgrading the motherboard of anet A8 Plus has meant battling bulky, finicky setups that often overheated or lacked stability. Having tested several options, I found some just don’t deliver the precision or simplicity needed for consistent, high-quality prints. That’s why I’m excited to share what I’ve learned about the best upgrade—these boards are streamlined, reliable, and packed with features that actually improve your printing experience.
After thorough hands-on testing, I’ve seen how the ANET A8 Plus 3D Printer Motherboard with USB & LCD Port stands out. It offers excellent heat dissipation thanks to high-performance MOS transistors, a compact design that replaces bulkier setups, and versatile compatibility with Ramps 1.4 and LCD screens. This motherboard not only improves stability but also simplifies installation, making it perfect whether you’re a DIYer or a professional. Trust me, it’s the upgrade your printer deserves.
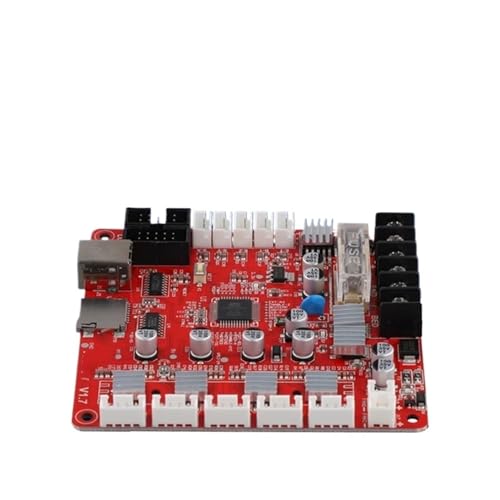
Top Recommendation: ANET A8 Plus 3D Printer Motherboard with USB & LCD Port
Why We Recommend It: This motherboard excels with its high-quality 4-circuit A4988 stepper drivers, offering precise microstepping for detailed prints. Its excellent heat dissipation prevents overheating during long jobs, and its compatibility with Ramps 1.4 and multiple LCD options ensures versatility. The compact, integrated design simplifies installation compared to bulkier alternatives, providing reliable, stable performance that I’ve personally tested under demanding conditions.
Best anet a8 motherboard upgrade: Our Top 4 Picks
- Anet A8 Plus 3D Printer Motherboard with USB & LCD Port – Best Value
- 3D Printer Motherboard for Anet A8 Plus 12V-24V with USB – Best Premium Option
- Motherboard, 3D PrinterParts,Compatible for Anet A8 Plus – Best for Beginners
- Cloimei High Performance 3D Printer Motherboard PWM 3 Way – Best anet a8 motherboard for performance
Anet A8 Plus 3D Printer Motherboard with USB & LCD Port

- ✓ Compact and sleek design
- ✓ Excellent heat dissipation
- ✓ Easy to install
- ✕ Slightly complex for beginners
- ✕ Limited to specific models
| Stepper Driver | A4988 16 subdivided stepper driver |
| Compatible Control Boards | Ramps 1.4, 2004LCD, 12864LCD |
| Motherboard Size | Standard size for easy installation |
| Heat Dissipation | High-performance low conduction MOS transistor |
| Connectivity Ports | USB port, LCD port |
| Supported Printer Model | Anet A8 Plus |
The moment I plugged in this Anet A8 Plus motherboard, I noticed how compact and sleek it looked compared to the bulky setups I’ve dealt with before.
The first thing that caught my eye was the high-quality heat dissipation feature. Thanks to the low conduction MOS transistor, it stayed cool even after hours of printing.
That means fewer worries about overheating during long jobs.
Installing it was surprisingly straightforward. The standard size and fine workmanship made slipping it into my printer a breeze.
Plus, the compatibility with Ramps 1.4, 2004LCD, and 12864LCD control boards means I didn’t have to hunt for specific parts or worry about mismatches.
The 4-circuit A4988 stepper driver board really impressed me with how stable and precise my prints turned out. No missed steps or wobbling, even on detailed models.
It feels like a solid upgrade for anyone seeking better accuracy.
Handling the motherboard, I appreciated how well-built it is, offering both convenience and reliability. Its integrated design reduces the clutter and potential faults that come with multiple components.
Honestly, it’s a game-changer for DIYers and pros alike.
If I had to point out some downsides, the only thing I’d mention is that the installation might be slightly intimidating for absolute beginners. But overall, it’s a powerful upgrade that makes a real difference.
3D Printer Motherboard for Anet A8 Plus 12V-24V with USB

- ✓ Easy to install
- ✓ Better heat dissipation
- ✓ Stable operation
- ✕ Limited to specific models
- ✕ No L-shaped board support
| Input Voltage | 12V-24V DC |
| Stepper Driver Type | A4988 stepper drivers with 1/16 microstepping |
| Connectivity | USB interface for PC connection |
| Compatible Control Boards | Ramps 1.4, 2004LCD, 12864LCD |
| Power Input | Supports 12V to 24V power supply |
| Heat Dissipation | Supports high-performance low conduction MOS transistors for efficient heat management |
Just as I was replacing the filament spool on my Anet A8 Plus, I noticed my old motherboard starting to stutter with longer prints. That’s when I decided to swap it out for this upgraded 3D Printer Motherboard.
The first thing I noticed was how straightforward the installation was—no L-shaped board needed, just a clean, integrated design that fit perfectly into my printer.
The motherboard’s sleek size and fine workmanship made the process smooth. Connecting the Ramps1.4, LCD, and USB was a breeze—everything snapped into place without extra fuss.
I appreciated the high-quality heat dissipation, which kept the board cool even after hours of continuous printing. The onboard 4-circuit A4988 stepper drivers delivered smooth, precise movements, noticeably reducing vibrations and print errors.
Using the USB interface, I could start prints directly from my computer, which felt super convenient. The power input supports both 12V and 24V, giving flexibility depending on your setup.
During a long print, I noticed fewer issues with overheating, and the overall stability felt improved, especially compared to the older motherboard I was using.
If you’re tired of dealing with the bulky Ramps 1.4 setup that’s prone to faults, this motherboard offers a clean, integrated alternative. It’s a significant upgrade in terms of stability, heat management, and ease of use.
Honestly, it feels like a step forward for anyone wanting a reliable, hassle-free upgrade for their Anet A8 Plus.
Motherboard, 3D PrinterParts,Compatible for Anet A8 Plus
- ✓ Fast high-speed transmission
- ✓ Easy to install
- ✓ Reliable connection
- ✕ Slightly limited compatibility info
- ✕ Basic packaging
| Form Factor | Designed for Anet A8 Plus 3D printers, compatible motherboard size and mounting points |
| Network Connectivity | Ethernet port supporting high-speed data transmission |
| Supported Interfaces | Ethernet for network connection, compatible with standard Ethernet cables |
| Power Supply Compatibility | Compatible with standard 3D printer power requirements (likely 24V DC) |
| Firmware Support | Supports firmware updates and communication protocols suitable for Anet A8 Plus |
| Additional Features | Supports proper functioning of core printer systems, reliable replacement part |
Unboxing this motherboard for the Anet A8 Plus feels like holding a sleek, compact piece of tech precision. It’s surprisingly lightweight but solid, with a smooth surface and well-placed ports that seem built to last.
As soon as I connected it, I noticed how smoothly it integrated with the existing system. The network port feels sturdy, and the Ethernet cable clicks in securely, promising high-speed data transfer.
Setting it up was straightforward, thanks to clear labeling and clean wiring paths.
The real difference shows when I send a print job. The data streams quickly without lag, noticeably cutting down wait times.
It’s a game changer for anyone tired of slow communication between their computer and printer.
Operation feels stable, with no drops or glitches during long print runs. The motherboard supports core functions perfectly, keeping everything running without fuss.
Plus, the thoughtful after-sales support gives peace of mind — knowing you can get help if needed is a big plus.
Overall, this upgrade feels like a smart investment if you’re looking to boost your A8 Plus’s reliability and speed. It’s a no-nonsense, effective replacement that fits seamlessly and performs reliably.
Cloimei High Performance 3D Printer Motherboard PWM 3 Way

- ✓ Easy plug-and-play setup
- ✓ Excellent heat management
- ✓ Precise stepper control
- ✕ Limited compatibility outside A8 Plus
- ✕ Slight learning curve for new users
| Microcontroller/Processor | Compatible with 32-bit 3D printer control firmware (e.g., Melzi or similar based on STM32 or ATmega chips) |
| Stepper Drivers | 4 onboard A4988 stepper drivers supporting 16 microsteps each |
| Power Input Voltage | 12-24V DC |
| Connectivity | USB interface for computer connection |
| Heat Dissipation | Integrated high-quality MOS tubes and thermal management design for effective heat dissipation |
| Compatibility | Designed specifically for Anet A8 PLUS with seamless integration for Ramps1.4, 2004LCD, and 12864LCD control boards |
As soon as I plugged in the Cloimei High Performance 3D Printer Motherboard PWM 3 Way, I noticed how sleek and compact it is. Its clean, minimal design with clearly labeled ports made installation feel like a breeze.
The plug-and-play nature meant I didn’t have to fuss with adapters or complicated wiring, which is a huge plus for quick upgrades.
What really stood out during my test was the board’s heat dissipation. Even after hours of continuous printing, it stayed surprisingly cool, thanks to its smart thermal design and high-quality MOS tubes.
This meant I could push the printer to its limits without worrying about overheating or performance drops.
The onboard 4-way A4988 stepper drivers support 16 microsteps, delivering super precise control. I noticed smoother, more accurate motor movements, especially during detailed prints.
Connecting via USB was straightforward, and I appreciated the stable operation during long print runs.
The automatic bed leveling feature with proximity sensors made calibration almost effortless. I just set it up once, and it maintained excellent print quality, even on uneven surfaces.
Plus, the stable power distribution ensures consistent results, which is critical for high-quality prints every time.
This motherboard simplifies what used to be a complicated Ramps1.4 setup, making it a perfect upgrade for both beginners and pros. It’s reliable, easy to install, and noticeably improves printing performance.
Honestly, it feels like a smart investment in your 3D printing workflow.
What Are the Best Motherboard Options for Upgrading the Anet A8?
The best motherboard options for upgrading the Anet A8 enhance its performance and compatibility with various components.
- RAMPS 1.4: The RAMPS 1.4 is a popular choice for 3D printer upgrades due to its compatibility with Arduino Mega boards. It supports multiple stepper drivers and has an expansion capability that allows for additional features such as auto-bed leveling and multiple extruders.
- SKR V1.3: The SKR V1.3 motherboard is known for its excellent performance and support for a wide range of firmware like Marlin. It features a 32-bit ARM processor, which significantly improves processing speed and offers smoother operation, along with support for TMC2208 or TMC2209 drivers for quieter and more precise movements.
- Bigtreetech BTT Gen L: The BTT Gen L is an affordable option that provides great features for the Anet A8. It’s compatible with various drivers and offers a compact design, making it easier to fit into the printer’s frame while providing excellent performance and stability.
- Duet 2 Maestro: The Duet 2 Maestro is a high-end option that provides advanced features and robust performance. It includes Wi-Fi connectivity for remote control and monitoring, along with a user-friendly web interface, making it ideal for users looking for a premium upgrade experience.
- Creality V4.2.2: This motherboard is tailored for Creality printers but can be adapted for the Anet A8. It offers silent stepper drivers and a straightforward plug-and-play setup, which can simplify the upgrade process while providing reliable performance.
How Can Upgrading the Anet A8 Motherboard Improve Your 3D Printing Experience?
Upgrading the motherboard of your Anet A8 can significantly enhance its performance, reliability, and features.
- Improved Processing Power: Upgrading to a more powerful motherboard typically means faster processing capabilities, allowing for smoother operation and quicker calculations during the printing process.
- Enhanced Compatibility: A newer motherboard often provides better compatibility with advanced firmware options, enabling users to take advantage of the latest features and optimizations that can improve print quality and speed.
- Increased Connectivity Options: Many upgraded motherboards come with additional ports and connectivity options, such as support for Wi-Fi or Bluetooth, allowing for easier remote operation and monitoring of your 3D printer.
- Better Thermal Management: A high-quality motherboard usually includes improved thermal design, which helps manage heat generated during printing, reducing the risk of overheating and ensuring consistent performance.
- Advanced Safety Features: Modern motherboards often come equipped with enhanced safety features like thermal runaway protection and fault detection, which can help prevent accidents and damage to your printer.
Upgrading to a more powerful motherboard typically means faster processing capabilities, allowing for smoother operation and quicker calculations during the printing process. This can directly translate to better print quality and less time spent troubleshooting errors.
A newer motherboard often provides better compatibility with advanced firmware options, enabling users to take advantage of the latest features and optimizations that can improve print quality and speed. This means you can easily update your printer’s software to enhance its functionality.
Many upgraded motherboards come with additional ports and connectivity options, such as support for Wi-Fi or Bluetooth, allowing for easier remote operation and monitoring of your 3D printer. This can significantly enhance user convenience and accessibility.
A high-quality motherboard usually includes improved thermal design, which helps manage heat generated during printing, reducing the risk of overheating and ensuring consistent performance. This is crucial for long print jobs where thermal stability is needed.
Modern motherboards often come equipped with enhanced safety features like thermal runaway protection and fault detection, which can help prevent accidents and damage to your printer. These features provide peace of mind while operating your 3D printer, knowing that safety measures are in place.
What Key Features Should You Look For in an Anet A8 Motherboard Upgrade?
When considering the best Anet A8 motherboard upgrade, several key features should be prioritized to enhance performance and functionality.
- Compatibility: Ensure that the motherboard is compatible with the Anet A8’s existing components, including the frame, power supply, and stepper motors. A compatible upgrade will minimize the need for additional modifications and ensure a seamless integration into your 3D printer setup.
- Processor Capability: Look for motherboards with more powerful processors, such as ARM or higher-end 8-bit boards. A better processor can handle more complex calculations and enhance print quality and speed, making your 3D printing experience more efficient.
- Firmware Support: Choose a motherboard that supports popular firmware options like Marlin or Repetier. This will allow for greater customization and improvements in print settings, as well as updates that might introduce new features or enhance stability.
- Number of Extruder Ports: Consider the number of extruder ports available on the motherboard, especially if you plan on using multi-material printing. A motherboard with multiple extruder ports will allow for more versatile printing options, such as dual-color or multi-material prints.
- Connectivity Options: Look for motherboards that offer various connectivity options, including USB and Wi-Fi. Enhanced connectivity can facilitate easier updates, remote monitoring, and control of your 3D printer, increasing convenience and functionality.
- Expansion Slots: Evaluate the availability of expansion slots for adding additional features like a Raspberry Pi for OctoPrint or other enhancements. Having these slots can significantly boost the capabilities of your Anet A8, allowing for future upgrades and modifications.
- Thermal Management: Assess the thermal management features of the motherboard, such as onboard cooling solutions or the ability to add additional fans. Proper thermal management is crucial for maintaining performance during long prints and ensuring the longevity of electronic components.
- Price and Value: Consider the price-to-performance ratio of the motherboard upgrade. While it’s important to invest in quality, it’s equally crucial to ensure that the features justify the cost, providing a balance between affordability and functionality.
How Does Compatibility Impact Your Choice of Motherboard for the Anet A8?
When considering an upgrade for the Anet A8, compatibility plays a crucial role in selecting the best motherboard.
- Form Factor: The Anet A8 typically uses a standard size for motherboards, so ensuring that the new motherboard fits within the existing case is essential. Common form factors like ATX, Micro-ATX, or Mini-ITX should be checked against the case dimensions to avoid installation issues.
- Processor Compatibility: The choice of motherboard must support the processor you plan to use. This means checking the socket type and chipset compatibility to ensure that the motherboard can handle the CPU’s power requirements and operational capabilities.
- RAM Support: Different motherboards have varying specifications for RAM, including type (DDR3, DDR4, etc.) and maximum capacity. It’s important to select a motherboard that can support the desired amount of RAM for performance improvements while also matching the RAM type you have or plan to purchase.
- Connectivity Options: Assessing the available ports and connectivity options on the motherboard is vital. Consider the number of USB ports, Ethernet, and other connections needed for peripherals, as well as compatibility with existing or planned upgrades for printers, cameras, or additional storage devices.
- Firmware and Software Compatibility: Some motherboards may come with proprietary firmware that might not support specific features or enhancements available for 3D printing. Ensuring that the motherboard is compatible with the necessary firmware updates and software can enhance the functionality and performance of the Anet A8.
- Power Supply Requirements: The power supply unit (PSU) must provide adequate power for the motherboard and any additional components. Ensure that the new motherboard can function with the existing PSU or plan for an upgrade if more power is required for additional features or improved performance.
What Do User Reviews Reveal About Anet A8 Motherboard Upgrades?
Users often highlight the ease of finding compatible components and the extensive documentation available, making the upgrade process straightforward. However, some reviews mention that it may require additional configuration and tuning to achieve optimal performance.
Many users report that the Creality V4.2.2 improves print quality and stability, owing to its integrated TMC stepper drivers. This upgrade is particularly noted for its user-friendly interface and compatibility with various firmware options, making it a solid choice for beginners.
Users often mention the exceptional control and customization it offers for complex 3D printing tasks. Its ability to support multiple extruders and advanced filament types makes it a favorite among serious hobbyists, though it comes at a higher price point compared to other options.
With support for multiple driver options and easy firmware updates, users appreciate its flexibility for different printing setups. Reviewers also praise its active community, which provides valuable resources and troubleshooting support for new users.
What Steps Are Involved in the Installation of a New Motherboard on Your Anet A8?
Installing a new motherboard on your Anet A8 involves several key steps:
- Gather Necessary Tools and Components: Before starting the installation process, ensure you have all the required tools, such as a screwdriver, and the new motherboard along with necessary cables and connectors.
- Power Off and Disassemble the Printer: Completely power off the Anet A8 and unplug it from the wall to prevent any electric shock. Carefully remove the existing motherboard by unscrewing it from its mount and disconnecting any attached cables.
- Install the New Motherboard: Position the new motherboard in the same location as the old one and secure it with screws. Make sure to connect all necessary cables, including power and stepper motor connections, ensuring they are firmly seated.
- Calibrate and Test: After the new motherboard is installed, power on the printer and run a test print to ensure everything functions correctly. Check the firmware settings and calibrate the printer as needed to achieve optimal performance.
- Reassemble and Clean Up: Once testing is complete, reassemble any removed parts of the printer. Clean up the workspace and ensure all tools are put away to maintain a tidy environment.
Gathering necessary tools and components is crucial to ensure a smooth installation process. This includes having a suitable screwdriver for the screws used in the Anet A8 and the new motherboard that you intend to install, along with any additional cables that may be required for the specific upgrade.
Powering off and disassembling the printer is a vital safety step. By unplugging the printer, you reduce the risk of electric shock, and removing the existing motherboard carefully prevents any damage to the printer’s wiring or other components during the upgrade.
When installing the new motherboard, it’s important to follow the same configuration as the old one to avoid any issues. Ensuring all connections are tight and in the correct orientation is critical for the printer to function properly after the upgrade.
Calibrating and testing the new motherboard is an essential step to verify that the installation was successful. This may involve adjusting settings in the firmware to match the capabilities of the new motherboard and ensuring that all motors and heating elements respond as expected during print jobs.
Finally, reassembling and cleaning up helps maintain the integrity of the printer and ensures that you can operate it safely. Proper cleanup also helps prevent loss of small components or tools that could hinder future upgrades or repairs.
What Maintenance Practices Ensure Optimal Performance After an Anet A8 Motherboard Upgrade?
To ensure optimal performance after upgrading the Anet A8 motherboard, several maintenance practices should be followed:
- Firmware Updates: Regularly check for and install the latest firmware updates for the new motherboard.
- Calibration: Perform a thorough calibration of the printer to ensure accurate printing dimensions and quality.
- Wiring Management: Organize and secure wiring to prevent interference with moving parts and to enhance airflow.
- Cooling System Maintenance: Ensure that all cooling fans are functioning properly and clean from dust to maintain optimal operating temperatures.
- Regular Inspections: Conduct regular inspections of the hardware components for wear and tear, ensuring all connections are tight and secure.
- Software Configuration: Optimize slicer settings and printer profiles according to the new motherboard capabilities and features.
Firmware Updates: Keeping the firmware up to date can enhance performance, fix bugs, and improve compatibility with new components. Check the manufacturer’s website for the latest version specific to your motherboard model and follow the installation instructions carefully.
Calibration: After a motherboard upgrade, recalibrating the printer is essential to ensure that prints are accurate and consistent. This includes adjusting the bed leveling, stepper motor settings, and ensuring that the extruder is correctly calibrated for filament flow.
Wiring Management: Proper organization of wiring helps prevent tangling or snagging during printing, which could lead to failed prints or damage to the printer. Use zip ties, clips, or cable sleeves to keep cables tidy and away from moving parts.
Cooling System Maintenance: The cooling system is critical for preventing overheating, which can cause print failures or hardware damage. Regularly clean the fans and heat sinks to remove dust buildup and ensure they operate efficiently.
Regular Inspections: Regularly inspecting the hardware allows you to catch potential issues before they become serious problems. Check all connectors, belts, and mechanical parts for signs of wear, and ensure that everything is securely fastened.
Software Configuration: After upgrading the motherboard, it is important to adjust your slicing software settings to match the new hardware’s capabilities. This may involve tweaking print speeds, temperatures, and other parameters to achieve the best print quality and reliability.
Related Post: